Serotta MTB Identification - Real or Fake? 1995? 1998?

I do not. Bike is in Switzerland now. Had exactly that feature with a cable cover, not a housing, over it. Best pic I have of that feature.
 

Attachments

  • IMG_1718.jpg
    IMG_1718.jpg
    452.6 KB · Views: 22
  • IMG_1711.jpg
    IMG_1711.jpg
    701 KB · Views: 24
That picture is helpful for sure. I thought maybe there was a holder missing at the nub on the seatpost clamp, but now I see from the brake lever there is cable housing to the cable stop on the top tube nearest the headset THEN a long cable sleeve along the top tube and over/around the seatpost clamp nub to the rear canti boss.
 
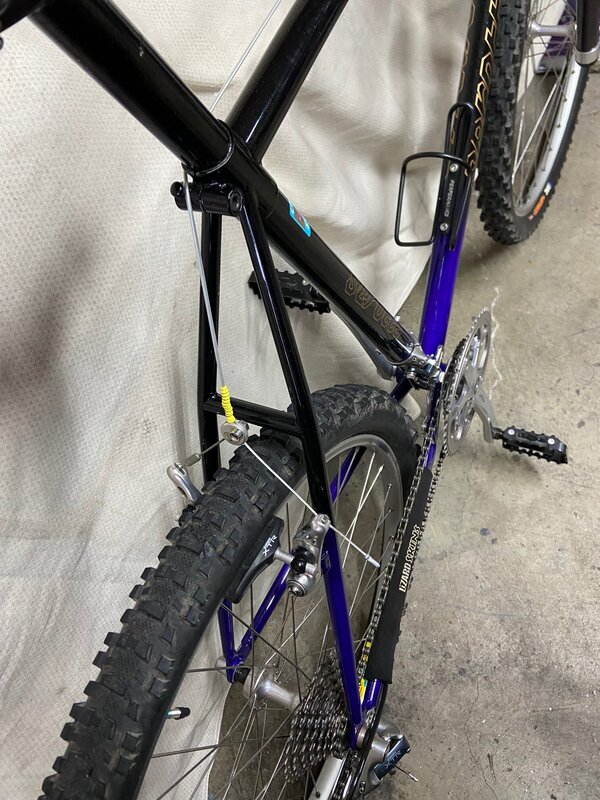
I honestly have a vague idea of what I am dealing with here. The cable stop/guide for the rear brake cable is not a hollow tube cable housing stop. It's a notched nub brazed onto the seat clamp mechanism and is all one piece design. Also, if you look closely, and draw a horizontal line with your eye along the axis of the seat clamp bolt, imagine this... the little nub is slightly canted vertically toward the the horizontal or vertical center line of the frame, if you will. For the rear brake, there is a cable stop brazed near the steerer tube, then there is nothing along the top tube for cable management until this nub brazed onto the seat post clamp. I've never seen a design like this, so I am a bit puzzled. 😁

Other than the rear drop outs stamped with "Ritchey" I don't know what else I can measure. Maybe the bike was resprayed at one point, as indicated by the water bottle holder bolts, one set is yellow the other red. Where the paint colors meet, there are no ridges. Where there are chips, I see very light grey primer then metal.

View attachment 662622View attachment 662623View attachment 662624
On which side is the top tube cable stop near the headtube? I suppose the nub works as a pivot for the cable.
 
Small update since I guess this is a build thread.

There was clear corrosion between the water bottle cage bolts as well as the bosses for the rear canti brakes when I stripped down the frame. While I wait on my mind to make up it’s mind… I chased the threads with taps to clean them up. I was surprised in the amount of old, dried grease and rust that stuck to the channels between the cutting surface of the taps! I highly recommend you all do the same! Especially since the interface between different metals encourages electrolysis.

Regarding the build, I have a donor bike with a near complete XTR m900 groupset but the old Mavic parts look pretty neat that came with the bike when I bought it. I am not sure if I set myself up for that headache trying to find the remaining parts as the bike needs everything except the headset and the bottom bracket. Speaking of which, look at this BB housing- chamfered to accept the Mavic BB.

1AB98490-9AF0-4B22-BF78-B397236C4663.jpeg 188B671B-77AF-450F-A131-4CD513C3943A.jpeg 24787FDC-A997-447D-89BD-16F9B8591EB8.jpeg FC3F8409-87A7-425D-9E26-F3036759F61D.jpeg 65A52317-E6C7-4FCF-A9DE-8A814B72D17D.jpeg 1E3D1CB4-68DD-4D50-9258-DAF096B1082D.jpeg
 
Mavic is my favourite looking headset.. you never see it on wannabe mass produced mtbs and the BB is excellent. Bikes like this Serotta were always built w/ a combination of the best parts around. No need to full grouppo here.
 
Honestly, this old chamfered Mavic is my first experience with their bottom brackets. This one is extremely well made and turns as smooth as butter.
 
Cleaned up the front fork this afternoon. Lots of old dirt. Really cleaned out the lower race surface to get a good seat when the fork goes back on eventually.

Some of the bolts are a bit rusted and chewed up so I’ll replace those soon.

456B11B2-CFBB-4869-8BD9-EE70EEED7005.jpeg 4B5BA87C-DDB5-416C-9BD7-E91AD512400A.jpeg 165E3499-2212-4E8E-BE50-80F890496675.jpeg
 
Back
Top