The Viking Saga NOW SOLD

Re:

It's going to look crap if I want to do that! However it came as 5 speed only, and I am happy to go with that. At the time (62) most models were just that - some just 4 speed actually.
I think the single chain wheel won't look out of place. And there's only the one braze on for the shifter as well. So to upgrade would mean a banded double which is ugly and awkward in my humble view. :?:
 
Re: The Viking Saga

Ok, sounds like a good save then.... looking forward to the build
 
Re:

Thanks Peachy! What would make my life complete would be to get my hands on a Benelux Mk 7 rear mech for a reasonable price. The bike came with the correct lever at least... Oh, and a pair of GB sidepulls - after having ruined one of the pair that were fitted.

I guess a couple of "wanted" posts are in order!
 
Re: The Viking Saga

Lug lining complete. Some may be a little surprised by the choice of colour. Gold would have been good but I thought not enough contrast with the main colour.


And red fill decals are available! Maybe a bit blingy?


Now on with gathering the bits needed to complete the build...
 

Attachments

  • lugs1.JPG
    lugs1.JPG
    49.1 KB · Views: 729
  • vikdec1.JPG
    vikdec1.JPG
    13 KB · Views: 729
  • vikdec2.JPG
    vikdec2.JPG
    11.7 KB · Views: 729
Re: The Viking Saga

Very nice, I for one do like the red lug lining, nice contrast and I think it will go well with the decals.
 
Re: The Viking Saga

allenh":2qw02h7r said:
Very nice, I for one do like the red lug lining, nice contrast and I think it will go well with the decals.
Thanks for the vote of confidence. Just wait until I bring the red or yellow cable outers on stage. Then we'll see!

I'm glad to say a super condition Cyclo Benelux Mk 7 rear mech is winging its way here thanks to forum member walkmanman, and at a very reasonable price.
 
Re:

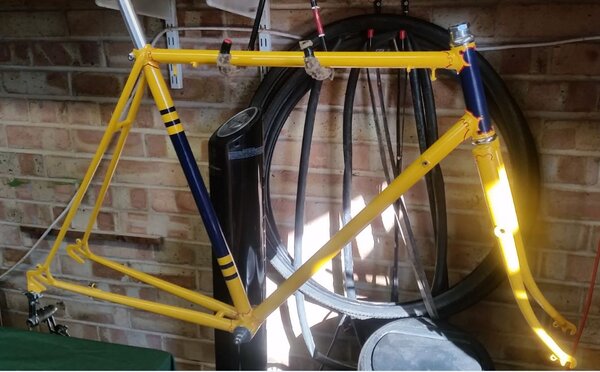
I thought I'd better start to do a bit of reassembly as there's a limit to how many times you can walk round a frame making admiring noises - or is there? This led on to some "pin spanner experience" that I didn't know I wanted. But more on this later.

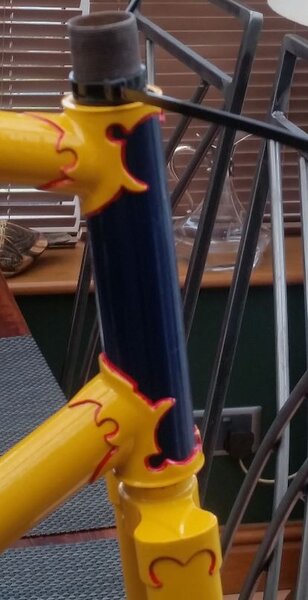
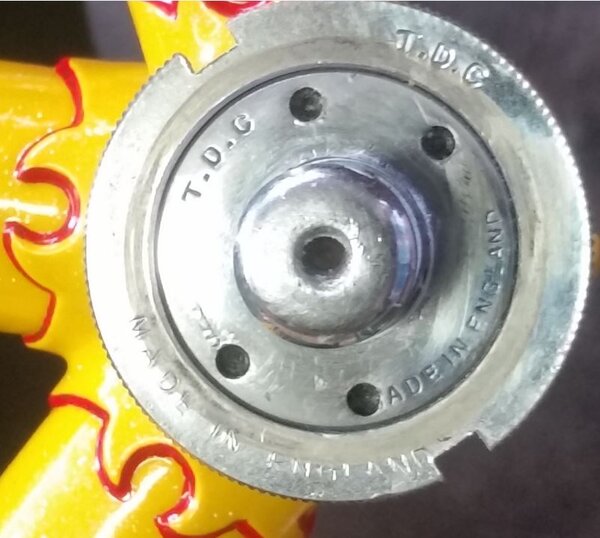
The TDC headset went together well - with the exception of the lock nut which was well and truly "scraunched" and so was replaced with an old but decent Tange one. (Did you know that "scraunched" is an example of those very rare English words of 10 letters but only one syllable?)

The old TDC bottom bracket (with cottered spindle of course) was a little more difficult. The fixed cup was OK, fitted by clamping it in my bench vice and revolving the rest of the world around it. OK, not the world but the frame. And don't forget that left hand thread :facepalm: Got there in the end...

The adjustable cup was a wee bit more problematic. The lock nut was OK as I have a selection of "C" spanners, one of which was sure to fit. And one did!

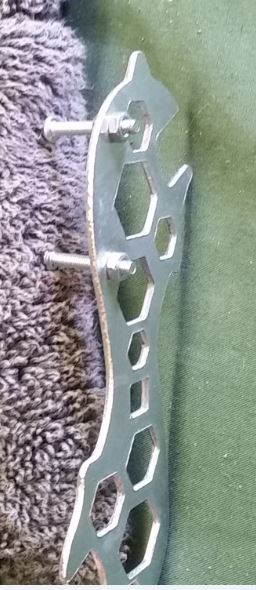
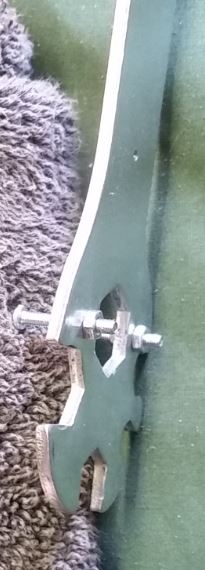
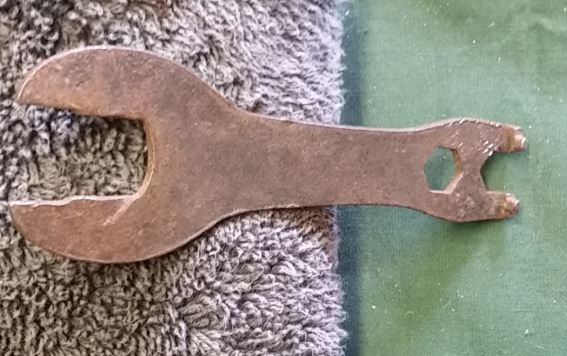
Now, that cup - with only pin holes my use of a pair of fine-nose pliers (81's to those in the trade) could only get it in so far - the usual powdercoat residue didn't help. I wanted to fit it prior to assembly of the whole thing to make sure the threads were OK. With no pin spanner to hand, and no desire to buy one, I knocked up something with an old spanner and some 3mm bolts that miraculously fitted in the holes. 1.100" spacing BTW. Here it is:

It worked perfectly thank you. Without the spindle in place of course...can you guess what's coming? I'd larded on the grease and popped the 11 balls into the fixed cup, lowered in the spindle. More grease - buckets of the stuff - into the adjustable cup and placed the balls in the race. Upside down, lower over the spindle, praying no balls would fall - and none did - reach for my fab pin spanner and...of course it wouldn't be any good with the spindle in place!

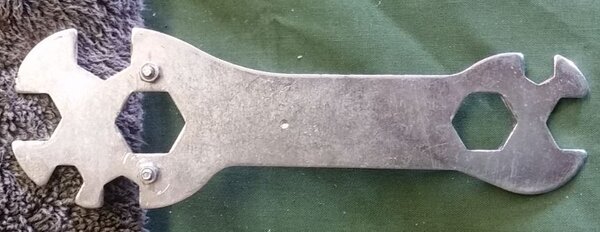
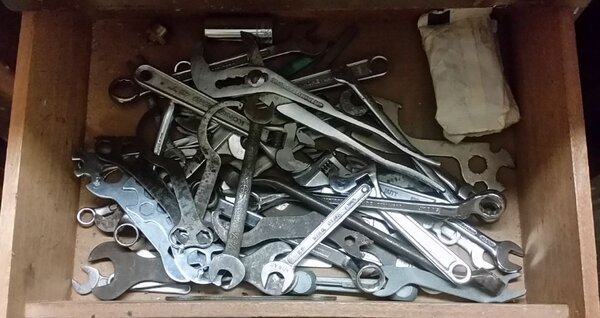
I had a rummage in the spanner drawer -

I guess we all have one? - fished one out and did this:


That did it. 3mm nuts and bolts again and a handy hole allowing it to fit over the spindle. Reminder to self: don't lose it!
 

Attachments

  • hanging on some bits.JPG
    hanging on some bits.JPG
    103.3 KB · Views: 567
  • pin spanner first effort.JPG
    pin spanner first effort.JPG
    36.2 KB · Views: 567
  • pin spanner 2nd effort 2.JPG
    pin spanner 2nd effort 2.JPG
    57.4 KB · Views: 567
  • pinspanner second effort.JPG
    pinspanner second effort.JPG
    31 KB · Views: 567
  • adjustable cup.JPG
    adjustable cup.JPG
    69.6 KB · Views: 567
  • entropy.JPG
    entropy.JPG
    93.8 KB · Views: 552
Re:

The nice Cyclo Benelux Mk 7. Note the pinholes (again!).

A faint memory stirred - I was sure I had something that might fit... After a lengthy rummage in aforementioned spanner drawer I made my way out with this:

A perfect fit, and not a 3mm bolt in sight... Must have been made for the job. The other end is, I think, cone spanners? They've seen some use over the years. This, along with all the other old bike spanners, is a legacy from my dad. I've carted them around for years through many house moves ("What! You're not bringing those rusty old spanners along again, are you?" :roll: ). But they refused to get lost. Thank goodness.
 

Attachments

  • cyclo benelux mk 7.JPG
    cyclo benelux mk 7.JPG
    36.4 KB · Views: 550
  • legacy pin spanner.JPG
    legacy pin spanner.JPG
    46.2 KB · Views: 550
Re: The Viking Saga

Great stuff, I still employ my Dads old tools some of which date back to the 50’s on a regular basis.
 
Re:

Looking good.

Can I ask if you lug-lined yourself and if so how? I read somewhere about paint pens that are good for home use assuming you are not a professional vintage bike painter!

Ray
 
Back
Top