If you are trying to remove the fork internals, you need to first separate the uppers from the lowers.
Screw the lower leg bolts in a few turns at least, then tap firmly with a rubber mallet until the bolts have moved inwards. This frees the damper rods from the lower leg taper. Remove the bolts and the uppers should pull out of the lowers.
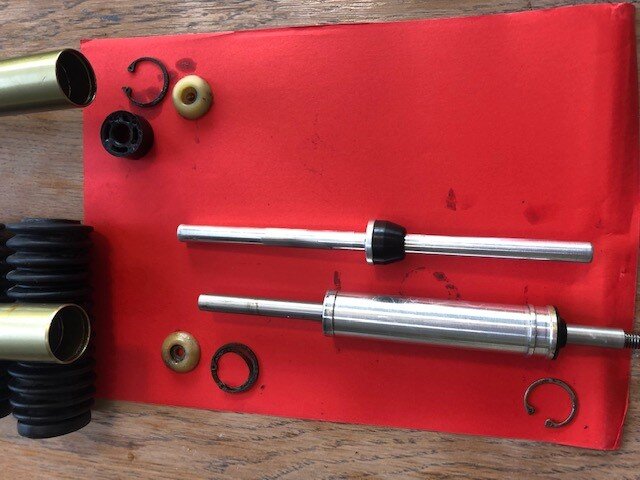
If you want to remove the damper and dummy leg shaft from the uppers, you need to remove the circlips holding them in place. These are at the bottom of each upper tube. Once the circlips are removed you can pull out the damper and dummy led from the bottom.
Springs or elastomers are removed from the top, and before you remove the lower legs and dampers. If your crown has pinch bolts on the side, loosen them then unscrew the top caps, remove them and then pull out the springs or elastomer stacks. If elastomers, hope they haven't turned into a sticky mush, or crumbled into dust. If they have, clean out the mess but avoid using anything rough or abrasive. Hot soapy water and patience is what's needed.
Assess everything, clean, service if needed, then put it all back together, damper and dummy leg first (lubricate moving parts with a suspension grease. I have some fluid for the dampers and Judy butter. I also lube the bushings in the lower legs (after cleaning and drying) and fill the void under the wiper seals with judy butter too (new seals tend to have a bit of grease applied but I add some more if they look a bit dry).
Make sure you seat the circlips back on fully. Pop the uppers back into the lowers and tighten the bolts (make sure the one with the hole goes on the damper side). Tighten up, not too much or you can crack the lowers (don't know the correct torque, but if you find the number and have a torque wrench, use it).
Drop the elastomers or spring assembly back in, fit top caps, tighten crown pinch bolts (again, torque to correct pressure if you can), fit the damper dial and all done.