You are using an out of date browser. It may not display this or other websites correctly.
You should upgrade or use an alternative browser.
You should upgrade or use an alternative browser.
boy"O"boy's 1992 Marin Pine Mountain / Browning suspension
- Thread starter boy"O"boy
- Start date
Re: Re:
Thanks Sam.
Good to see another Browning Suspension surfacing. Feel free to add to this thread to use as a resource pool for other owners......definitely get some more pics up whether it's on here or your own build thread.
In terms of restoration, I was lucky in that most of the paint scheme was intact but had suffered badly from fading and having other bikes piled on top of it. I went down the bare metal respray route to get the desired restoration, but did document everything 1st before I stripped it.
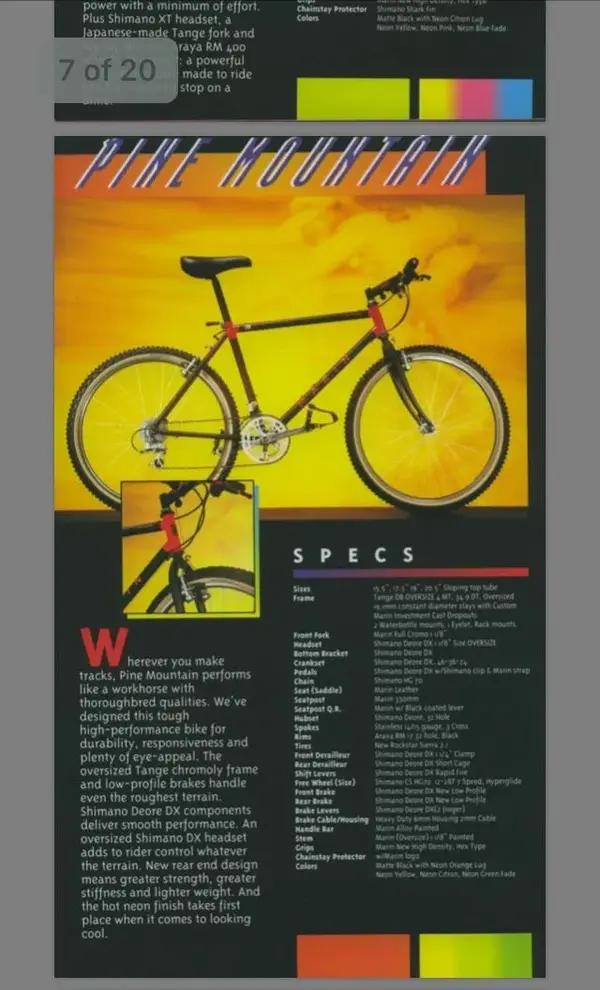
A few of the details were unclear... I'd seen another Pine Mountain Browning Suspension at Iconoclassic, so knew the colourway was correct and matched that small teaser picture in the 1992 Catalogue. This also confirmed the decals were Orange on the Pine Mountain and not White as I'd seen in Pictures of the Purple 'Team' version.
All the Browning suspension Marins I've seen here as well have the Tange Prestige tubing sticker. As you mention..... There was a lot of effort put into these over the standard '92 Pine mountain. 1 1/4" Headtube, Suspension Specific geometry, Tange Prestige construction, Low batch numbers
. I've contacted Marin to ask if the could confirm any more info such as where they were made, numbers etc...but so far it's turned up nothing. Again, Feel free to add here if you've any more info.
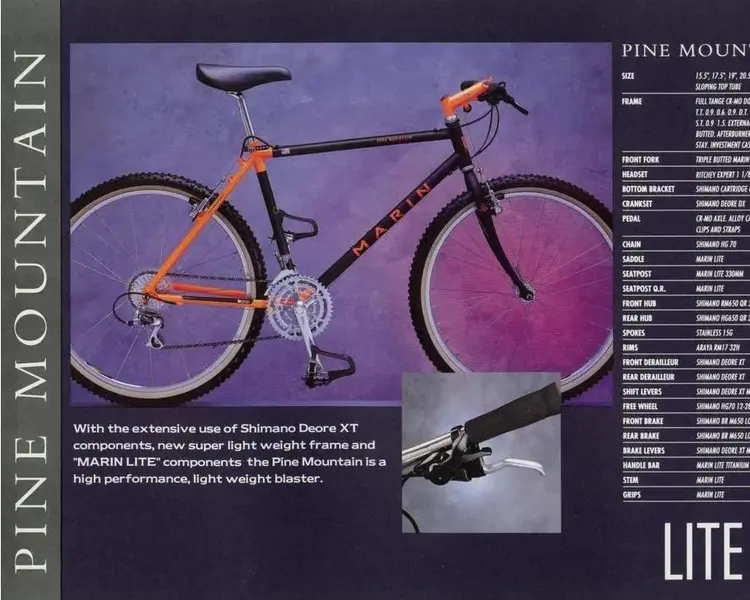
Thanks for adding the '91 Brochure picture. There are undoubtedly Marin experts out there that would know more......but I think that picture is from the European Version of that year.
The UK version for 91 is the familiar 'Zolatone' paint in dark grey for this year.
The '92 Catalogue shows the Pine mountain with the orange back end and headtube with a matte black finish.
The '92 Browning Specific version is as the same colour break up as the '91 European version but uses the same 'Pine Mountain' script on the top tube as the '91 UK version.
Probably because it was a 'Limited Edition' they mixed and matched the design. Whether this version is a UK specific Marin is another unanswered question though.
Here's some pics to explain the catalogue variants.
Cheers.
boy"O"boy
SamOsborne":2jdc5fi1 said:Lovely bicycle! You got it pretty much bang on as it was pretty much the paint scheme and decal design from the 91 catalogue.
I also have a Browning Pine Mountain 1992 which I purchased after lusting after the 91.
Forks still work even after being hung in the garage with the frame for the last twenty odd years.
All this lockdown business over the last few months got the juices flowing again and your thread made the pondering over getting it back up and running a little easier.
Great work!
Thanks Sam.
Good to see another Browning Suspension surfacing. Feel free to add to this thread to use as a resource pool for other owners......definitely get some more pics up whether it's on here or your own build thread.
In terms of restoration, I was lucky in that most of the paint scheme was intact but had suffered badly from fading and having other bikes piled on top of it. I went down the bare metal respray route to get the desired restoration, but did document everything 1st before I stripped it.
A few of the details were unclear... I'd seen another Pine Mountain Browning Suspension at Iconoclassic, so knew the colourway was correct and matched that small teaser picture in the 1992 Catalogue. This also confirmed the decals were Orange on the Pine Mountain and not White as I'd seen in Pictures of the Purple 'Team' version.
All the Browning suspension Marins I've seen here as well have the Tange Prestige tubing sticker. As you mention..... There was a lot of effort put into these over the standard '92 Pine mountain. 1 1/4" Headtube, Suspension Specific geometry, Tange Prestige construction, Low batch numbers
. I've contacted Marin to ask if the could confirm any more info such as where they were made, numbers etc...but so far it's turned up nothing. Again, Feel free to add here if you've any more info.
Thanks for adding the '91 Brochure picture. There are undoubtedly Marin experts out there that would know more......but I think that picture is from the European Version of that year.
The UK version for 91 is the familiar 'Zolatone' paint in dark grey for this year.
The '92 Catalogue shows the Pine mountain with the orange back end and headtube with a matte black finish.
The '92 Browning Specific version is as the same colour break up as the '91 European version but uses the same 'Pine Mountain' script on the top tube as the '91 UK version.
Probably because it was a 'Limited Edition' they mixed and matched the design. Whether this version is a UK specific Marin is another unanswered question though.
Here's some pics to explain the catalogue variants.
Cheers.
boy"O"boy
Attachments

SamOsborne
Dirt Disciple
Re:
Definitely a blast from the past, seeing the bicycle you ended up with, after all of your hard work and research. Reminded me of seeing mine as it was as a young man again. Pretty much exact although mine had/has XT mechs.. I remember my dad hiding all the paperwork in the spare wheel well in the boot, so my mother didn’t find out how much he’d paid for it. It was the one Christmas present I had to work a good twenty hours a week with him while in my final year of school.
Hope you’re enjoying riding yours")
Definitely a blast from the past, seeing the bicycle you ended up with, after all of your hard work and research. Reminded me of seeing mine as it was as a young man again. Pretty much exact although mine had/has XT mechs.. I remember my dad hiding all the paperwork in the spare wheel well in the boot, so my mother didn’t find out how much he’d paid for it. It was the one Christmas present I had to work a good twenty hours a week with him while in my final year of school.
Hope you’re enjoying riding yours
Re: Re:
Cheers Sam.
Glad you got a blast from the past from the end result. I get the same buzz from my Aluminium "O" seeing that completed as I had it when I was 16! - check it out in my signature, but having the back story and the memories makes the restoration well worth the effort....and I've restored that one twice now!
I'll be honest though.......I don't ride the Marin much.
I know the Browning fork does work from a test ride, but there's not much difference between the 2 'movement' settings. That sticker on the inside that advises again disassembly put me off from investigating further.
The main reason though is that the Trek, Saracen and "O" get the 1st look in when it comes to regular riders.
Look forward to seeing some pics of yours.
Cheers.
boy"O"boy
SamOsborne":3kxlxku3 said:Definitely a blast from the past, seeing the bicycle you ended up with, after all of your hard work and research. Reminded me of seeing mine as it was as a young man again. Pretty much exact although mine had/has XT mechs.. I remember my dad hiding all the paperwork in the spare wheel well in the boot, so my mother didn’t find out how much he’d paid for it. It was the one Christmas present I had to work a good twenty hours a week with him while in my final year of school.
Hope you’re enjoying riding yours
Cheers Sam.
Glad you got a blast from the past from the end result. I get the same buzz from my Aluminium "O" seeing that completed as I had it when I was 16! - check it out in my signature, but having the back story and the memories makes the restoration well worth the effort....and I've restored that one twice now!
I'll be honest though.......I don't ride the Marin much.
I know the Browning fork does work from a test ride, but there's not much difference between the 2 'movement' settings. That sticker on the inside that advises again disassembly put me off from investigating further.
The main reason though is that the Trek, Saracen and "O" get the 1st look in when it comes to regular riders.
Look forward to seeing some pics of yours.
Cheers.
boy"O"boy
gtturbo
Senior Retro Guru
Re:
Hi boyOboy, I managed to pick up the same Pine Mountain recently and had a few questions you could probably answer if you would be so kind. Do you find much difference between the 3 settings on the dial. I find moving the dial does make a difference but even locked out they still move a fair bit, just a bit harder to compress. Just wondered if yours were the same or if locked out meant no movement. I'm assuming there is no valve to adjust the pressure on these and they are just a sealed unit and have probably lost some gas over the years. Secondly mine had V brakes fitted so the front cable hanger is missing. Am I right in thinking its actually welded to the fork, doesn't look to me like it bolts on but could be wrong. Finally before I go all ham fisted and remove the forks did you have to remove the dial before taking off the stem. Doesn't look like you need to but thought I would ask.
Thanks in advance.
Mark
nporternz":pvew45ur said:i need to see this bike in the flesh!!

gtturbo":pvew45ur said:Hi boyOboy, I managed to pick up the same Pine Mountain recently and had a few questions you could probably answer if you would be so kind. Do you find much difference between the 3 settings on the dial. I find moving the dial does make a difference but even locked out they still move a fair bit, just a bit harder to compress. Just wondered if yours were the same or if locked out meant no movement. I'm assuming there is no valve to adjust the pressure on these and they are just a sealed unit and have probably lost some gas over the years. Secondly mine had V brakes fitted so the front cable hanger is missing. Am I right in thinking its actually welded to the fork, doesn't look to me like it bolts on but could be wrong. Finally before I go all ham fisted and remove the forks did you have to remove the dial before taking off the stem. Doesn't look like you need to but thought I would ask.
Thanks in advance.
Mark
Look forward to seeing that one Mark! Feel free to add pics here if you want as a resource pool for other owners. Definitely get a build thread up though with loads of pics!
")
Ok. Q&A
i) There's not a lot of difference between the 3 settings on my fork. The lock out slows the compression but doesn't entirely lock the fork out. The 2 movement settings are almost identical in their action. There's no air valve on these like a Rockshox etc.. the damper is a sealed unit filled with Nitrogen. As you say, I can imagine over time that some of this has dispersed. The sticker on it advises against disassembly and no one here has ventured into trying a repair/service yet!
I don't think the forks had the best record for reliability if you read back through some of the posts here.
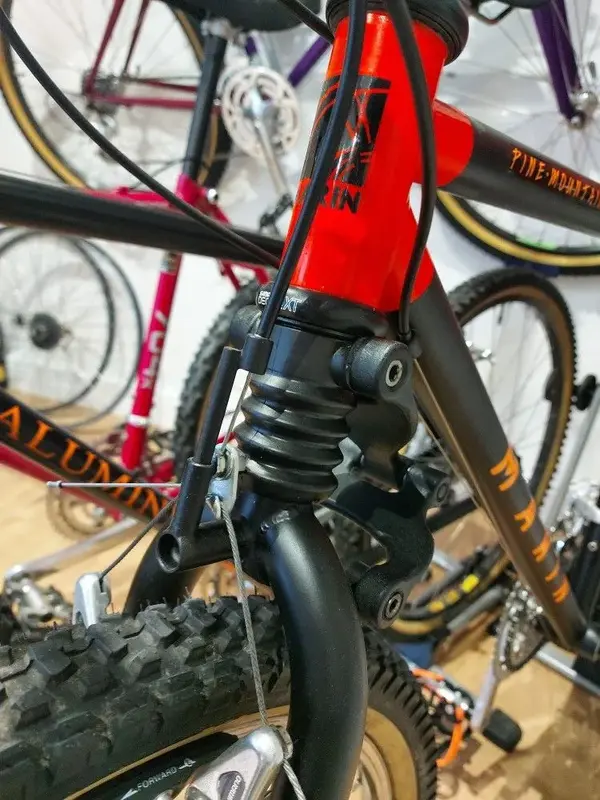
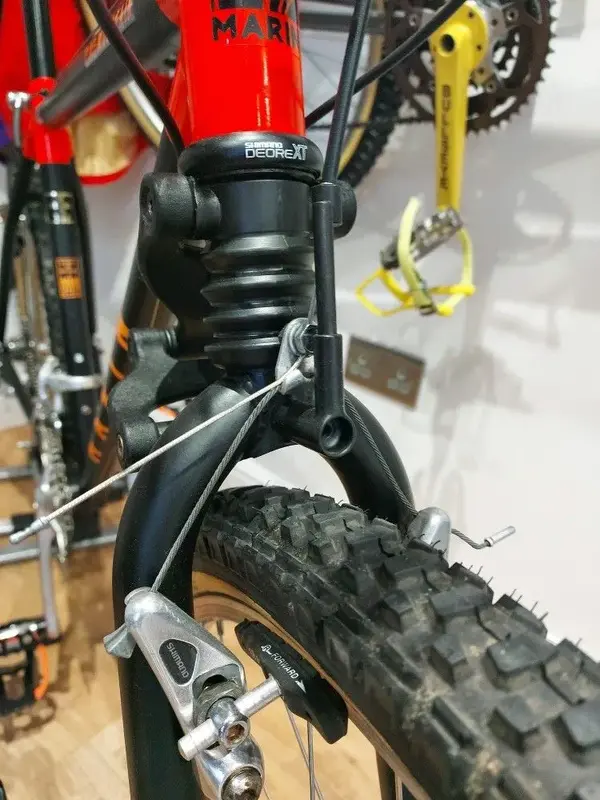
ii) I've added a couple of detail pics to explain what I mean here. ( Yes. the XT logo is facing forwards!
 :facepalm: )
The front cable hanger ( under the straddle wire ) is welded to the fork, not bolted on.
If you mean the ferrule and rod that holds the cable stop above the straddle wire.... that part just slots in. A few pages back I've taken a pic of this against a ruler for dimensions.
iii) No need to remove the dial if you want to remove the forks.
The aheadstem slides straight over. You then remove the 1 1/4" headset with spanners as you would with any other threaded headset.
Don't think there's any set up's out there that use both threaded and aheadset parts like the Browning fork. It's also the only Marin to use a 1 1/4" headset too.
Hope this helps.
Cheers.
boy"O"boy
Attachments
gtturbo
Senior Retro Guru
Thanks for the info. Looks like whoever fitted the v brakes was keen to 'clean up' the appearance of the frame/fork and has cut off the cable hangers :roll: . Still doesn't look that difficult to fabricate a replacement.
With regards the threaded/threadless setup my 92 Almega XT had a similar setup. Threaded fork and headset but then an unthreaded section of steerer which appeared to be bonded in for an ahead stem. Where as my 91 Almega, which I still have, is just a conventional threaded steerer and quill stem.
Thanks again for the info and I will start a build thread when I get around to looking at the bike in more detail.
Re:
I owned and raced one of these back in 1992, the frame and forks were my 16th birthday present...and were bought from Ben Hayward Cycles. I was lucky enough to race for them a few years later.
If anyone ever wants to sell theirs then please contact me first...especially if it came from Ben Haywards!!
Cheshire1980
Orange 🍊 Fan
Enjoyed reading through this build thread again, whilst enjoying my morning coffee. Definitely a project I would consider in the future, although cant say I have seen many for sale
 , so will have to keep a sharp eye out in the coming years for one.. Anyway great resource and thread Ben
  .
.
, so will have to keep a sharp eye out in the coming years for one.. Anyway great resource and thread Ben .Similar threads
- Replies
- 6
- Views
- 2K
Latest posts
-
For Sale 91/92 Small Bontrager for sale. Immaculate. Now £420 posted
- Latest: 95bonty_rtn
-
-
-