Re: Re:

ez054098":1i9xmf4y said:
I love it!

Cheers buddy, its still work in progress......

I’ve since discovered that for the past 12 months I’ve had the seat post in back to front !
The correct (Factory) way is with the height lines at the front and the bolt in the clevis pin at the rear,
I got the Clevis pin right but had the gradations at the rear


I know this is correct cuz it say’s so here (point number 4) :D


And mine now follows suit ;)


one day it will be finished ;)
 
Re: Re:

Retro Spud":1o3td69z said:
ez054098":1o3td69z said:
I love it!

Cheers buddy, its still work in progress......

I’ve since discovered that for the past 12 months I’ve had the seat post in back to front !
The correct (Factory) way is with the height lines at the front and the bolt in the clevis pin at the rear,
I got the Clevis pin right but had the gradations at the rear


I know this is correct cuz it say’s so here (point number 4) :D


And mine now follows suit ;)


one day it will be finished ;)

Argh....had mine on the wrong way too!!!


Nice build!
 
perfect. last details is completed.

It was necessary to remove bottom bracket bearings for anodizing?
 
Re: Re:

Retro Spud":3scf2ovb said:
ez054098":3scf2ovb said:
I love it!

Cheers buddy, its still work in progress......

I’ve since discovered that for the past 12 months I’ve had the seat post in back to front !
The correct (Factory) way is with the height lines at the front and the bolt in the clevis pin at the rear,
I got the Clevis pin right but had the gradations at the rear


I know this is correct cuz it say’s so here (point number 4) :D


And mine now follows suit ;)


one day it will be finished ;)
Yep, I have argued that point with a couple of Retro Bikers. Now I have documentation to back it up.
 
Re: Re:

ez054098":2opscr9s said:
Retro Spud":2opscr9s said:
I’ve since discovered that for the past 12 months I’ve had the seat post in back to front !
The correct (Factory) way is with the height lines at the front and the bolt in the clevis pin at the rear,
I got the Clevis pin right but had the gradations at the rear


I know this is correct cuz it say’s so here (point number 4) :D

Yep, I have argued that point with a couple of Retro Bikers. Now I have documentation to back it up.

Looking back I think it was your comments on a previous thread that started me thinking/Questioning, and asking Elite504 for clarification

To be honest I think 90% of folks would but the lines facing rear wards, but we've all been wrong all these year(s) :shock:
 
F.R.O.":3iut6fen said:
perfect. last details is completed.

was it necessary to remove bottom bracket bearings for anodizing?

Yeah it was and also the rubber Axle seals

Now I'm no Alchemist when it comes to the anodizing process, but I believe ferrous material dissolves in the process,

Here they are fully stripped down, Chris at Intrincycles emailed with his concern about how much metal had been removed in the machining process back in the Grafton factory.... "do you know you can see daylight through them ?" :shock:

we checked the other ones Chris had previously done for me and non of the others were so weight weenie :LOL:


Looking Good yeah....no holes


Spin them around and you can see day light though the peg holes :shock:


and a picture of the CK grip nuts after being dipped


if you look closely at the speedcase you can see a half moon hole in the peg at the 2 o'clock position, thankfully once it was fitted it's impossible to see
 
Re:

I imagined.
other metals affect the anodized.

I'm surprised. :shock: :shock: :shock:
machining amazing work by John, they are extremely thin. It is the first time you see it.

as she could reach that finesse ...

It was easy estraer bearings? :!: :?:

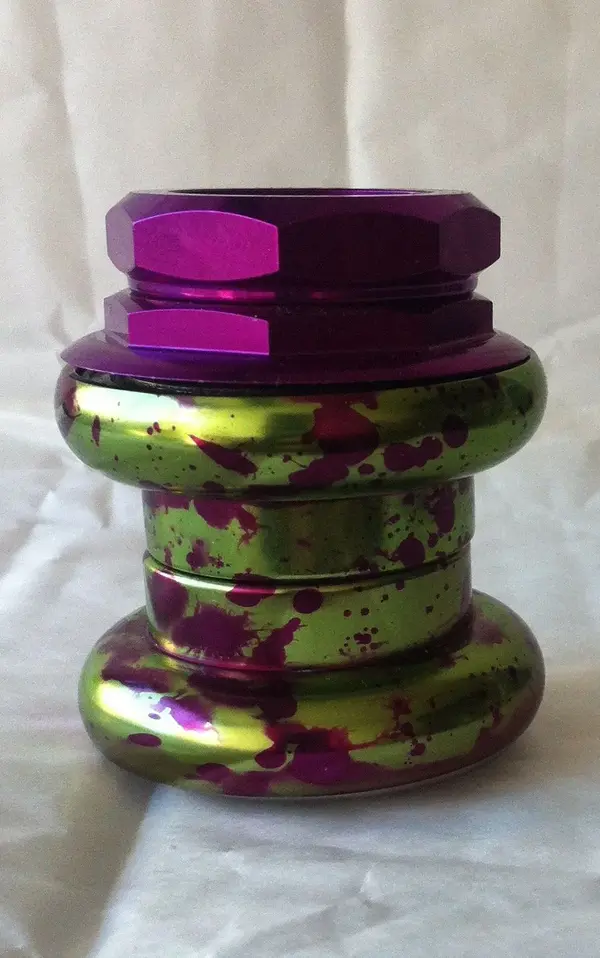
chris also work on my bowls CK. lime green and splash 3dv (ORIGINAL SCREW COVER CK)

chris does a great job.

the yeti, the smallest detail ... nice!
 

Attachments

  • la foto 3.JPG
    la foto 3.JPG
    221.1 KB · Views: 793
Re: Re:

F.R.O.":1hkq2462 said:
It was easy extract the bearings? :!: :?:

Chris also work on my bowls CK. lime green and splash 3dv (ORIGINAL SCREW COVER CK)

chris does a great job.


the yeti, the smallest detail ... nice!


Hi FRO

Getting the bearing out was a little tricky as naturally I didn't want to damage the Speedcase nor bearing (if I could help it),
I applied only a small amount of light oil and then gently tapped out the bearing taking my time to ensure it came out evenly, no special tools here ....just a little patience and a degree of common sense


Yes Chris does some great work, and to be honest I don't think he gets the recognition he deserves, my bike wouldn't look anywhere near like it does today without his help support along the way

"the Yeti, the smallest detail ..."
it's all about the detail, and now I'm close to finishing I'm able to work on the areas that for so long have annoyed me,


BTW that CK headset of yours looks awesome, but why not Splash anno on the King Gripnuts™®


regards

Nick
 
Back
Top