Everything comes together with a good glue: Raleigh Chill 1990

Obi-Juan

Retro Guru
On these dates, work absorbs me and I get quite severe drops in sugar, which is why I come home and fall asleep and don't do much work in forums or chats.
It also affects me in the hobbies that I hardly dedicate time to.
But it has been good for me to think better about some projects and change the initial euphoria for the realization of something more thoughtful.
So while parts for the other bikes are arriving, I thought I'd look for something quick to entertain myself.
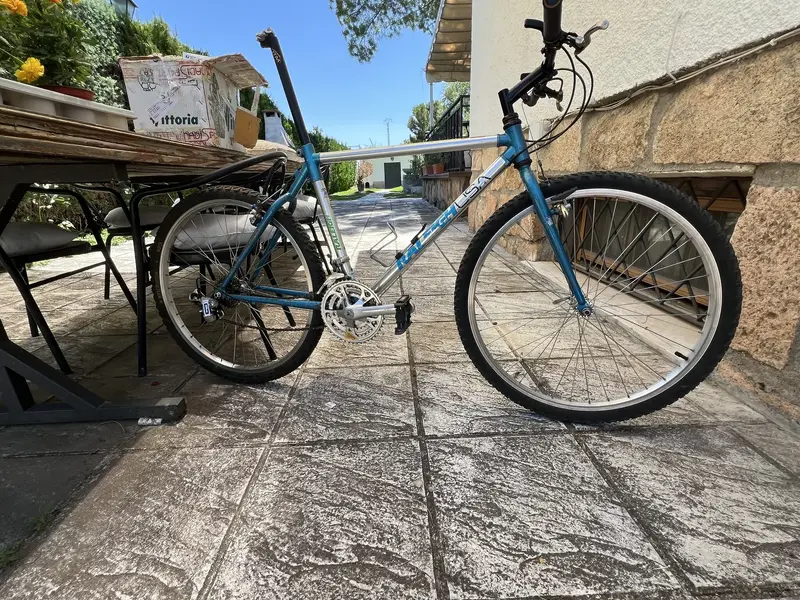
I have wanted a bonded frame for a long time. There have been many from the Look MI-90 carbon to the Vitus CT1, through Trek, Reflex, the albondtech or the Cadex that I love (I can't even name the epic ultimate because I start salivating).
But among all the brands there was one that caught my attention powerfully at the time. The Raleigh Jhon Tomac signature.
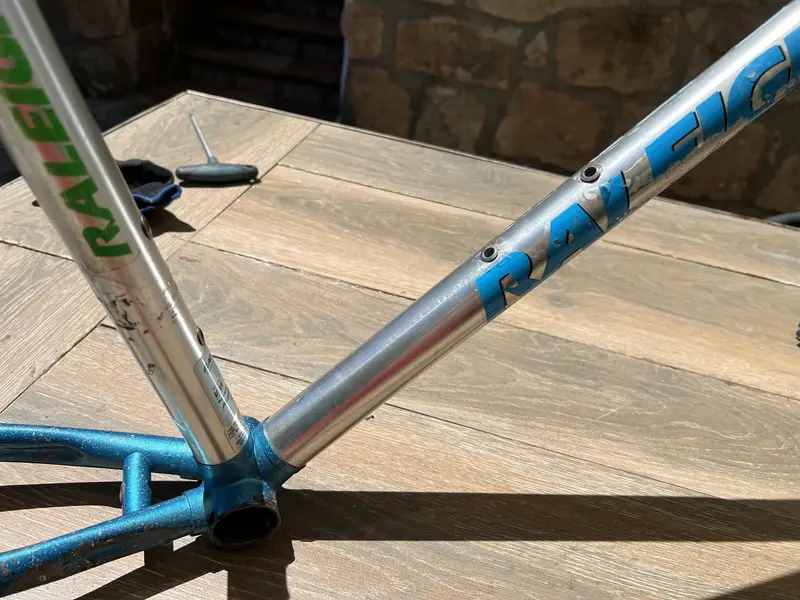
Over time I discovered that Raleigh's composite work was not just on that bike, they also had the Dyna-Tech and the Technium.

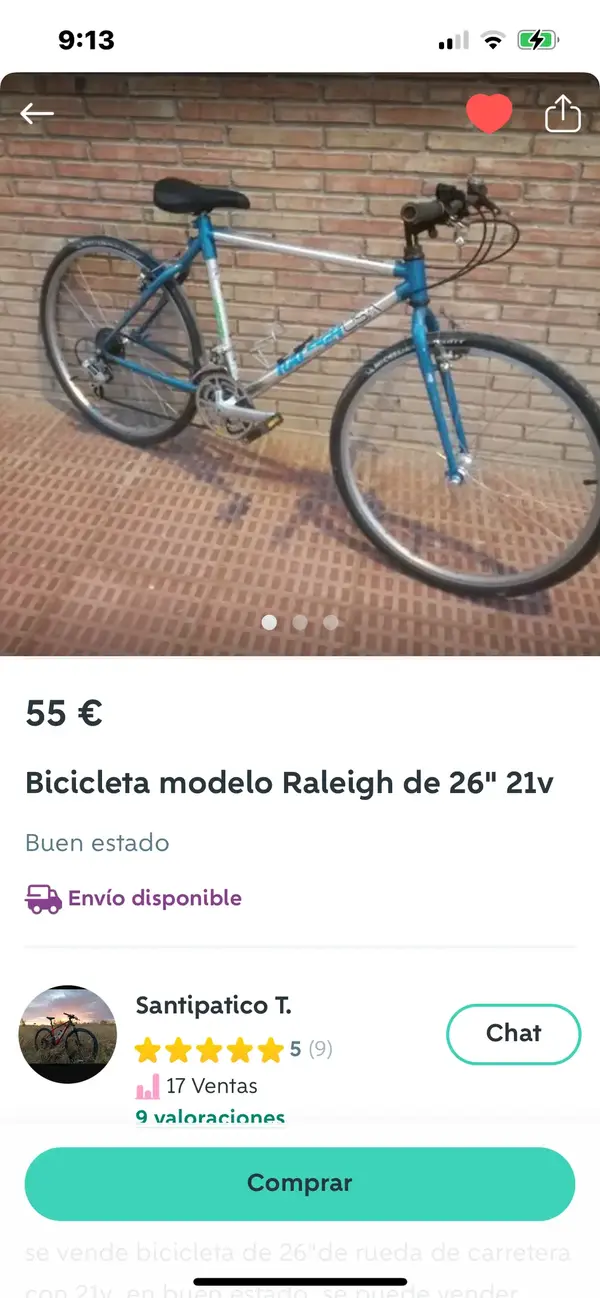
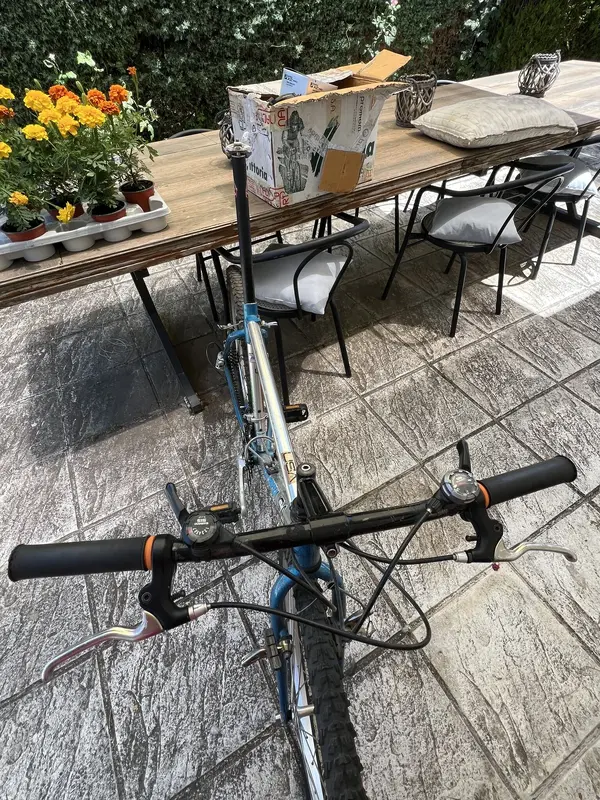
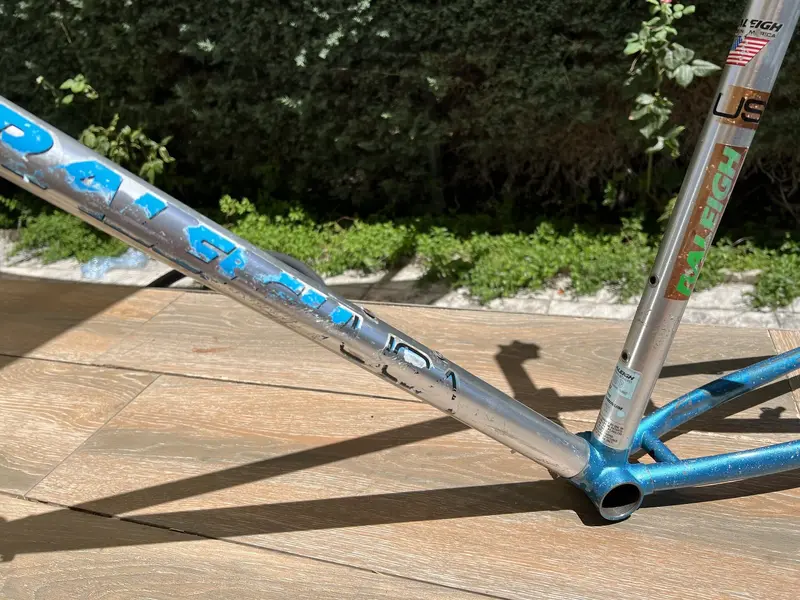
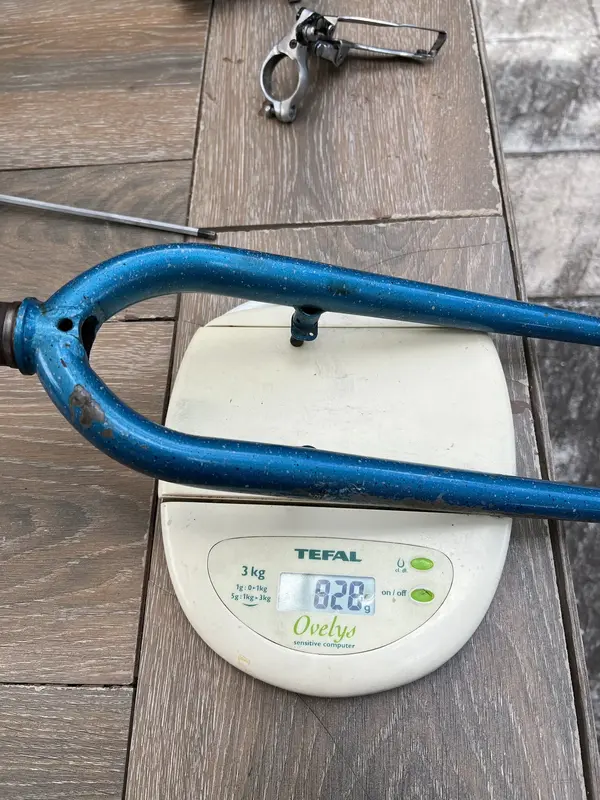
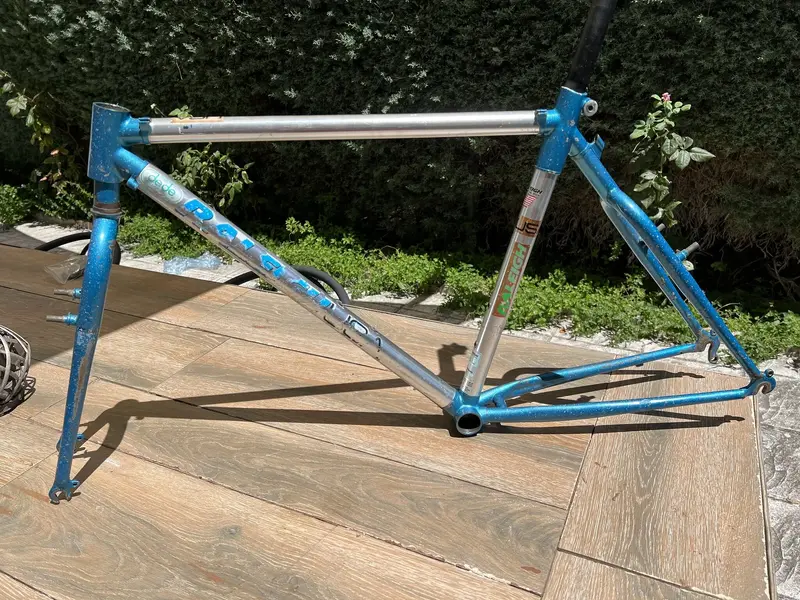
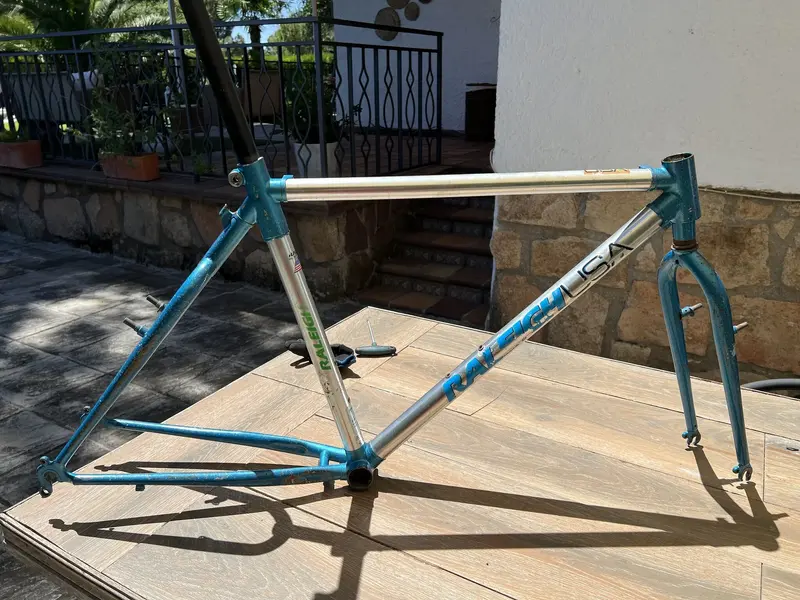
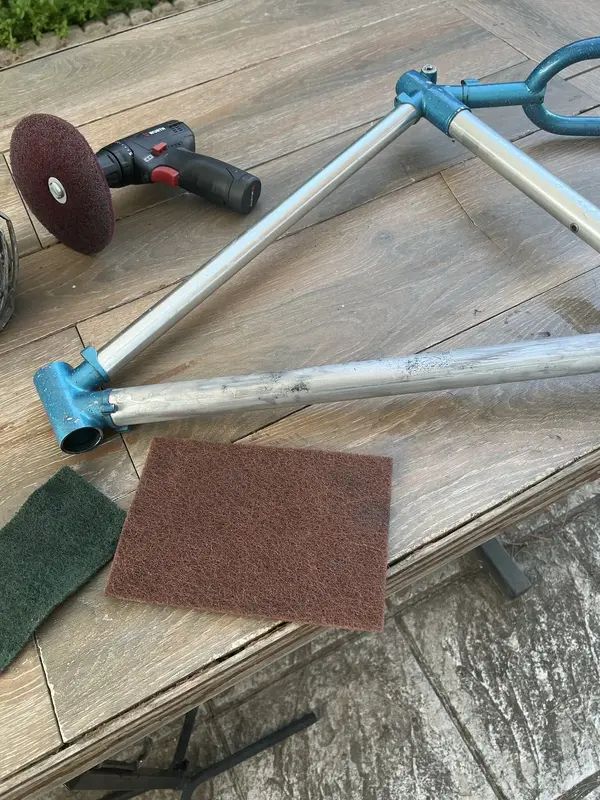
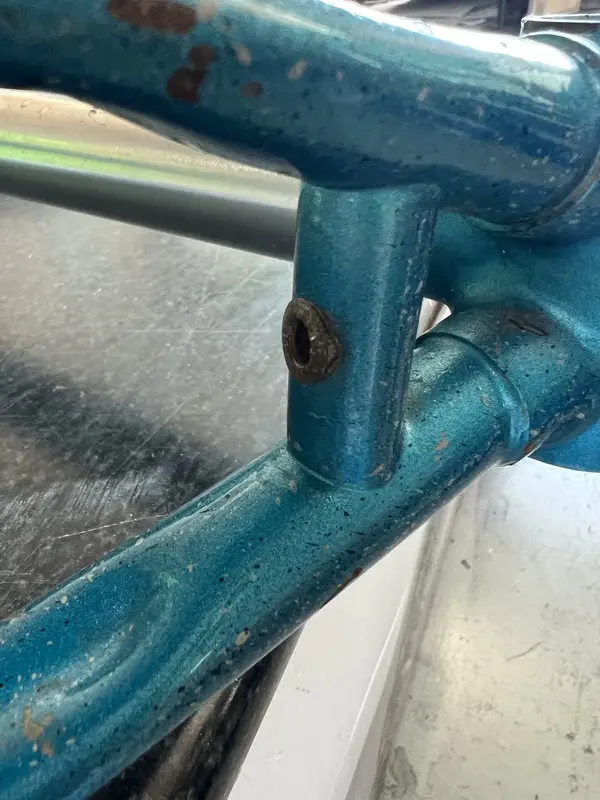
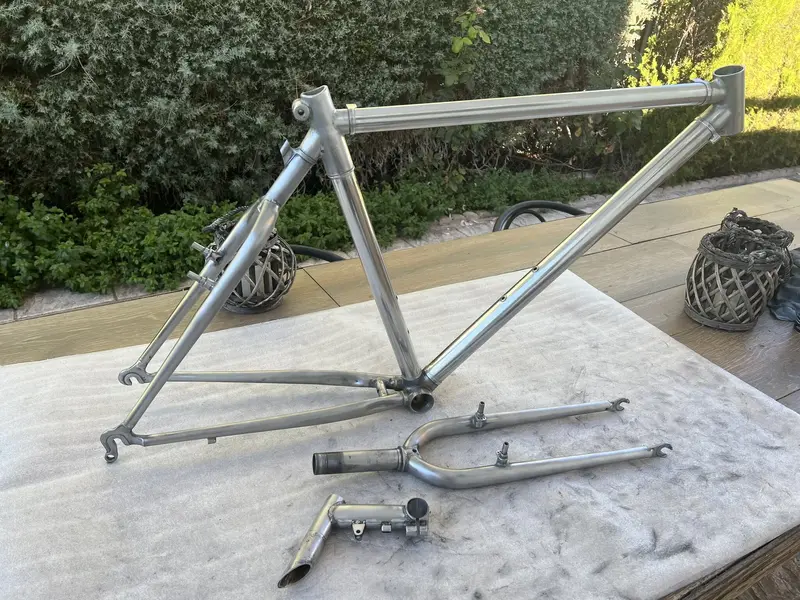
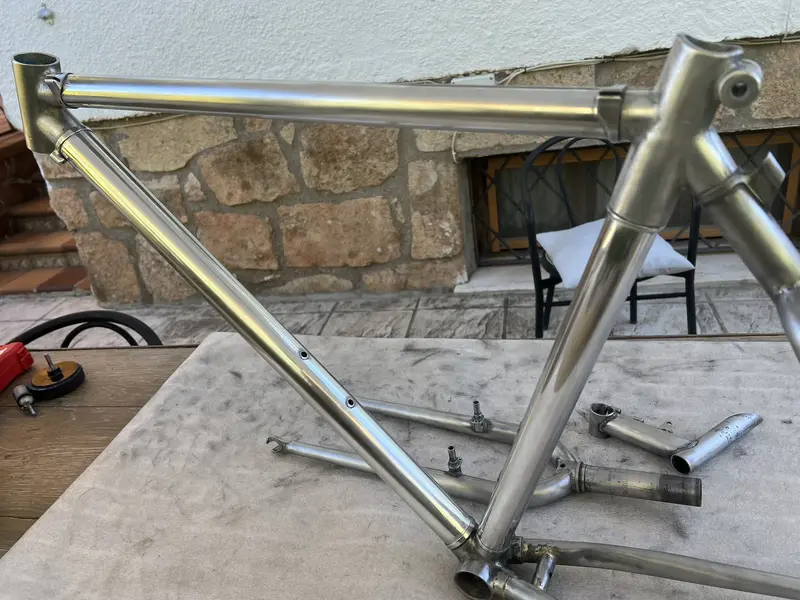
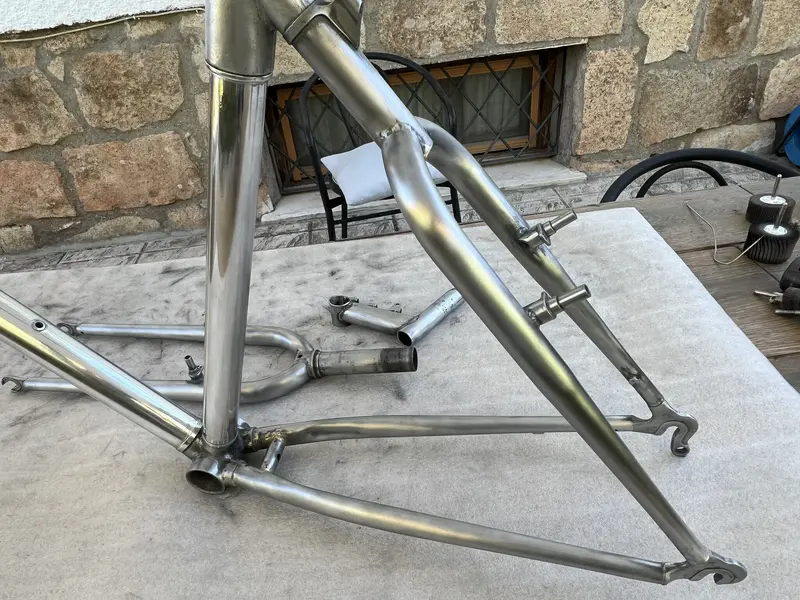
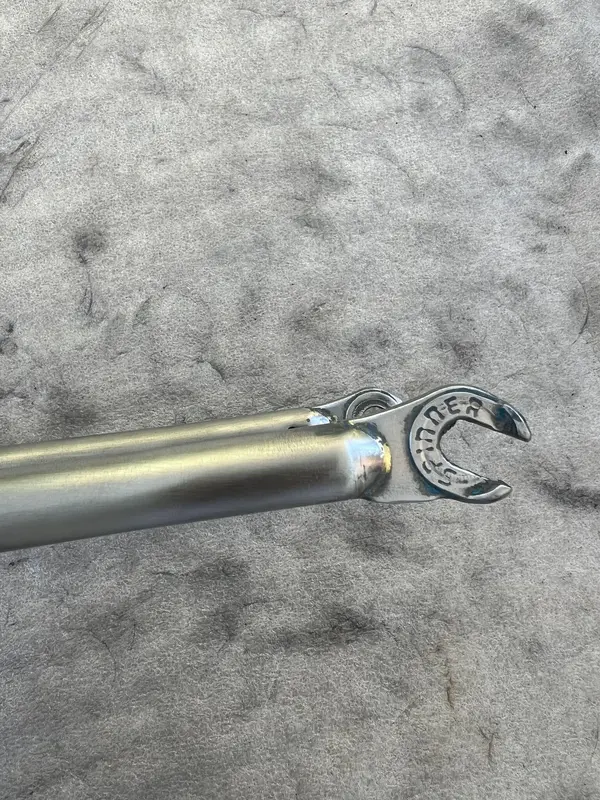
Well, in Spain it is not easy to see a Raleigh and although it is true that I sometimes search on Ebay for "dyna-tech" it is not what I was doing now. I was looking for a Litage frame, nice, simple, easy to find and accepts any piece, to work quickly and that would look good, with its catilevers and threaded headset
But suddenly a Raleigh appeared!!!
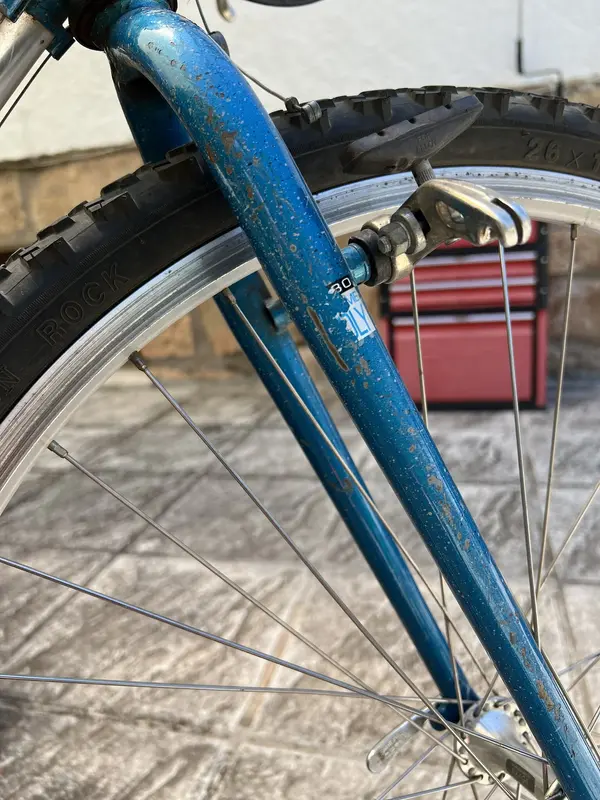
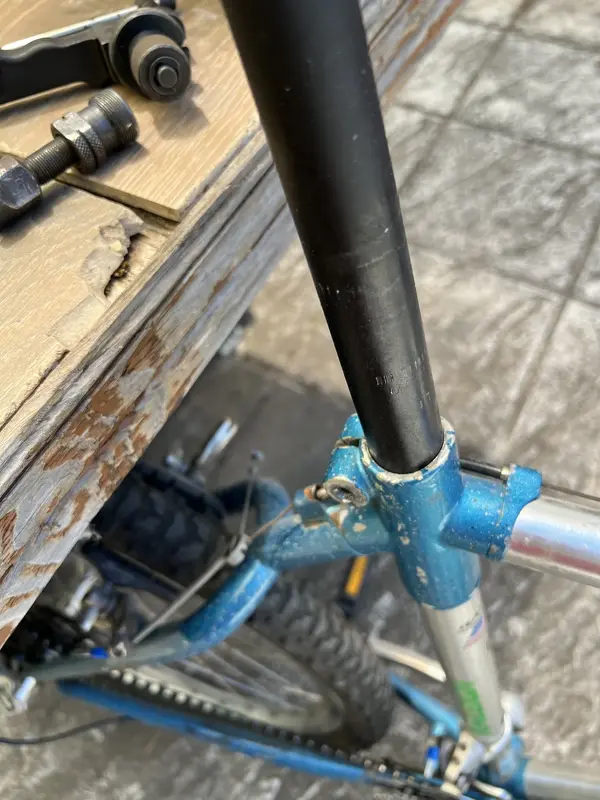
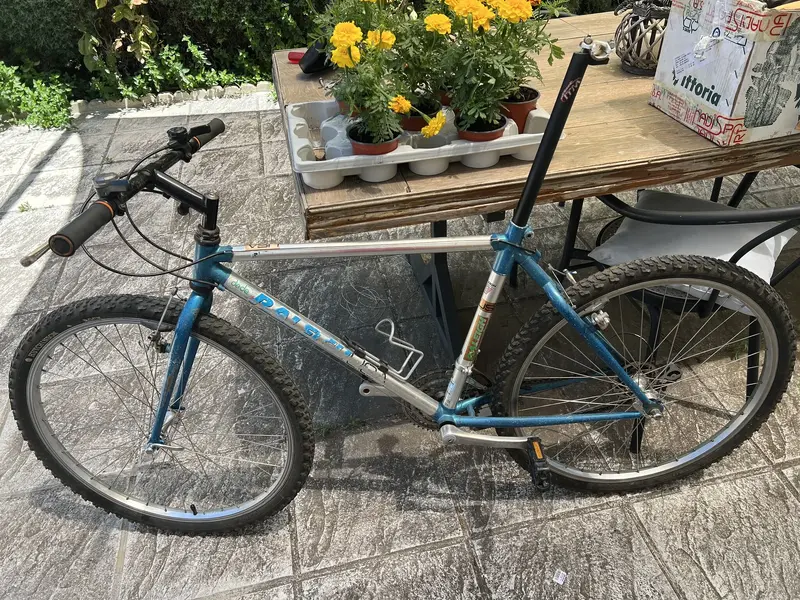
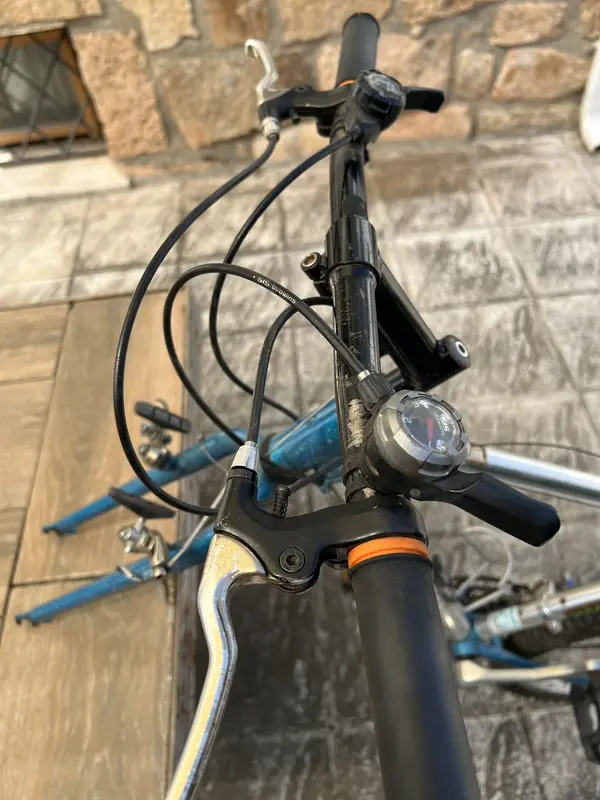
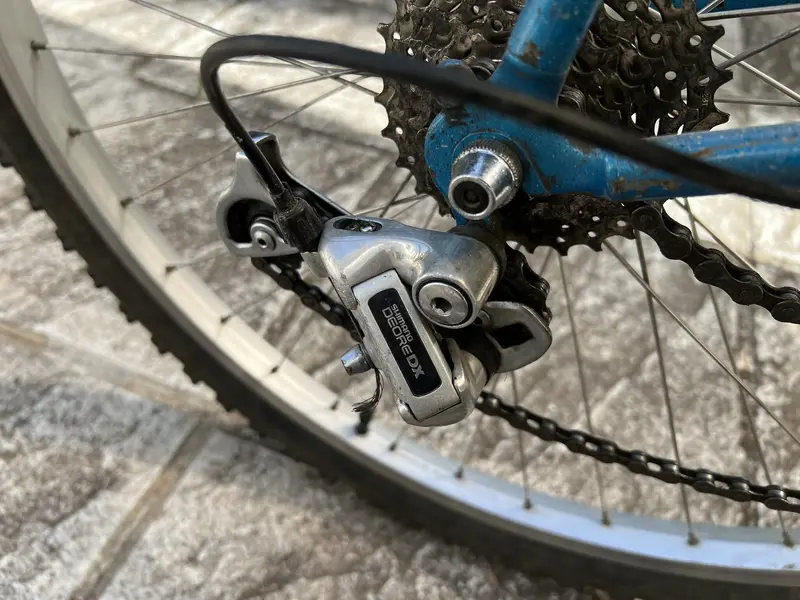
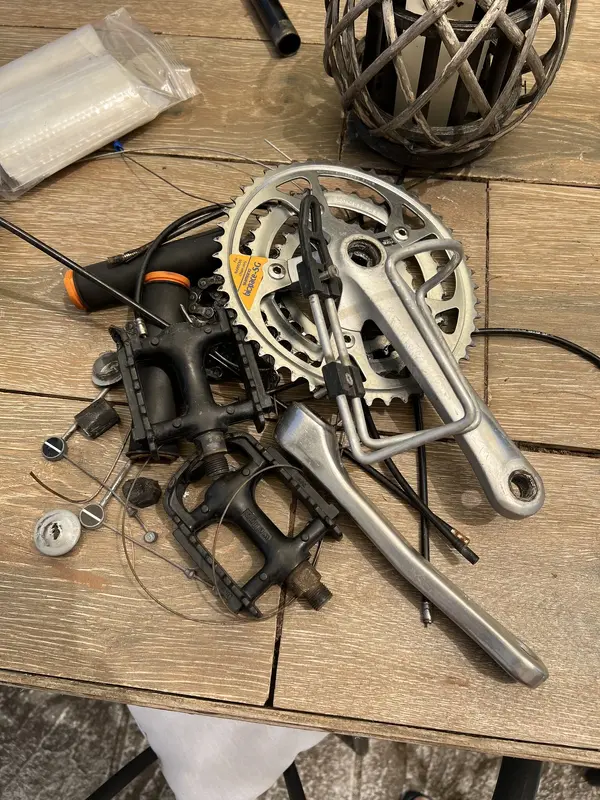
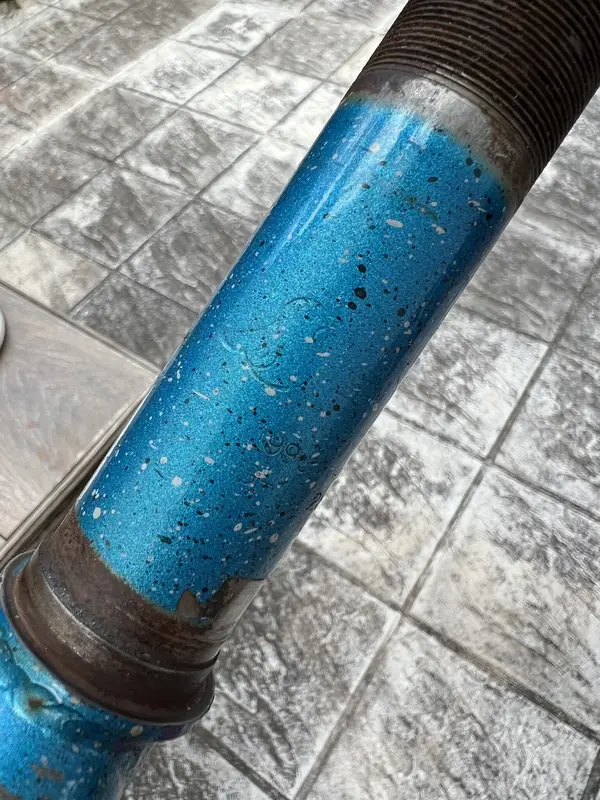
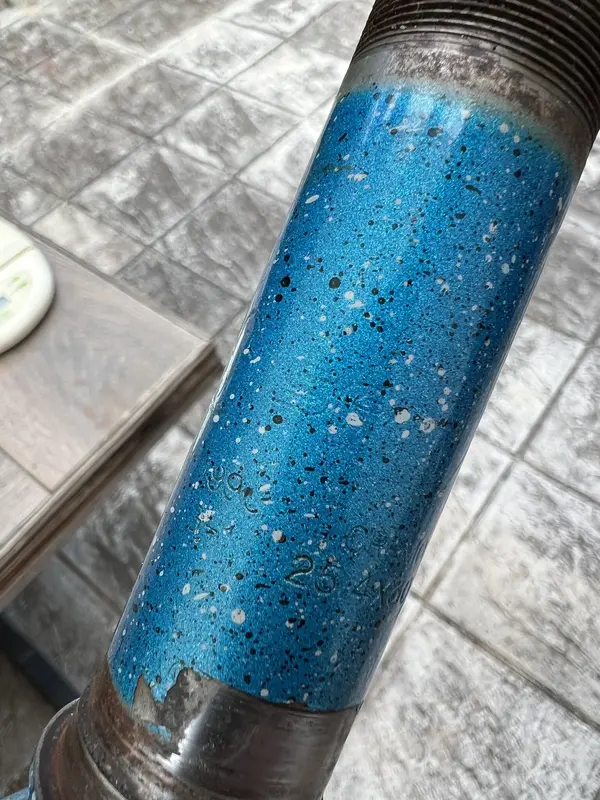
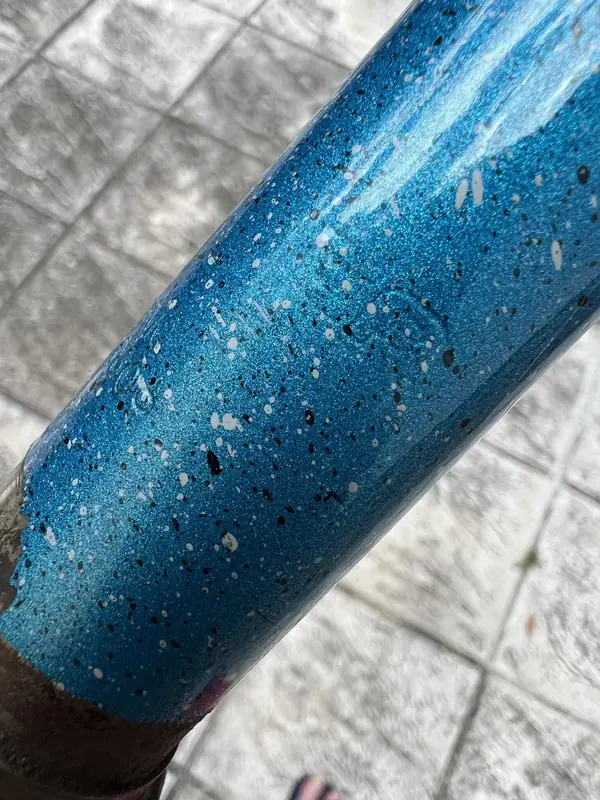
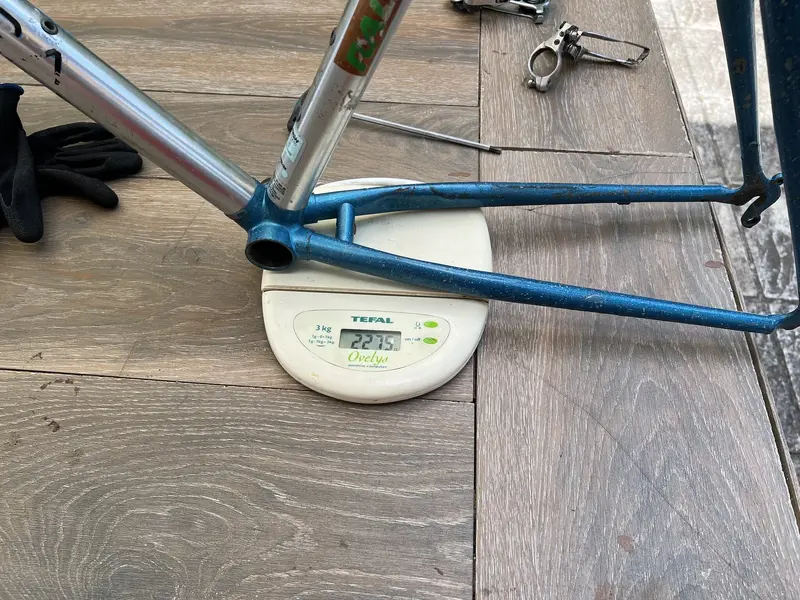
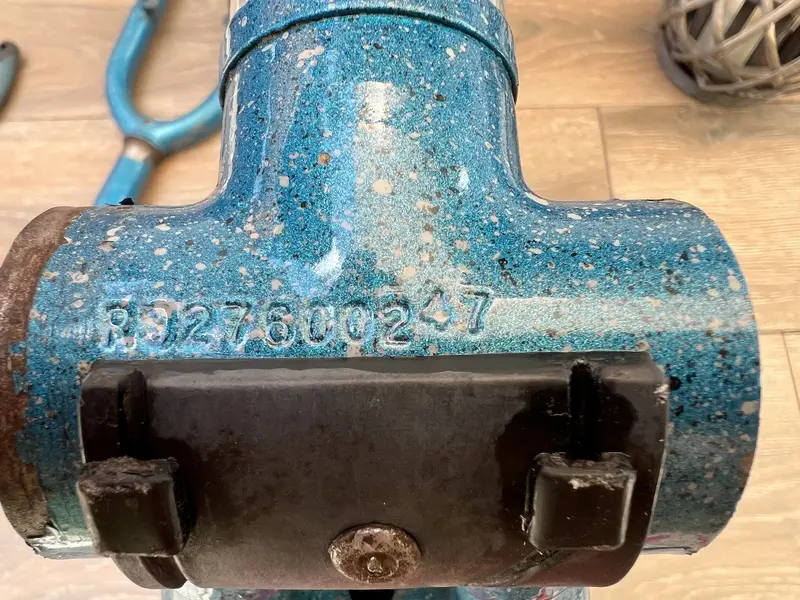
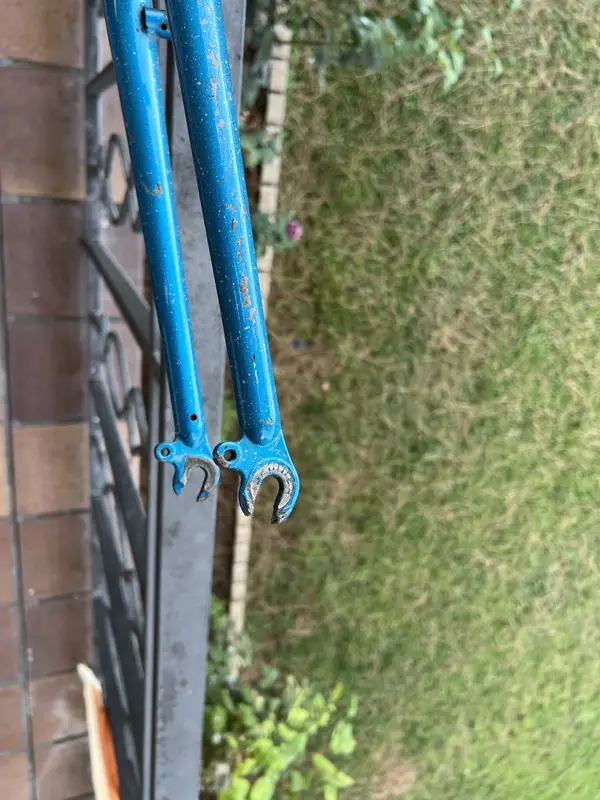
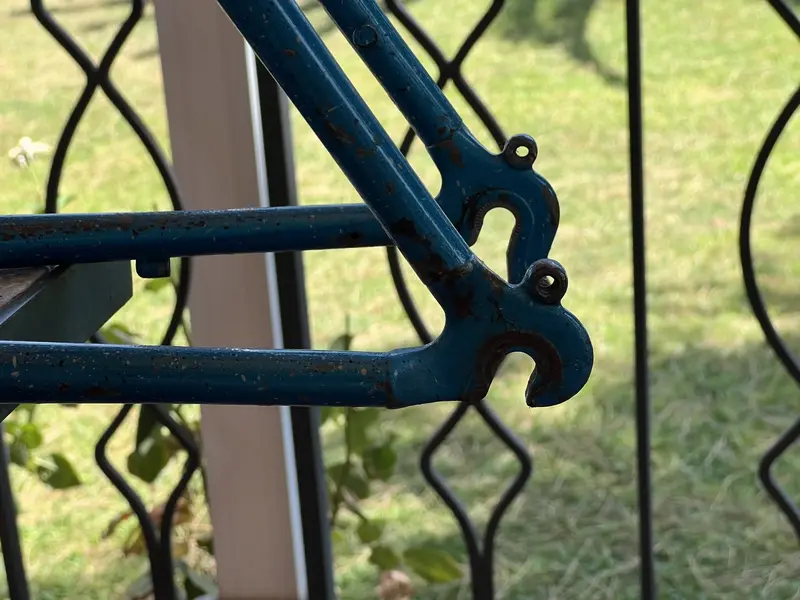
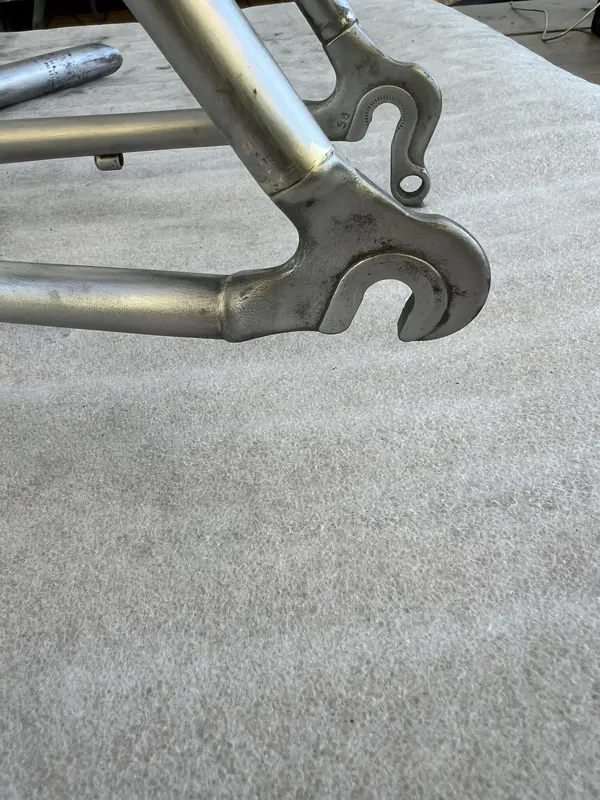
I didn't know the model and the photos were terrible. But you could see a Deore DX rear derailleur (they are inimitable) and tubes made of something similar to aluminum
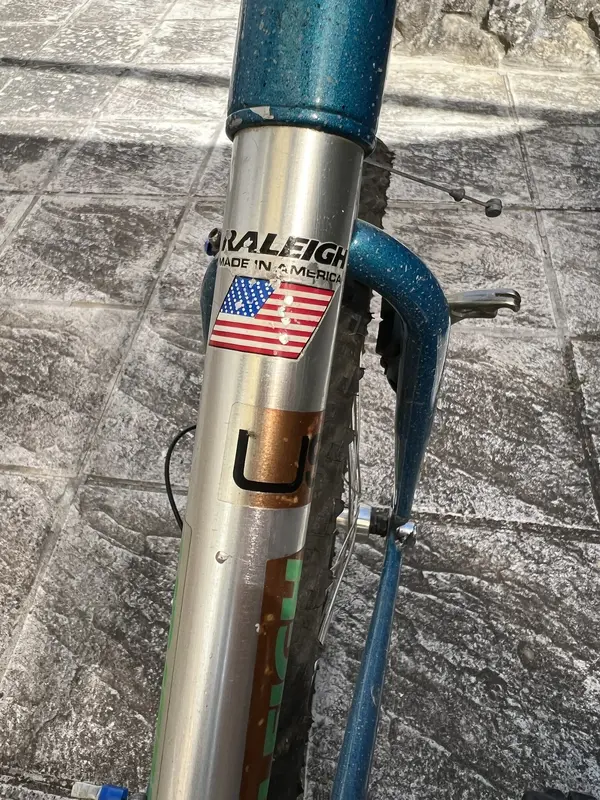
I searched the internet for a week and thought it was a Technium Chill from 1991
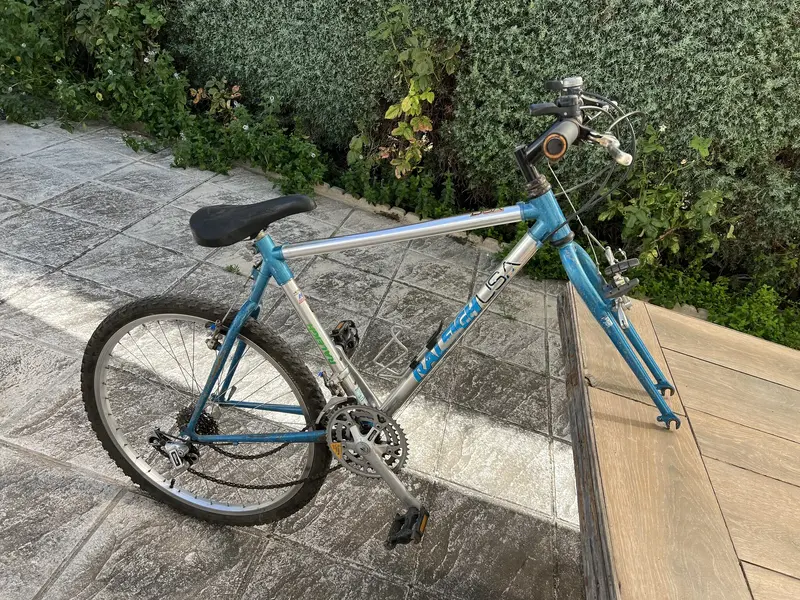
A Raleigh Technium in Spain! Well, it was only €55 and 700 km... for it
 
My first Raleigh and a dream of youth (even if it wasn't the Tomac signature, it is already a dream come true). I was excited....but the terrible Wallapop photos, the stickers that couldn't be seen (then I saw that they didn't have them at all)... €55 and a lot of doubts.
Of course, the gearbox that was seen from the side was undoubtedly a Deore DX and after my research it was quite clear that it was a Technium from 1991, although some details did not add up. Curiously, in the photos you could see some thumbies but in '91 they didn't give them although they did in '92, but the '92 decoration didn't fit me. Also you could see a silver thumbie and another black one! Doubts, many doubts
Anyway, if the price dropped a little, the worst that could happen was that he would sell the rear derailleur (the only thing he was sure of) and get the money back.
And with that thought I went for her.
Typical, I wanted to die when I saw it. But not of taste, more of disgust.
but in the end I left it for €40 and for that money I would at least be compensated for the 700 km invested in it. And I could always throw everything away and sell the change (deep down I knew it wasn't going to happen, even though I thought about it several times).
but it is a Chill and in Spain. Needs rescue. A challenge, I like it
 

Attachments

  • IMG_0191.webp
    IMG_0191.webp
    84.8 KB · Views: 84
  • IMG_0295.webp
    IMG_0295.webp
    386.1 KB · Views: 65
  • IMG_0294.webp
    IMG_0294.webp
    263.8 KB · Views: 64
  • IMG_0293.webp
    IMG_0293.webp
    1.1 MB · Views: 60
  • IMG_0292.webp
    IMG_0292.webp
    1.1 MB · Views: 75
  • IMG_0290.webp
    IMG_0290.webp
    1 MB · Views: 70
  • IMG_0262.webp
    IMG_0262.webp
    236.7 KB · Views: 69
  • IMG_0258.webp
    IMG_0258.webp
    679.7 KB · Views: 64
  • IMG_0256.webp
    IMG_0256.webp
    276.2 KB · Views: 69
  • IMG_0254.webp
    IMG_0254.webp
    1.2 MB · Views: 91
Well, where to start. Yes, for the saddle
The saddle!!!!! Not even my children's bikes ever carried something so despicable!!!
Of course, that 25" pure iron seatpost has deformed the fitting, so I put a 27.2" one on it and left it on so it can recover calmly.
The thumbies: I was going to cry, but in the end I laughed weakly
The connecting rods: the exage ones fit, but the left one is Altus!!!
The decals: terrifying. The worst thing is that I don't even have a place to start to replicate them. I'll get it out, it's just one more challenge.
The brakes: installed for the occasion, a generic rubbish that who knows what remote country in the world they were manufactured in, I don't even think they come from China.
Anyway, several scratches, faded and non-existent decals, broken pieces...but I fell in love. It's just a challenge that mainly requires a lot of affection.

The stickers are going to be a problem. I don't even have a place to start creating files to print. The technium ones don't even appear...
If anyone knows where I could get them it would be very helpful.
 

Attachments

  • IMG_0308.webp
    IMG_0308.webp
    526.4 KB · Views: 15
  • IMG_0311.webp
    IMG_0311.webp
    731.5 KB · Views: 15
  • IMG_0315.webp
    IMG_0315.webp
    516.3 KB · Views: 15
As Jack the Ripper said, "let's go in parts."
First disassemble and count
-What's leaving:
Saddle with its seat post, it makes me sick to see it, seriously, it gives me chills. Also, those PVC pipe supplements to adjust it already kill me.
The steering is a shame, a stock Tioga Avenger that has broken the bowl!!! "Really George"...yes really. A cracked Tioga steel bowl. Of course I filled the entire floor with balls, thank goodness there are magnets.
The wiring, bottle cage, the ****** chain and etc etc are already in the trash, I don't even give that to the scrap dealer
The cranks, one exage and one altus...to the trash. I still remove the biopace plates to save more crap that I will never use.
-What remains:
The power is the original. I like the pulley powers, it's a bit awkward but maybe I'll use it or maybe not, I'll see. There is always time to get rid of it.
The handlebar: 1/2 kg of good "error"! That is not thrown away, it is useful for many things (if it is not for the fact that I do not release the power). It also helped me to leverage and loosen the connecting rod bolts. As I said, multiple uses, all except the one for which it was designed: D.
The thumbies and the brakes: there will always be a father looking for parts to repair his son's bike and I can exchange them for something that interests me, I don't know, a book, a 1/43 scale stroller, a coin or anything else that might interest me
The derailleur: same as the brakes
The cassette is a sunrace but it is perfect. It's new. In the end, it remains
-What is used:
The change is in perfect condition.
The Araya VP20 wheels are nothing exceptional but at the end of the day they are the original ones and curiously they are fine.

Well, little more to say, let's get to work.
 

Attachments

  • IMG_0310.webp
    IMG_0310.webp
    724.5 KB · Views: 11
  • IMG_0312.webp
    IMG_0312.webp
    782.3 KB · Views: 11
  • IMG_0313.webp
    IMG_0313.webp
    691.9 KB · Views: 11
The bike has been dismantled well. The power at the cost of God and help, was well held. Thanks to the 1/2 kg handlebar and a special loosener, everything came loose. the connecting rod bolts tightened with a torque. The bottom bracket without problems.
And so I have been able to appreciate several things:
I love the straight fork: Also, as a surprise, you can see an "S" engraved at the beginning and an "ER" at the end...well, we now know who made it, good reference. There is also a "dove" engraved.
The paint is great, full of chips but it is beautiful, in a greenish blue with black/white specks simulating like marble, very early '90s; I was thinking of stripping it and repainting it because I think that in liquid I could do it without going through the typical baking of the powder paint that still took off the tubes, but I wouldn't be able to recover that marble design and the truth is that it has a lot of charm. I hesitate, I don't know what to do.
From the serial number I found out that it is from 1990, that's why I couldn't find any references (I didn't see the exact catalog). Searching for "Raleigh Chill 1990" on the internet, it already appeared. Oh! this little girl is a classic
And since I like to talk to the bicycle, I started doing it while I cleaned it. It has turned out to be a very chatty bike.
I don't know exactly how many owners it has had, but at least 4:
-The original: a Raleigh thermo-glued in the 90s and in Spain!!!!! There's hardly any Raleigh around here. It is clear that someone who knows about bicycles bought it, probably a cyclist who, due to the size, would already have an Alan or Vitus and indulged himself. From the range it is clear that it was to have a more than decent MTB if you spent money because I was barely going to use it. Something very typical of cycle tourists from the '90s, buying an MTB because of the pull of the MTB and the love of cycling that in the end was little used because on Sundays you went out with the road group and for fear of falls
-The son: The stickers placed everywhere that were not part of the decoration (the USA ones on the horizontal and vertical tube, the Raleigh ones on the vertical one in a different tone, etc.) are some kid's thing. but they are placed with love, displaced but with aesthetics, done deliberately seeking to beautify the bike. I imagine the father did not use it and some son took it to enjoy MTB. It is clear that I take care of her. Possibly he was the one who at a given moment dismantled the gears and brakes to install V brakes, which is why the beautiful DX that it should have originally did not exist.
-the penultimate user (surely there were some more in between): at some point it was sold or more possibly given as a gift. Surely the V brakes were removed to use them on another bike and in their place that crap was placed so that it could be used for 2 pesetas. This penultimate user used it for urban trips, completely switching from the bike. I'm just a transportation tool. The vertical scratches on the fork and seatstays are from supporting the bike and tying it against lampposts and benches. They would "mangarize" the saddle and decided to put that piece of crap on with a "fabulous" nut/screw assembly from pure and simple hardware. Also self-locking nut to prevent future theft. Anyway, the maintenance was no longer done by a professional, he would do it himself, because the chain came uncut and fitted with a self-closing, come on, it hung everywhere, someone put it on without having a clue and without giving a damn. There is a nice chain-suck in the right chainstay, that is where the chain must have broken, it must have already had more km than the fugitive's suitcase and of course, the original cassette had to be changed.
-The last one: The one who sold it. I don't know, it would be found in a junkyard or a container. I suppose that the previous user would be fed up with the chain jumping (the normal thing to do with having it long, very long, very long) and would have gotten another one or maybe already a car, Jjjj and he would throw it away.

Out of curiosity I weighed it. Well, it's not a light-retro, but it's pretty cute. And the straight fork, so period, I love it.
 

Attachments

  • IMG_0297.webp
    IMG_0297.webp
    568.1 KB · Views: 24
  • IMG_0301.webp
    IMG_0301.webp
    537 KB · Views: 19
  • IMG_0302.webp
    IMG_0302.webp
    526.2 KB · Views: 17
  • IMG_0303.webp
    IMG_0303.webp
    636 KB · Views: 22
  • IMG_0314.webp
    IMG_0314.webp
    827.2 KB · Views: 22
  • IMG_0316.webp
    IMG_0316.webp
    551 KB · Views: 22
  • IMG_0317.webp
    IMG_0317.webp
    453.4 KB · Views: 23
  • IMG_E0296.webp
    IMG_E0296.webp
    789.9 KB · Views: 25
  • IMG_E0305.webp
    IMG_E0305.webp
    582.2 KB · Views: 28
Last edited:
In the end the frame had too many scratches. Not only was the paint bad, the aluminum was also very scratched, possibly from having attached a chain with a padlock or to tie it in daily use.
So I have decided to strip and sand the steel and polish the aluminum.
It was a lot of work, the aluminum had a very hard layer of polyester varnish and then it was anodized with a truly extraordinary, extremely hard manufacturing. It took a while for everything to come out

I have also decided to remove the package holder threads. That was something we did regularly in the '90s because a "racing" frame looked horrible with those threads that you were never going to use. You also lightened something...I was always curious to know how much real weight was gained: a magnificent 7 grams. WOW!!! now it's a light-classic
I have also eliminated the rivet nut that is used for the fender because I will never use it. I also have M5 rivet nuts, I can put them on if one day I want.
 

Attachments

  • IMG_0423.webp
    IMG_0423.webp
    759.6 KB · Views: 27
  • IMG_1002.webp
    IMG_1002.webp
    874.3 KB · Views: 31
  • IMG_0982.webp
    IMG_0982.webp
    1.2 MB · Views: 29
  • IMG_0975.webp
    IMG_0975.webp
    314.7 KB · Views: 26
  • IMG_0936.webp
    IMG_0936.webp
    282.2 KB · Views: 24
  • IMG_0935.webp
    IMG_0935.webp
    221.6 KB · Views: 25
  • IMG_0940.webp
    IMG_0940.webp
    363.5 KB · Views: 27
The frame has been ready for painting after sanding all the steel well to remove the black layers of the material.
The polished aluminum has been conveniently covered as have the threads.

2 weeks ago I formulated the paint and took it to the painter. It's beautiful!!! It is so pretty that I have decided not to paint the white/black dots characteristic of that year. The painter can do it, but I think it would look better without them. I didn't really like them much either. In a photo you can see the original frame chain on the right and the formulated color painted on the left. It's achieved.
Today I took it to paint and varnish. I'll cross my fingers and wait

By the way, I can't powder paint it because it is thermo-glued and that type of paint needs to be baked. Specifically at 180º...it scares me and I have decided to paint it in liquid + varnish for exterior
 

Attachments

  • IMG_1063.webp
    IMG_1063.webp
    693.5 KB · Views: 32
  • IMG_1064.webp
    IMG_1064.webp
    421.8 KB · Views: 31
  • IMG_1065.webp
    IMG_1065.webp
    617.7 KB · Views: 28
  • IMG_1066.webp
    IMG_1066.webp
    483.2 KB · Views: 30
  • IMG_1068.webp
    IMG_1068.webp
    772.2 KB · Views: 34
  • IMG_0980.webp
    IMG_0980.webp
    480.8 KB · Views: 30
  • IMG_0981.webp
    IMG_0981.webp
    326.5 KB · Views: 32
The frame has been ready for painting after sanding all the steel well to remove the black layers of the material.
The polished aluminum has been conveniently covered as have the threads.

2 weeks ago I formulated the paint and took it to the painter. It's beautiful!!! It is so pretty that I have decided not to paint the white/black dots characteristic of that year. The painter can do it, but I think it would look better without them. I didn't really like them much either. In a photo you can see the original frame chain on the right and the formulated color painted on the left. It's achieved.
Today I took it to paint and varnish. I'll cross my fingers and wait

By the way, I can't powder paint it because it is thermo-glued and that type of paint needs to be baked. Specifically at 180º...it scares me and I have decided to paint it in liquid + varnish for exterior
Thanks for your support
The truth is that I'm excited to rebuild parts for this bike, such as the head set, a Ritchey that I had forgotten about because it was in poor condition. In the end I started working on it and I think it turned out very well. I have already gotten the parts it was missing and the 2 types of bearings it had, although in the process it has lost the lower logo. I don't know if I can do it again, it's just over 3 mm high.
But I will also wear some new pieces because I had several DX ones saved and I have grown quite fond of this little one. I hope it turns out pretty, I'm giving it a lot of love
 

Attachments

  • IMG_0309.webp
    IMG_0309.webp
    877 KB · Views: 11
  • IMG_0377.webp
    IMG_0377.webp
    403.7 KB · Views: 11
  • LFSK5502.webp
    LFSK5502.webp
    469.1 KB · Views: 10
Well, on Thursday they painted it and on Friday they varnished it completely. I picked it up today
I am very happy
Removing the black and whiteheads makes you lose that 90s madness but it is more serious. Much more serious. I like
The stem is the original, and since I had leftover paint I thought it would be curious to give it the same finish. I couldn't help but start to stain it with grease and put on the head set to see how everything turns out.
 

Attachments

  • IMG_1090.webp
    IMG_1090.webp
    164.3 KB · Views: 45
  • IMG_1091.webp
    IMG_1091.webp
    416.2 KB · Views: 44
  • IMG_1107.webp
    IMG_1107.webp
    781.3 KB · Views: 40
  • IMG_1108.webp
    IMG_1108.webp
    690.4 KB · Views: 38
  • IMG_1112.webp
    IMG_1112.webp
    376.1 KB · Views: 43
  • IMG_1115.webp
    IMG_1115.webp
    493.8 KB · Views: 43
Last edited:

Latest posts

Back
Top