Harry Hill's 1954 AS Gillott (Ron Cooper Frame)

Re:

Thank you guys.....

What a journey of discovery and it has been great sharing. I must say, the feedback and contributions made by forum members has been wonderful and touching.

Thank-you

The great things about these vintage bikes is that they have a story. There are riders that peddled and there are artisans that crafted. Different people overlapping with an abundance of stories and memories forged over time and woven into a single bicycle left in the dark and forgotten in a container. It's great to turn on the light, rub down the dust and 'touch time'!

As for the red "Harry Hill" Gillott. I'm still riding it each day although it is in need of period restoration and TLC. I hope to post on the site as and when that starts. Perhaps towards the end of the year or early next.

In the meantime, I need a regular ride to and from work whilst the, "Harry Hill Gillott", is restored. I was planning on picking up an old 80's donor frame that didn't require cosmetic (respray) work and fitting it out with contemporary components. A small project that I could expedite fairly quickly, yet still feel happy in the knowledge that I can 'touch time'

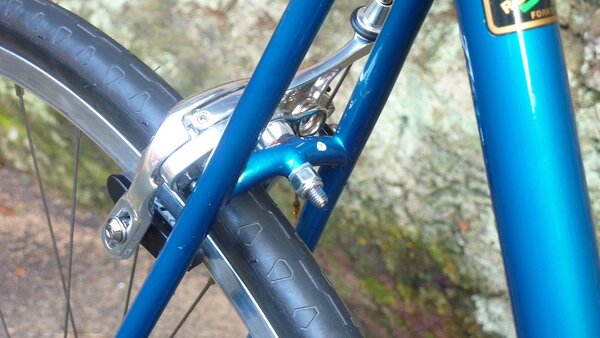
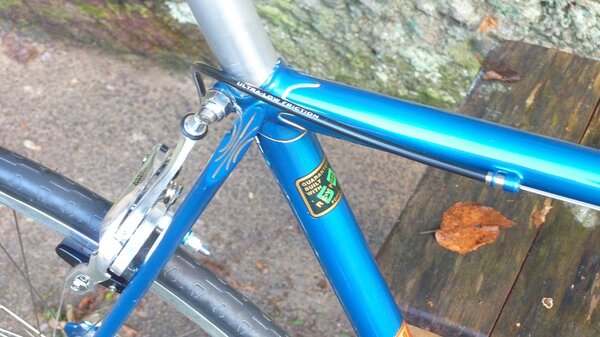
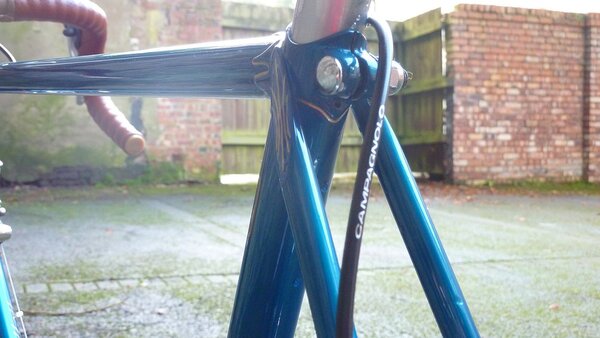
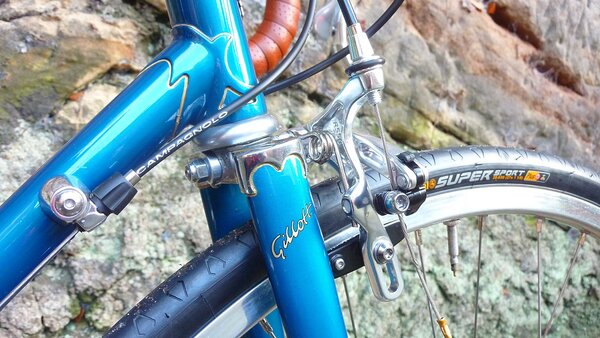
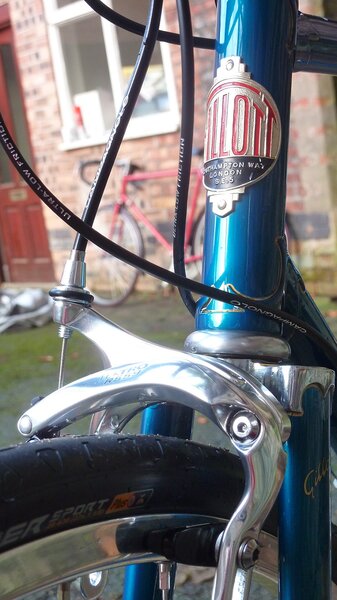
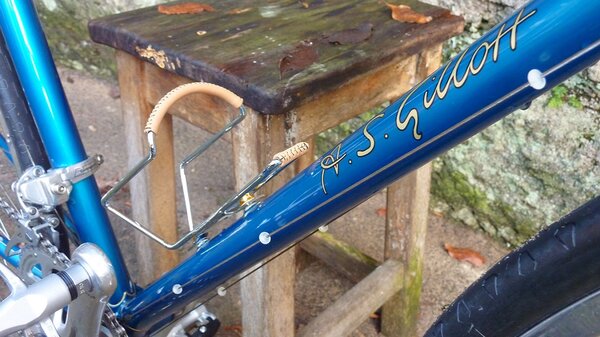
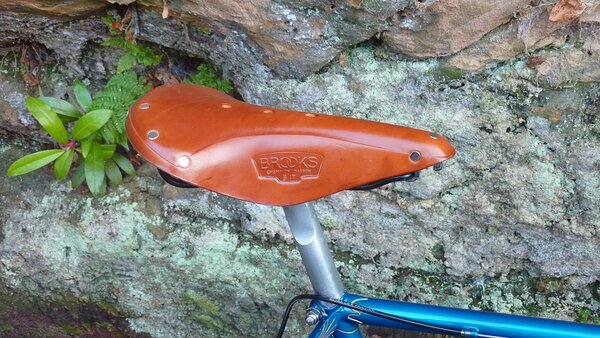
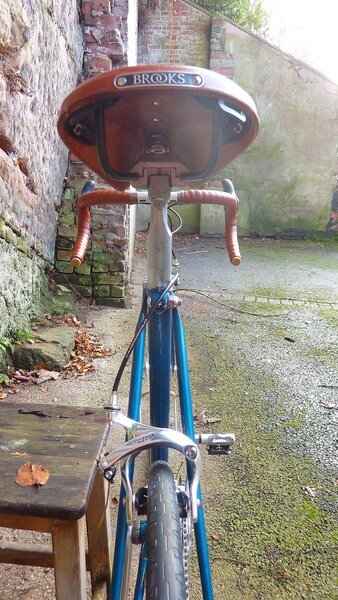
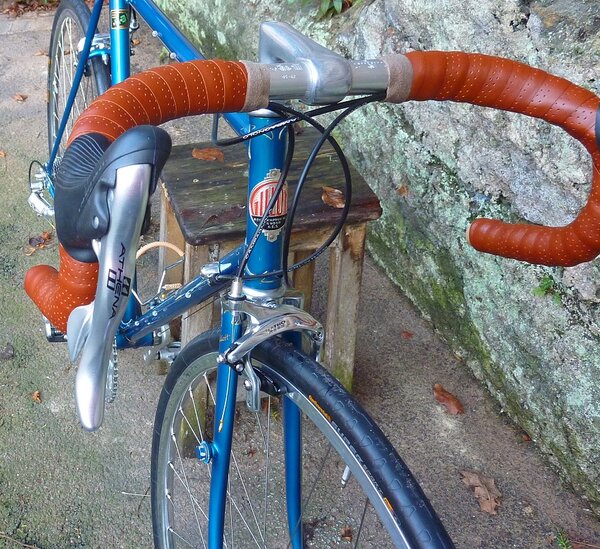
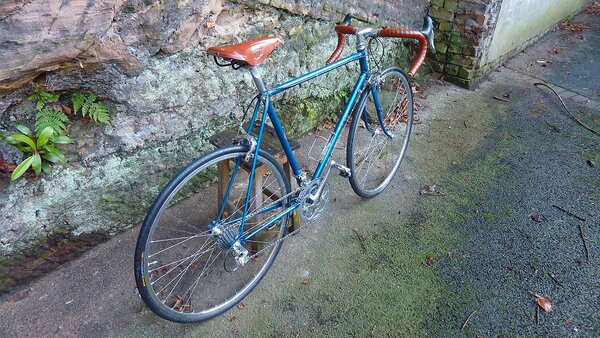
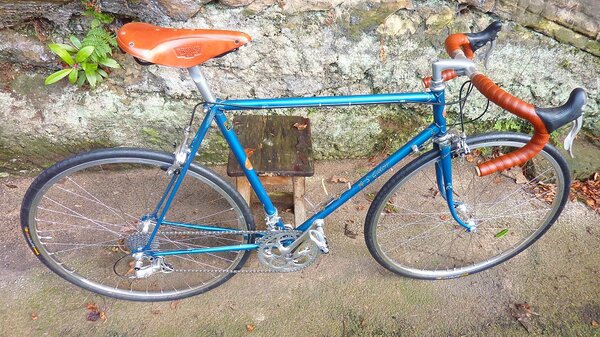
The plan for the 80's donor bike has now been revised.....in part, because I stumbled on this little beauty whilst looking for a Gillott head badge...


...and also because I ended up buying it. So the donor bike is now the "Blue Gillott frame"

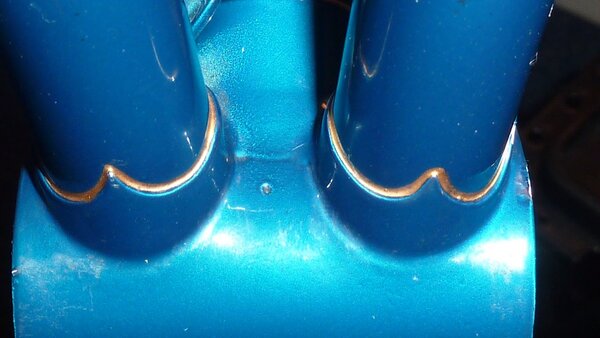
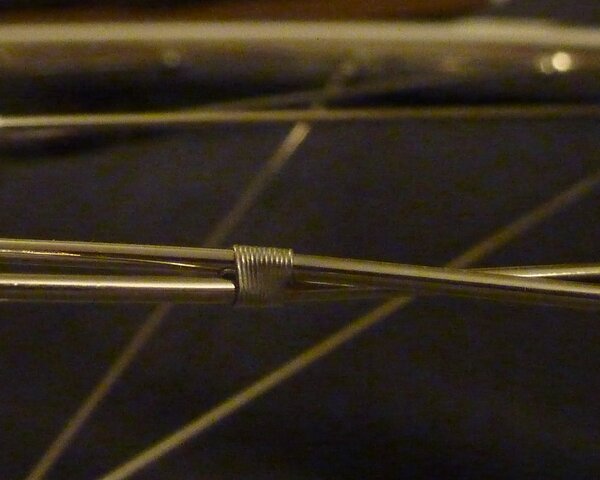
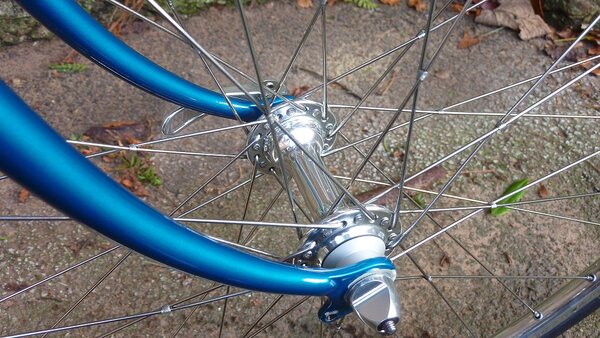
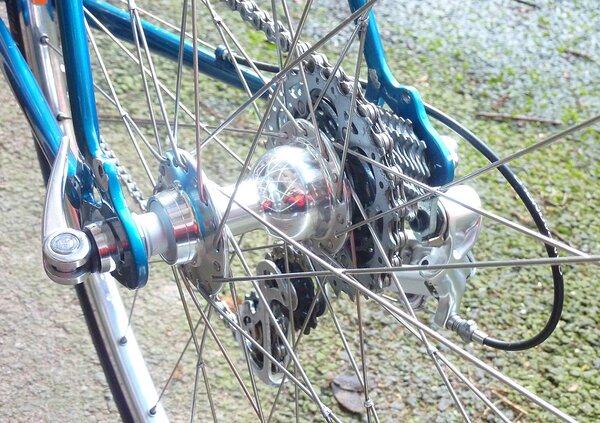
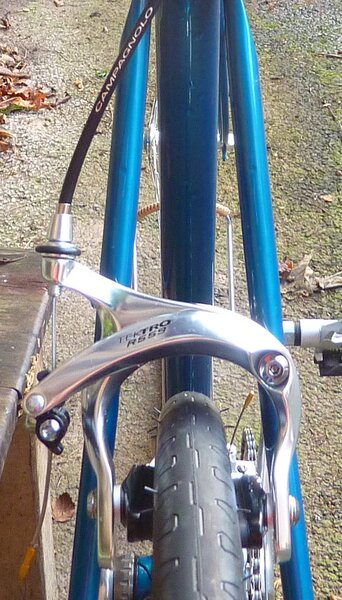
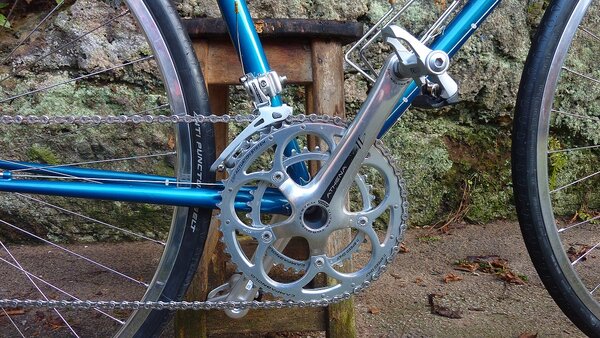
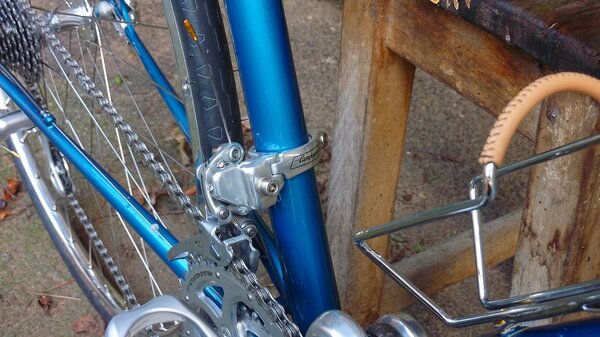
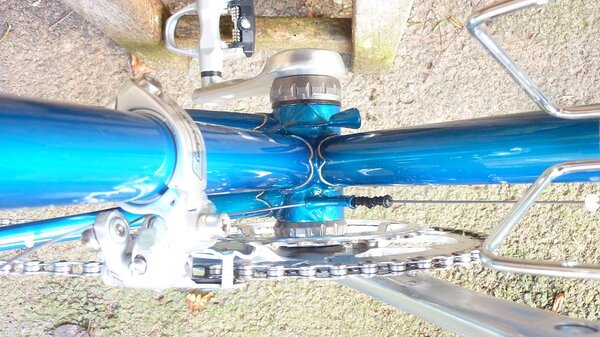
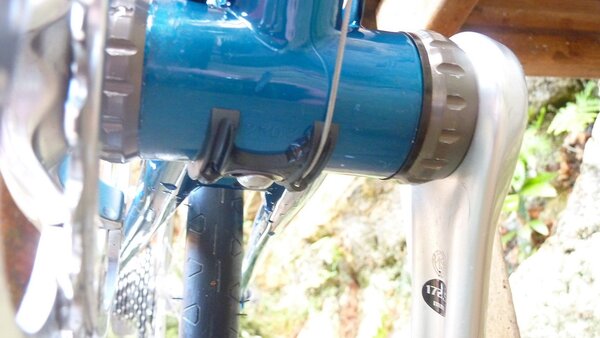
I thought I'd take a punt on the bidding during the last 10 seconds. I was pleasantly surprised to win it for a criminally modest sum. Even more surprised to find that is in FANTASTIC condition. The photographs do NOT do the frame justice. It has been renovated at some point to a very high standard. The frame number on the bottom bracket is 523023. In addition, it also has the Ron Cooper centre punch mark in-between the chain stays.

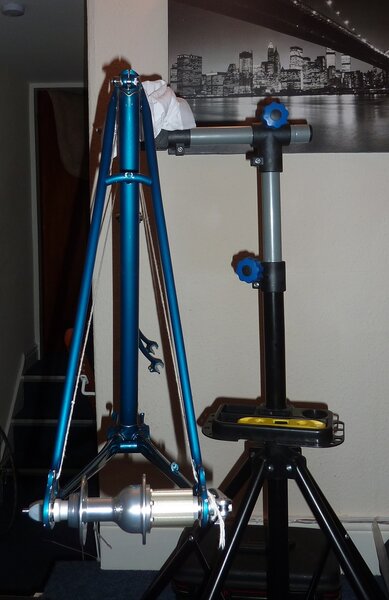
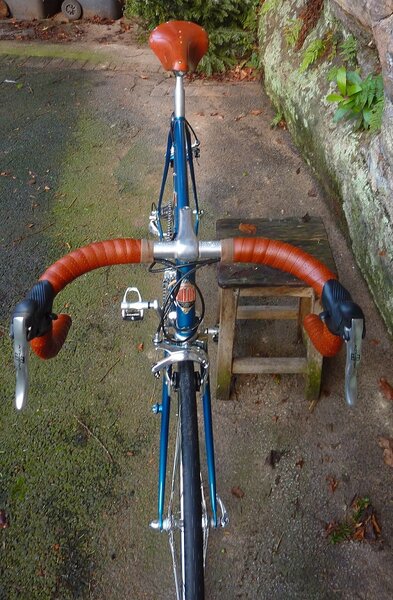
I have it on my frame stand in the living room (Single blokes can get away with such things) and I have spent many an hour cherishing the "Blue Gillott". Alas, I can't find any house numbers and postcodes anywhere so I shall try alternative methods to find a backstory to the frame.

I may buy a lottery ticket this week.

In the meantime... once I have decided on the approach I shall take on the, "Blue Gillott" build, I'll start off a new thread and keep you posted on that build and thereafter the, "Harry Hill Gillott", restoration.

Many thanks for your support, direction, comments and contributions.
Hope you follow the build and restoration threads.

Kind regards

Sand_Dune

p.s. Do I continue the build and restoration threads here? Or do I start a new thread? If so. Where do I start said thread?
 
Last edited:
Re:

Wow!
Another stunning frame, what a great find and clearly found it's way to the perfect home.
The best place for this thread is in the readers rides section. Rather than start a new one for both and separate all this really interesting and enjoyable thread, I can as a mod, just move it complete over to the other section. Just let me know if you want me to do that.
Jamie
 
Blue Gillott Build

Finally completed the Blue Gillott... thought I'd share some build pictures.....

My plan was to take a 1952 Gillott frame and build with modern components whilst attempting to maintain a vintage look...


The single centre punch between the stays; An indicator that the frame was built by Ron Cooper. He would have been 20 years old when he built this frame. 5 years after starting his apprenticeship at A S Gillott.


One of the more daunting tasks was cold setting the frame from 120mm (5 speed) spacing up to 130mm.
My initial approach was using threaded rod nuts and washers. This offers up a decent control in increasing the space but for me one side spread more than the other meaning I had to resort to the traditional lumber and yanking method!

It isn't Rocket Science!


Maintaining frame alignment throughout..using some old string.


Aligning the dropouts to conclude...


To be fair...the methods described are all legitimate and work. The internet does not mention how difficult it is to be reasonably accurate whilst bent double grunting and bouncing on a plank of wood on your living room floor. This whole process took a couple of days to get done. I liberated the plank of wood from around the corner from where I lived...the string I borrowed.

All in all...fairly cost effective.
 

Attachments

  • 2_Ron Cooper Centre Punch.jpg
    2_Ron Cooper Centre Punch.jpg
    72.8 KB · Views: 2,391
  • 3_Cold Setting Rear Stays.jpg
    3_Cold Setting Rear Stays.jpg
    107.4 KB · Views: 2,390
  • 4_Frame Alignment.jpg
    4_Frame Alignment.jpg
    144.2 KB · Views: 2,390
  • 5_Dropout adjustment.jpg
    5_Dropout adjustment.jpg
    171.8 KB · Views: 2,391
Last edited:
Blue Gillott build - wheels

I made the decision to build the wheels up myself. I felt it was something I should do.

I decided to go with old school 27 x 1/4 inch 630 rims from Velo Orange.
I guess in part to maintain a vintage "old school" spec although in the future I would be looking to go more standard size given the lack of choice in 27" rims.
Spokes were DT Swiss revolution and the hubs were budget in the form of Novatec...
...as a throwback to old I felt the need to tie the spokes. I will be honest here. The real reason I wanted to tie the spokes is that it looks great. :oops:

Here's the assembled front wheel with ties in place.


and a close up of a tie...


Other than the attractive low cost of the hubs the old and shiny Campagnolo feel to the hubs were the main attraction.
They do look very pretty in situ with ties in place!


and the rear hub...


The wheel building piece was quite the roller coaster. It is NOT easy. I chased perfection and failed to many times to mention.
Experience is a harsh mistress. I got there in the end (took around 10 evenings) and jabbing hot needles into my eyes. True round and dished....eventually.
Once the penny had dropped the process became more straightforward, although it is a skill and needs to be learnt. It's also very therapeutic once you get the hang of it too!
 

Attachments

  • 6_wheel assembly front hub.jpg
    6_wheel assembly front hub.jpg
    249.7 KB · Views: 2,388
  • 7_Spoke Tie.jpg
    7_Spoke Tie.jpg
    121.9 KB · Views: 2,388
  • 8_Front hub in situ.jpg
    8_Front hub in situ.jpg
    147.7 KB · Views: 2,388
  • 9_Rear hub in situ.jpg
    9_Rear hub in situ.jpg
    229.9 KB · Views: 2,388
Blue Gillot build

I had decided on a Campagnolo groupset for the build. However given the nuances of vintage frames they do not accommodate short drop brakes. So I needed to source a pair of brake calipers that offered up a long reach not only for the 27" 1/4 630mm BSD rims but for later 622mm BSD rims (700c) rims.

A few are on the market. I opted for the Tektro long reach calipers. They were very cost attractive, have a nice look about them and come with the option of bolt retention versus recessed nut.


Worth taking a closer look at the elegant rear brake bridge. Even if I had wanted to, recessing the nut just wouldn't work.


And another angle of the rear brake caliper with a view of the super lugwork on the Gillotts. A nice paint job too.


and another of the seat lug....because they do not make them like this anymore.


Front brakes... this next photo is my favourite picture of the entire build. Just so much to say about it. A picture paints a thousand words...


The front caliper from the front quarter with the blurry Red Gillott frame of Harry Hill in the background.


Having ridden the bike. I'm VERY impressed with these brakes; excellent stopping power, very easy to set-up, quick release and shiny.
 

Attachments

  • 10_Rear Tektro brake caliper.jpg
    10_Rear Tektro brake caliper.jpg
    257.3 KB · Views: 2,385
  • 11_Rear brake and bridge.jpg
    11_Rear brake and bridge.jpg
    124.4 KB · Views: 2,384
  • 12_Rear brake and seat lug.jpg
    12_Rear brake and seat lug.jpg
    159.4 KB · Views: 2,383
  • 13_Seat lug.jpg
    13_Seat lug.jpg
    136.8 KB · Views: 2,384
  • 14_Front Brake Caliper.jpg
    14_Front Brake Caliper.jpg
    180.2 KB · Views: 2,385
  • 15_Front Brake Caliper with Harry Hills Red Gillott to the rear.jpg
    15_Front Brake Caliper with Harry Hills Red Gillott to the rear.jpg
    195.6 KB · Views: 2,385
Blue Gillott build

Onto the Groupset...

My original choice for the groupset was going to be the Veloce. Ideally a used groupset that I could get at a bargain price. Whilst I had sourced the wheel components new and also the brakes new. Spending brand new for a groupset is out of my reach.

I spent many weeks on ebay and on RetroBike looking for the right groupset, in the right finish at the right spec and in the right condition to come up.

My patience paid off when an excellent Athena 11 speed Ultra torque groupset came up at a very reasonable price...

I purchased a brand new Campag cable and conduit set to make it whole.

The 'rear end' does present some problems that require solving...
The frame did not have a rear mech hanger I had to source one that "looked" about right. With some modification to it and the drilling and tapping of the frame to mount it it works well. Also worth mentioning is the very tight clearance required between the dropout and the small 11 sprocket. It is very tight there. (good job I aligned those dropouts early doors.) I was also fortunate that the groupset came with an 11 sprocket. any bigger, i.e. a 12 sprocket and I would have rubbing on the frame. As it stands the chain rubs "ever so slightly" on the seat stay on the smallest rear sprocket. Not a big problem in the short term.

My plan to negate this will be to add a 1mm washer to the rear hub and re-dish the wheel. I shall certainly do this when I build my next set of 622mm BSD 700 wheels for this bike. When I get time, I'll modify this on the current set of 27" wheels. It is a worthy point of note for others attempting a build of this type.


When setting the indexing up on the bike. The whole powershift thing looks great albeit I have never ridden anything other than a bike with shifters on the uptube. on my first test ride, it took a period to adjust but I can say this is ABSOLUTELY the way forward. It's a dream!

I wanted and got the compact with 172.5mm cranks... Just love the ease of assembly and feel of this modern chainset. Fantastic.


The front mech posed a few small problems...

1. You need a clamp to attach a braze on front mech.
2. Getting a silver Campagnolo clamp is tough! Everything is black!
3. Shims are required to accomodate the narrow 531 tubing of yesteryear.
4. It's a bitch to set up!


The bottom bracket (love the lugwork and guides and paintwork).
Take note of the 2mm spacer on the LH BB cups.
These old frames have a 66mm spacing and that is too narrow for Campagnolo, hence the spacer. An easy fix.

I used the brazed on guide for the cable routing of the rear mech and also put the bellows there to try and keep out some of the spray from the front wheel.

I did consider using conduit down there but the guides are too narrow... it works a treat anyways...


I did try and use the original guide for the front mech. Alas the angles were too tight and you could feel the difference through the powershift levers. I had to resort to using a modern cable guide and resort to another drilled and tapped hole in the bottom bracket.
 

Attachments

  • 16_Rear mech and hangar.jpg
    16_Rear mech and hangar.jpg
    190.9 KB · Views: 2,385
  • 17_Compact Chainset.jpg
    17_Compact Chainset.jpg
    223.4 KB · Views: 2,385
  • 18_Front mech clamp and spacers.jpg
    18_Front mech clamp and spacers.jpg
    185.1 KB · Views: 2,385
  • 19_BB Assembly and cable routing.jpg
    19_BB Assembly and cable routing.jpg
    215.4 KB · Views: 2,384
  • 20_Campag cable guide front mech.jpg
    20_Campag cable guide front mech.jpg
    118.6 KB · Views: 2,384
Blue Gillott build

Finishing parts and pieces....

Stainless cage with leather bits. looks nice and vintage. Gold coloured bolts to match the detailing on the paintwork. Another nice photo too!


Handlebars...only one choice really Cinelli Criterium bars (ebay) along with a cheap system Ex quill stem (new). Leather handlebar wrap and underneath all of that is some gel pads to make for a comfy ride.


Cinelli Crit bars....


The obligatory Brooks B17 saddle...


Since 1866
 

Attachments

  • 21_Finishing pieces bottle cage.jpg
    21_Finishing pieces bottle cage.jpg
    170.6 KB · Views: 2,384
  • 22_Finishing pieces Cinelli crit bars and leather tape.jpg
    22_Finishing pieces Cinelli crit bars and leather tape.jpg
    211.4 KB · Views: 2,384
  • 23_Finishing pieces Cinelli crit bars.jpg
    23_Finishing pieces Cinelli crit bars.jpg
    171.3 KB · Views: 2,385
  • 24_Brooks B17 Saddle.jpg
    24_Brooks B17 Saddle.jpg
    211.4 KB · Views: 2,384
  • 25_Brooks since 1866.jpg
    25_Brooks since 1866.jpg
    261.7 KB · Views: 2,385
Blue Gillott build

Three final pictures of the finished article.
I'm afraid to say the light wasn't at its best in my man cave courtyard. Will try and do better next time.


Final build weight is 10.8kg or 24lbs in old money.
All in final cost well under £1k. (need to do a final tot up) Edit (actually just over) see later post


Hope you enjoy the build thread.

Regards

Sand Dune
 

Attachments

  • 26_Front.jpg
    26_Front.jpg
    228 KB · Views: 2,386
  • 27_Rear Quarter.jpg
    27_Rear Quarter.jpg
    244.6 KB · Views: 2,386
  • 28_Side.jpg
    28_Side.jpg
    214.3 KB · Views: 2,386
Hi Sand Dune
What a great thread and what a beautiful build you have put together. Great job with the wheels.
It is a credit to your attention to detail that while it has up to date modern parts throughout it still has the look of a classic machine.
Photos are great as well and really show it off. A job very well done.
If you want me to lift the thread complete and move to readers rides, just let me know. Just so it doesn't get pushed down the order and lost here in the main thread.

Jamie
 
Thanks again, Sand Dune, for a great thread. It was nice to re-read it. Excellent work on the blue Gillot, and looking forward to further proceedings with the red one. :thumb:!
 
Back
Top