Droch Stàilinn. Attempt to save a scottie.

True, the STI is a ball ache - forced to stock up on them too. Went on a stupid buying spree about 3 years ago now.

No way will I pay stupid NOS prices in the future. Today it probably makes more economical sense to buy a 10 year old completely out of fashion low mile road bike just for the parts. Without going to Dura-Ace level, there is still a good chance everything is cable driven.
 
Good idea to stock up.
We'll be riding mickey's 6x2 bar ends in friction mode soon I think.
However, I must praise the Microshift STIs - come in 7x3, 8x3, 9x3, don't cost an arm and a leg and perform quite well.

I do prefer the Campy shape though. 😍

Here's the fork crown. In particular, the opening between the steerer and the crown (where the crown pulled away from centre) is flashing red light warnings at me. The other pic is the ds side where the crown has bent inside and you can see some steel ripples.
 

Attachments

  • PXL_20220820_170653400.jpg
    PXL_20220820_170653400.jpg
    208 KB · Views: 25
  • PXL_20220820_170724348.MP.jpg
    PXL_20220820_170724348.MP.jpg
    215.1 KB · Views: 25
That bike as been on the unfortunate end of a massive side impact. To deform a cast crown like that requires some force.
 
Still a mystery why the blades and the steerer are straight...

It all moves in strange mysterious ways...... a bit like a head on collision where you see the wheel perfectly survives but the forks and frame are utterly mangled.
 
see the wheel perfectly survives

That's easy to explain - the wheel is designed to take a hit from any direction (it's round and it spins) while the frame and forks are designed to be stiff in some directions but not others.
A bit like a cf mtb that will take your body weight on drops, but if you put it on its side and step on the rear triangle, it will crack.
 
Waiting for a clamp to try and remove the dent. After that I'll need to make a decision on what to do with this old timer.

Option 1: Bend the fork back, spray paint, and use it on sunny days for family rides to a local cafe.
Option 2: Get the fork done professionally, get the bottom bracket replaced & get the braze-ons done professionally, then send for painting and use as my main bike.

Knowing my luck with option 2, I'll get a crack on one on the stays or on the seat tube soon after the bike is built and will be looking at throwing a few more hundred £ to chase after ~£500 invested to get the bike into top condition.

This leaves Option 3: get the fork done professionally, try to do the braze-ons myself, get it painted and ride it to see if anything else cracks. If anything cracks, I only lose the price of the paint job and I can then decide whether to scrap it or get it rebuilt in a shop.

Will put a pin in this one until I get the clamps.
 
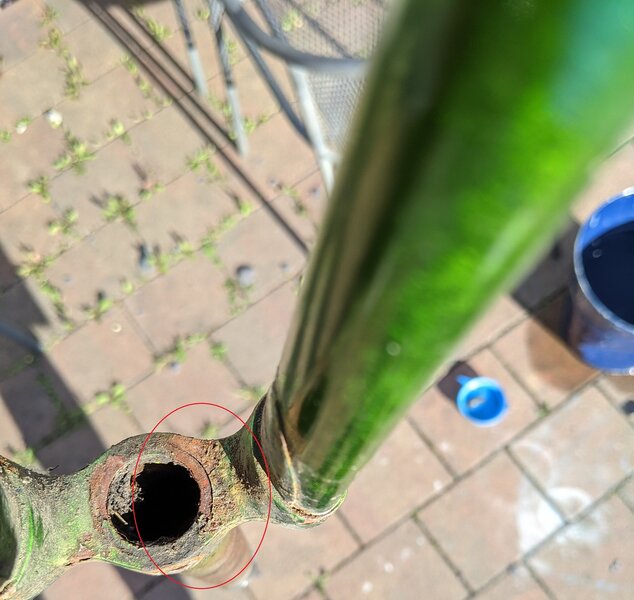
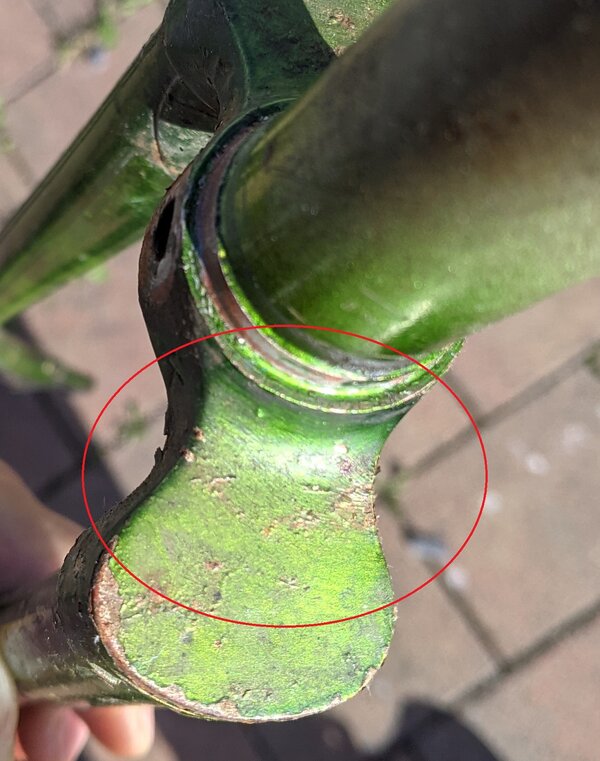
Start with option one, start out with a used straight fork at first. Build it up using this alternate used fork. Use as much of your stash or used parts as you can find to see what has to be modified. After you figure out how to build it and all the components work together ride it. Work out bugs, ride it some more, until da bugs is gone. Then straighten the fork, ride it, work out bugs. If it works and you like it, upgrade to new parts. I would strip one of my road bikes for parts to try, then reassemble the donor after the bugs disappear. If you like it and it runs straight move to option two. Buy new parts. I did this with old used parts and it told me a lot about the frame, does it ride straight, no hands? Does the replacement fork sit inline with the frame? Does the fork spin freely without binding? Then I had a frame maker replace two tubes, brazed in the small part of the dents I couldn’t remove, put on new drops and did a track frame alignment. He also spread the frame. Check around for prices, the guy I used charged less for everything than a track alignment at some other frame makers shops. Go slow, but once you figure the frame is salvageable and you have your parts working and get the frame back, it should go fast. I would assemble it again after I get it back from the frame maker and ride it to make sure it’s okay. Then disassemble and send out for paint. Paint is expensive, my quotes for paint from bicycle frame painting shops were higher than the frame repair. I had it powder coated which cost $100 USD. Frame painting was around $600 here in the States. My vintage Triumph motorcycle tank paint job, in original colors and pin striping, cost $800.
 
Last edited:
^ Pro-high-class-wrencher advice from @Nabeaquam

Said it early on concerning your other build Francine. Don't throw money at a bike until you know it will be worth it.

The moment you move to the decision to make a rider out of an old wreck, you've got to remain a bit level headed and completely dismiss all ideas you can re-create something as it left the factory all those years ago. It's fantasy thinking, even with deep pockets.
 

Latest posts

Back
Top