Complete rebuild of 1990's MTB to 2016 XT spec 1x10

Hi k-rod

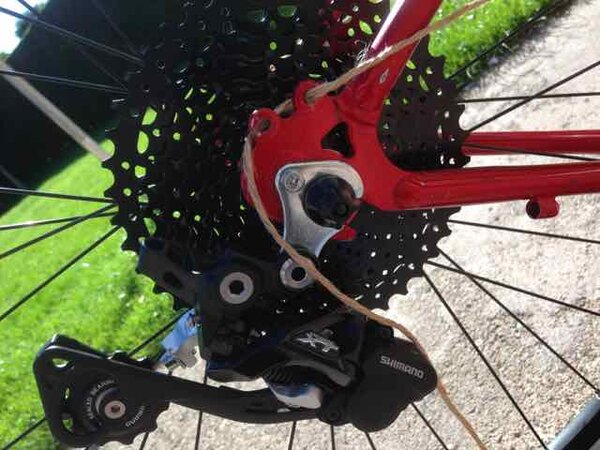
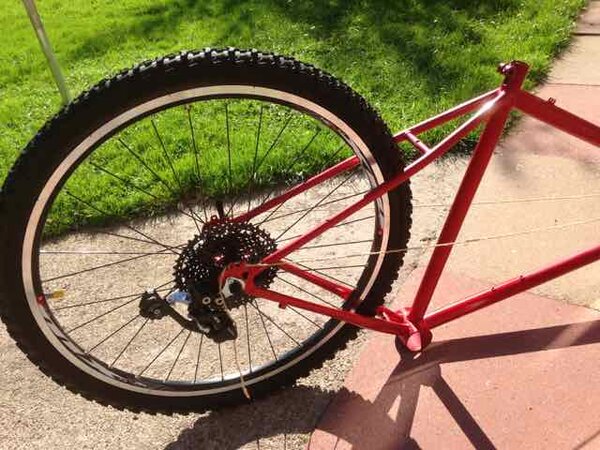
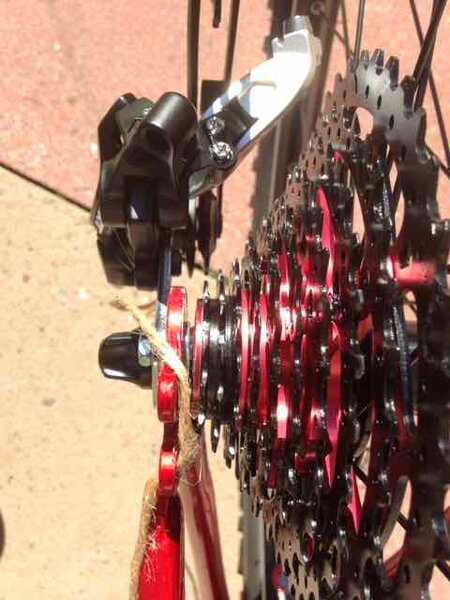
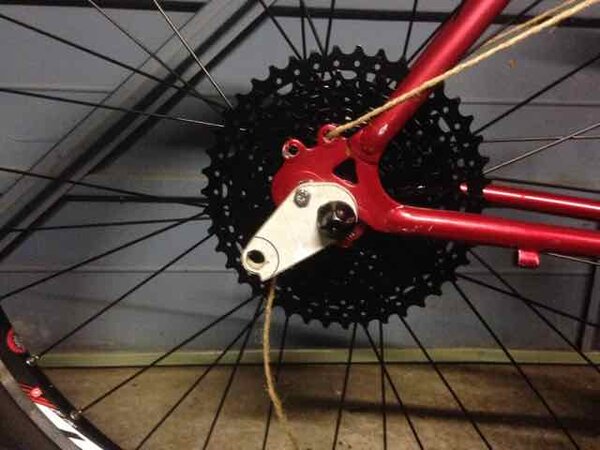
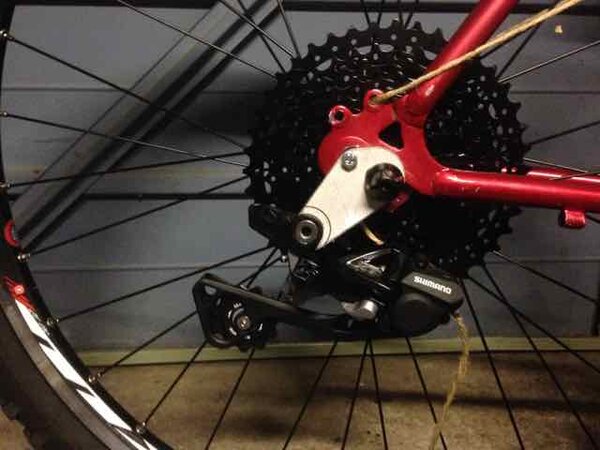
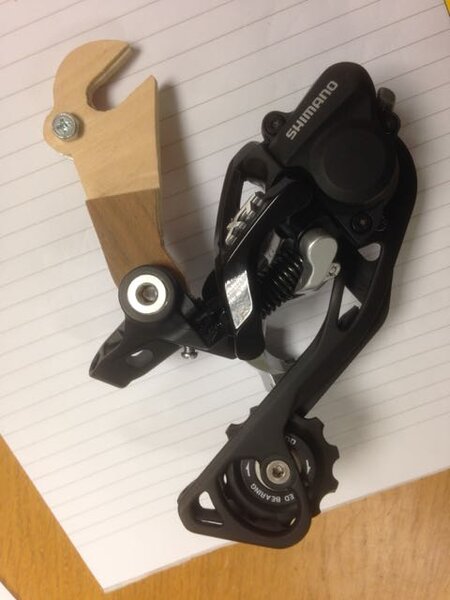
I have to admit that the difference in size between the original 5 speed freewheel and the new 10 speed 11t - 42t cassette was quite shocking!

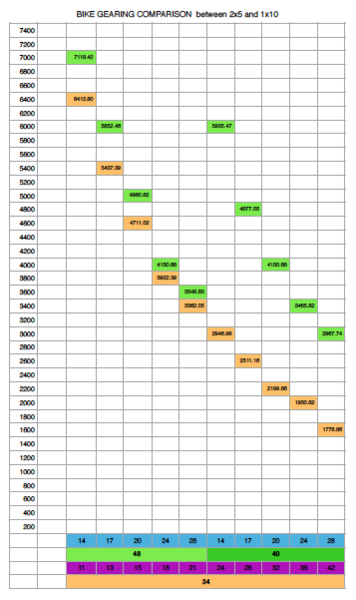
Over the weekend I will be working out my gear gain ratios to establish what size chain wheel to install on my 1x10 set up. I will also be working this out for the original 2x5 format so I compare the effect. I will post results soon.
 
During my lunch hour today I worked out the gain ratios for my bikes original 2x5 gear set followed by the gain ratios for the 1x10 set up I am looking at building with a 11t-42t cassette with 34t chain wheel. It is quite interesting that I will actually gain a greater variety of gears that will be simpler to use than the 2x5 range offers. As a new rider the 34t chain wheel produces at great range of low gears for climbing while the high gears are not massively behind the 2x5.

During researching chain wheels I came across oval chain wheels and those of a manufacturer called Absolute Black. I like their narrow wide design and the reviews are good so I have taken the plunge and ordered a 34t together with a shimano Deore M590 chainset to take apart and make my 1x chainset. At this time I have also ordered a Shimano hollow tech XTRBB93 bottom bracket as its external dimensions will fit really neatly between the USA to Euro BB adaptor.

Weighed some of the new components today and the comparisons are below:

Original steel rear rim = 1740g
New rear Shimano Deore hub on Mach 1 MX aluminium rim = 1095g

Original 5 speed freewheel = 394g
Original freewheel plastic guard = 26g
New Sunrace MX3 10speed 11-42 cassette = 400g
 

Attachments

  • Screen Shot 2017-03-17 at 18.39.07.png
    Screen Shot 2017-03-17 at 18.39.07.png
    37.1 KB · Views: 522
Over the weekend I intend to cut away the unused gear end stops for the front derailleur and clean up the frame welding before sanding back the paint so the frame will be ready to start painting some point next week. I plan to prepare the frame myself and with the help of a friend to spray the frame and the brake components with primer, followed by a 2k colour and finally finished off with 2k gloss lacquer.

Luckily at work with have a full paint workshop with spray gun and extraction together with heaters so this will help. I am looking forward to the spraying as I have never done this before and presents an interesting challenge.

I view of this I have been looking at colours over the last month while contemplating this rebuild and it eventually came to two VW colours, Flash Red or Night Blue Metallic. After much consideration I have decided to go with the Night Blue Metallic as the VW garage have a Golf GTE in the showroom and it looked stunning. I feel that this colour will look modern and provide clean lines while complimenting the older style of the bike frame.

Colour samples can be seen below:
 

Attachments

  • IMG_3156.jpg
    IMG_3156.jpg
    15.4 KB · Views: 512
  • IMG_3157.jpg
    IMG_3157.jpg
    13.8 KB · Views: 512
  • IMG_3158.jpg
    IMG_3158.jpg
    23.4 KB · Views: 512
Hi All

Busy weekend but managed to get a day in on the bike build. I was able to test fit the rear derailleur on the traditional hanger and verify that the even though it was a long arm version the arm was going to not provide enough clearance for the sunrace 11t-42t rear cassette. I worked out the geometry issues and geometry changes I wished to make to the traditional mount position and make a wooden prototype.

The first prototype worked well in repositioning the derailleur and removing the B2 link however it did not provide enough clearance to remove the extreme position on the B screw. After a revisit of my geometry and the making of a second prototype this one worked much better. The derailleur position was much improved and the long arm moves beautifully down and along the cassette with ease and no adjustment required on the B screw position except for just adjusting the basic travel stops.

I intend to have my new hanger constructed from 316 marine grade stainless steel so no finish will be required to keep it in tip top condition.

Once happy with this position I moved onto removing the two end stops for the front derailleur as these will be unnecessary on the finished bike. As I wanted the frame to look as factory as possible I heated up the end stop fittings that had been brazed on so it was far easier to remove. Once gone I sanded back the area to achieve a super smooth finish. At the same time I rubbed the frame down with 1000 grade grit paper to remove as many marks as possible and smooth off the welds I had filed snots from so everything looks as tidy as possible.

Photos below of works so far!
 

Attachments

  • IMG_3113.jpg
    IMG_3113.jpg
    33.4 KB · Views: 474
  • IMG_3114.jpg
    IMG_3114.jpg
    36.2 KB · Views: 474
  • IMG_3115.jpg
    IMG_3115.jpg
    31 KB · Views: 475
  • IMG_3125.jpg
    IMG_3125.jpg
    25.5 KB · Views: 475
  • IMG_3126.jpg
    IMG_3126.jpg
    25.6 KB · Views: 475
  • IMG_3162.jpg
    IMG_3162.jpg
    25 KB · Views: 475
  • IMG_3163.jpg
    IMG_3163.jpg
    29.1 KB · Views: 475
  • IMG_3166.jpg
    IMG_3166.jpg
    19.4 KB · Views: 475
Further images
 

Attachments

  • IMG_3167.jpg
    IMG_3167.jpg
    30.8 KB · Views: 472
  • IMG_3185.jpg
    IMG_3185.jpg
    23.2 KB · Views: 472
  • IMG_3186.jpg
    IMG_3186.jpg
    17.6 KB · Views: 472
  • IMG_3193.jpg
    IMG_3193.jpg
    20.6 KB · Views: 472
  • IMG_3194.jpg
    IMG_3194.jpg
    19 KB · Views: 472
  • IMG_3195.jpg
    IMG_3195.jpg
    21.6 KB · Views: 472
  • IMG_3196.jpg
    IMG_3196.jpg
    18.3 KB · Views: 472
  • IMG_3197.jpg
    IMG_3197.jpg
    18.3 KB · Views: 472
I am particularly keen to use my own design of derailleur hanger for two reasons really.

1, I don't like the look to the traditional hanger together with the B2 Link and then I might need a further extension link because of the 11t-42t I am using. I have attached some images of the traditional hanger with B2 link attached.

2, I feel that as i have a pretty good understanding of engineering I can design at much simpler and more attractive solution to the 11t-42t rear cassette problem. My design will require the purchase of two chains as I am adding a couple of links within the geometry to ease the amount of travel the derailleur will need to make. This will help to correct the possible accelerated chain/gear wear that people on the internet seem to be experiencing.
 

Attachments

  • IMG_3844.jpg
    IMG_3844.jpg
    19.3 KB · Views: 470
  • IMG_3843.jpg
    IMG_3843.jpg
    21 KB · Views: 470
  • IMG_3842.jpg
    IMG_3842.jpg
    21.5 KB · Views: 470
All I can say is that this the most eccentric and technically ambitious retro mod bike project I've pretty much ever seen.

I like it!
 
Hi Narcotitian

Thanks for the support. While I have only just learnt to ride the science of bikes have always interested me. This is my opportunity now to put some ideas into practice!
 
So this evening I thought I would start putting my new 1x chain wheel together as the parts arrived over the weekend. With the triple chain wheel taken apart with an allen key I positioned my new Absolute Black 34t oval chain ring with the arrow correctly and started putting in the bolt caps together with the bolts. It quickly became apparent that the bolts would not tighten up as the single chain ring is thinner than the original chain ring the spider was bolted onto.

After some cursing and looking on the internet I found it is recommended to purchase short bolts for this job, but they are very expensive for what they are!!

As a result I decided to use a 1.2mm stainless steel washer on the back of the chain wheel. They centred brilliantly and come no where near the teeth of the chain wheel. Once positioned I passed the bolt caps through from the back and torqued up the bolts using the special bolt tool I brought when I ordered these parts online.

Really happy with the results and will be packing this finished part away for now, ready for the rebuild.

Next jobs are to start painting the frame and stripping down the brakes so they can be prepped and painted at the same time. After consideration I have decided to paint the frame and brake components in Night Blue Metallic.

Images below:
 

Attachments

  • IMG_3534.jpg
    IMG_3534.jpg
    39.6 KB · Views: 445
  • IMG_3535.jpg
    IMG_3535.jpg
    39.9 KB · Views: 445
  • IMG_3536.jpg
    IMG_3536.jpg
    40.1 KB · Views: 445
  • IMG_3538.jpg
    IMG_3538.jpg
    29.2 KB · Views: 445
  • IMG_3540.jpg
    IMG_3540.jpg
    34.9 KB · Views: 445
  • IMG_3541.jpg
    IMG_3541.jpg
    26.6 KB · Views: 445
  • IMG_3542.jpg
    IMG_3542.jpg
    30.1 KB · Views: 445
  • IMG_3543.jpg
    IMG_3543.jpg
    35.2 KB · Views: 445
Sorry going slightly out of order, I also made prototype derailleur hanger number 3 during lunch today. Last night I slightly reworked my geometry to allow the derailleur to sit slightly lower relative to the 42t low gear.

The offset of the bracket has also worked really well on this prototype so pleased with that. The plan now is to design how the new hanger will actually look and ask a friend to turn it into a computer model/file for me so I can send it off to be water jet cut from 12mm 316 stainless steel. However I will hold off hitting the button on this until the frame painting and main assemblies are finished as I what to try moving through the 10 gears below committing.

More on this at a later stage, but I have attached some images of work so far...
 

Attachments

  • IMG_3593.jpg
    IMG_3593.jpg
    38.4 KB · Views: 439
  • IMG_3600.jpg
    IMG_3600.jpg
    33.9 KB · Views: 438
  • IMG_3601.jpg
    IMG_3601.jpg
    38.8 KB · Views: 438
  • IMG_3602.jpg
    IMG_3602.jpg
    46.3 KB · Views: 438
  • IMG_3603.jpg
    IMG_3603.jpg
    25.2 KB · Views: 438
  • IMG_3605.jpg
    IMG_3605.jpg
    22.7 KB · Views: 438
  • IMG_3606.jpg
    IMG_3606.jpg
    34 KB · Views: 439
  • IMG_3608.jpg
    IMG_3608.jpg
    30.4 KB · Views: 433

Latest posts

Back
Top