Raleigh Competition 1985 Build

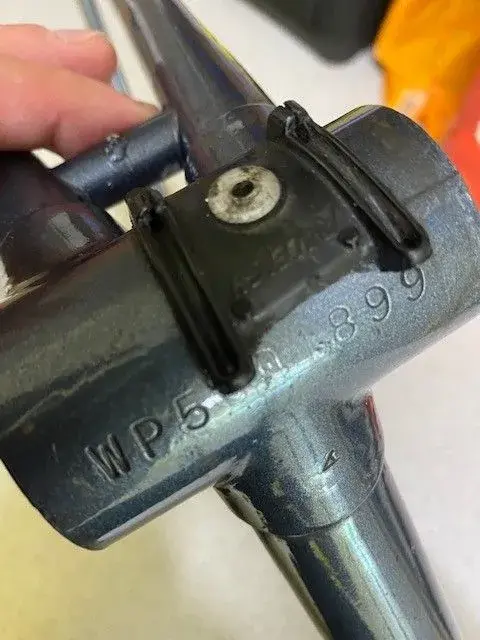
Checked the frame number also - looks like WP5001899, which would make this a November 1985 frame, so actually the same production year as my other bike, but the next 'Model Year' in terms of design/tube set/colour etc.

Anyone know what the original spec would have been, or have a Raleigh 1986 model year catalogue?

The spec that I've seen and put up the picture of earlier in the thread for this frame is 1987 and has Shimano 105 group set, but I think these early ones actually came with Shimano 600 parts as I've seen a couple of complete bikes with these earlier components, not 105 stuff. I can't find a catalogue/spec anywhere that shows this though - it maybe that they just used up what was on hand from the previous year specs on the first of this model years frames?
 

Attachments

  • Comp Frame 5.jpg
    Comp Frame 5.jpg
    51 KB · Views: 4
Taken delivery of first parts for this - got some decent condition 1055 STI levers, few small scrapes but overall pretty good nick for 30 years old, and should match the colour scheme of the frame quite nicely.
 

Attachments

  • 105 Shifters.jpg
    105 Shifters.jpg
    507.8 KB · Views: 2
Not updated for a while, not much progress on either bike at the moment, spent the summer riding the built one.

Did a weekend in the Cotswolds and did just over 200km in a couple of days, kept up with another 4 friends on Ali and Carbon bikes no problem (may have more to do with the riders than the bikes admittedly!) and rode nicely for 3 days, no issues other than the headset needed tightening up a couple of times - seems to vibrate loose on rough roads - is this a normal thing with older style threaded headsets? Any fixes - thread-lock maybe?

Only other issue I had was picking up several punctures - rear wheel only so far. Now i think this may be tyre related - I decided to go for Panaracer Race C Evo 4 Classics for their vintage looks - nice tan walls with classic looking diamond file/chevron tread pattern. They ride really nicely and are pretty lightweight, but the tread area is noticeably thin, and have picked up several sharp flint/glass shards that have just gone straight through. Although there is supposed to be a puncture strip in them, they don't seem particularly robust, so have decided to try something else for comparison.

I still wanted tan walls, and managed to pick up a pair of barley used Continental GP5000 Tour editions, which I'm hoping will both look the part, and perform a bit better - swapped them over at the weekend...
 

Attachments

  • Rear Wheel_ContiGP5000.jpg
    Rear Wheel_ContiGP5000.jpg
    100.3 KB · Views: 10
Re: the headset coming loose, I had a similar issue after installing a new one on a build. The issue turned out to be that even though it seemed like I was tightening the top nut enough, in fact it needed a small 1mm spacer on the steerer to properly tighten it. So that could be it. Might be worth trying, as it's luckily a very easy fix - if that is the problem.
 
Re: the headset coming loose, I had a similar issue after installing a new one on a build. The issue turned out to be that even though it seemed like I was tightening the top nut enough, in fact it needed a small 1mm spacer on the steerer to properly tighten it. So that could be it. Might be worth trying, as it's luckily a very easy fix - if that is the problem.
Yep I have a spacer washer in, looks to all be correctly spaced and the top nut is not held off by the top of the steerer - i.e. it's pinching up on the spacer washer not bottoming out on the threads on the steerer first which I've had before - i think more than anything it was just some fairly rough/broken road surfaces that have vibrated it loose, I have a bit of scope to tighten it up a bit ore, and I guess there's always a bit of debate over how tight to have your headset - i.e. should the handlebars be stiff to move or 'loose'/smooth.

I'm in the middle of getting all the bits together to do an non-threaded ahead-set conversion to a 1" steerer full carbon Columbus minimal fork anyway, so this won't be any issue then anyway.
 
Brief update, have sourced a SR Laprade fluted seatpost for the 501SL frame.

Also got all the bits now for my fork conversion, so the plan is to 'upgrade' the 531c frame with the carbon fork, ahead stem and carbon handlebars (both Ritchey parts), i'll then use the Nitto stem and handlebars that i'm taking off that bike to fit on the 501SL frame.

I'll need to unwrap the bars to get the shifters and cables off as the 600 stuff is staying on the 531c bike, so will swap those onto the carbon bars, and then the 1055 shifters will go on the Nitto bars. Still need to get a bottom bracket, and some 1055 brake calipers and derailleurs before I can build the 501SL one up.
 

Attachments

  • SR Seatpost.jpg
    SR Seatpost.jpg
    39.6 KB · Views: 3
Got a free morning to do the fork swap, so here goes...

Have been cooking this idea up for a while, having got hold of a nearly new Columbus Minimal 1" fork, as I want to lose a bit of weight from the bike and also have the flexibility to swap stems and spacers etc to get my position tweaked. Yes you can do this with various angles and lengths of quill stem, but you have to take the handlebars out of the stem every time, which means un-wrapping and removing shifters etc every time too.

However, I still want the option to easily swap back to the original chrome threaded forks if I fancy it, and here lie the issues.

1) If I swap the headset to a threadless ahead type, I won't be able to use the original fork without swapping the headset back to a threaded type.
2) None of the available 1" threadless headsets look nice, not compared to my nice Tange Levin anyway!

So what to do...
 

Attachments

  • Columbus Minimal Fork.jpg
    Columbus Minimal Fork.jpg
    90.2 KB · Views: 6
  • Nitto Stem.jpg
    Nitto Stem.jpg
    75.7 KB · Views: 6
Step 1:

Got hold of another 1" threaded Tange Levin headset upper race cup.

I then used the lathe at work to turn the internal threads off to give a smooth inner diameter of 1 inch. I also turned a shallow groove around the top inner edge to accept a rubber O-ring.
 

Attachments

  • Top Crown Side by Side.jpg
    Top Crown Side by Side.jpg
    73.3 KB · Views: 4
  • Top Crown Threaded.jpg
    Top Crown Threaded.jpg
    57 KB · Views: 4
  • Top Crown Machined.jpg
    Top Crown Machined.jpg
    69.2 KB · Views: 4
  • Top Crown with O-ring.jpg
    Top Crown with O-ring.jpg
    73.5 KB · Views: 4
Back
Top