Cleaning a Shimano Freehub

willbloke

Dirt Disciple
My old 7 speed Shimano Freehub started making terrible graunching noises and occasionally taking nearly a 1/2 rev to engage.

I pulled it out , got the cassette off and sprayed some brake and clutch cleaner into the mechanism , loads of muck came out and it's much better , it now engages immediately and clicks when freewheeling , I've sprayed some GT85 into it to lube it up , but there's still a tiny bit of grit floating about.

How do I go about giving it a thorough clean ?
Does the freehub bit slide off the hub if the axle is removed ?
Could I dunk it in a bath of something ?
Ultrasonic ?
 
The GT85 will strip it of any proper lube and will need a better oil in it afterwards. Good old 3in1 works very well as it wont gum up

freehub body is removed via a 10mm allen key once the axle is out
 
You can strip shimano hubs down (remove axle/cones/bearings, use 10mm allen key to release free hub)
But the free hub is *essentially* sealed/non-serviceable, you can recover it by pumping light grease/heavy oil into it after cleaning with solvent and drying, but eventually you are likely to need a replacement.
I've found that you can get 2 or 3 years out of a brand new one, once you've stripped, cleaned, relubed, you might get another 12-18 months......... They can be dismantled, and rebuilt, but only by watchmakers and those with far more patience than me (i'm pretty good with fine work, and have rebuilt shimano road shifters, i gave up after an hour or so on the free hub and bought a new one)

Also, if you've blasted a load of clutch/brake cleaner in there, you've probably washed all the grease out of the drive side of the hub, so it's going to need a strip down and service anyway.
 
Cheers , it was no use as it was anyway , it was almost seizing and not engaging properly, so it's considerably better than it was , which was useless !

Unfortunately the bike has been well used on sandy commons and near the beach so has sucked a fair bit of sand up over the years .

A quick Google show that the freehubs are still available , but how do you tell which model/part you need ?
Is it marked on the body somewhere ?
 
You'll need to have a rummage on shimano tech docs, failing that a few pictures on here might get some help.

There are many many combinations of freehub/hub/spacers/axles for different models and years of shimano hub, its very rare that there is absolutely nothing that will work........
 
...and its often cheaper to buy the whole hub over just the freewheel

but NOS Exage rear hub supply seem to have finally dried up
 
Re:

The hub has FHM-452 on it and the rear mech is Mountain LX , if that means anything?

I've had the wheel on its side and flooded it with a light machine oil , feels better already , I'll leave it overnight .

Right !

Googled FH-M452 and the front spider / mech looks like this
http://velobase.com/ViewComponent.aspx? ... p;Enum=115

So , does that mean the model is M452 and the different letters (FH) is for different parts ?

What did we do before the Internets ? :lol:
 
My Exage500 hub's freewheel was running dry after 20 years, so I had it done by my LBS. Apparently the freehub is non-serviceable but he used a syringe with needle to inject heated grease (grease is too thick at room temperature, so it won't pass through the needle unless it's heated)
 
On most vintage Shimano hubs, the freehub body is pretty easily removed.

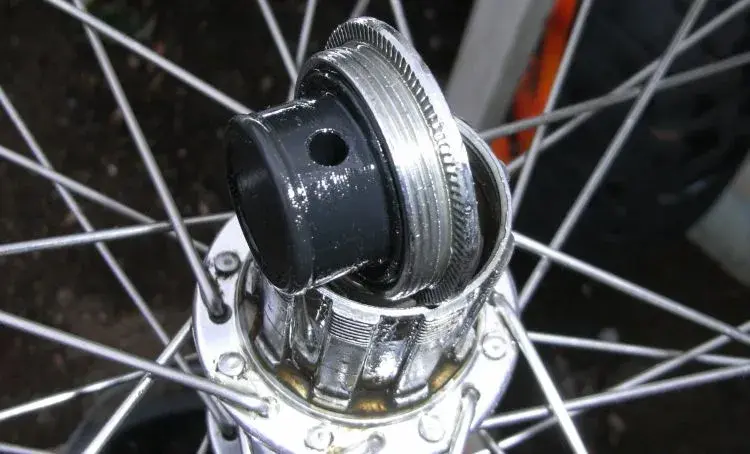
Remove the cassette, undo the non-drive side lockwasher and unscrew that cone. Extract the axle and non drive bearings, then extract the drive side bearings. Use a 10mm allen wrench to unscrew the hollow bolt that holds on the freehub body. Freehub body is now in your hand.

Better freehub bodies have a rubber lip seal on the rear (hub) side of the body. Use a dental pick or similar to prise it out carefully (don't damage the seal lips). Cheaper models have no seal.

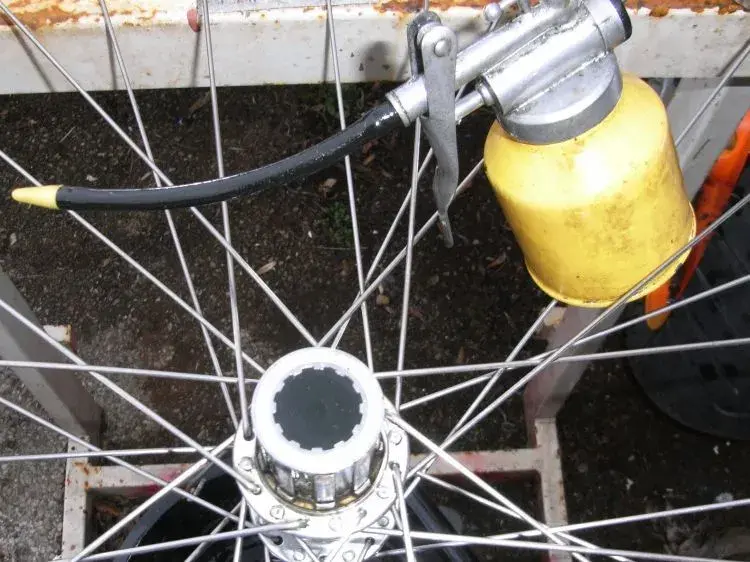
I clean freehub bodies by syringing petrol (Coleman Fuel) or similar into the gap where the seal was (or wasn't, if cheaper). This will dissolve the old grease and help flush out the debris causing the crunching. Keep flushing and spinning until things are smooth and clean.

If you feel really adventurous, you _can_ disassemble the freehub body entirely... Gently pry out the seal plate on from the hub bearing end of the freehub body (note its position first, so you can replace it correctly), and you'll see that the hub bearing cup has 2 slots in its top.... You can fabricate a tool from bar stock, and unscrew it. Best to count the balls in the rear race before you do, however, so you can get it all back together correctly.

When the cup is unscrewed, you'll see it's also the cone for the outboard freehub bearings. Extract the many tiny balls from the outboard end (magnet probe), then lift off the outter shell of the freehub body. The inboard race balls will drop onto the table, or may stick in the grease... Don't loose'em. I do final disassembly on a clean white towel. Beneath the cup/cone is a handful of washers of varying thickness - These are how Shimano sets the bearing clearance within the freehub body. If you have a very sloppy freehub body, you can occasionally benefit from leaving out the thinnest shim, but usually they've got it right.

Clean it all up. Inspect the prawls for chips on their working edges. Inspect the ratchet inside the outter shell for the same. Clean all immaculately.

To reassemble... Count out the inboard race balls and separate them from the rest. Apply a bead of thick grease around the inboard ball race (I do this on the inside shell, which sits on a paper towel on the table), and carefully stick all the inboard balls to the race with the grease. Carefully lower the outer shell over the inner and the balls. With luck, it'll slip nicely into place. A little twist to engage the prawls is sometimes needed.

A note on lubrications - Shimano says you need their "special" grease for this mechanism. They have valid concerns. Thick greases may prevent the prawls from fully engaging the ratchet, causing slippage under load. I tend to lubricate with a mixture of bearing grease and oil. Some prefer straight grease (works fine till it's cold). Some prefer just oil. You makes your choice, you takes your chances.

Once it's in place, drop in the outboard race balls, the shims, and thread on the cone/cup. Tighten it well. Replace the inboard seal if equipped. Carefully drive in the outboard seal plate to the depth you noted when you started(don't over-drive it). Screw it back onto the hub, snug up the 10mm bolt nice'n'tight, repack you hub, and you've done it.

It's fiddly, but not difficult.

J
 
I had a few pretty bad freehubs, one used to make such a racket I would have people in cars stopping wonder what the noise was;-) I pumped synthetic motor oil thru them, the really noisy one is still nice 2 years on[make that 3 years].
 

Attachments

  • freehub1.webp
    freehub1.webp
    62.3 KB · Views: 644
  • freehub2.webp
    freehub2.webp
    37.6 KB · Views: 644

Latest posts

Back
Top