DIY Almarc-like leather handlebar cover

And another one for Mercian that has been rebuild for Eroica for my lady :)

xVBmm3w9xTli85LncT3F3T41wEaQJvS55O-qFyXBnpQAAcZ751ofaU8Z-Zknlbi-nQWfyw9rFWzXvsuNKSoCJwxnRqkOm-sBLYKEpuoDgkU2CdN0D3onwZT9jbGyY4942Ui8kIxgorqNkmQcKQSYKCISWX--1jBKqxmhHgwaFi5H-FHlVPsY5FEDyF7hIi7i-e21Ufk6GKItwpDT2xjJh_kKAW4AUoaeBEODA7O21TqZDD72QMGaVtqWVCN9AtK1Z7U854u-kXgYbtLvDnGBEcMLXnaiauGFU23oIF9xELnI2Zz3XT4zxG0znVbF5RSBy8SUnkku2U1wSqnaOU2IVXhN8Xl2OSQtjZ8qI4wiDfX1yZoH666AzlFBZURbGZ-E_Okf84g5djO4jXnxGXuGG7FjBI-hwbz20XdXeD3-OCDiRQQ3Iz_e1b4VfRuH7gKV3Y1pIXQ9SDmZrXAXNLZ5MfRM5akpPN4TU7DXMOAYcCsRiqkHyQOvPfIHivOTH2wprYyaKf5EmIs8rFx58W0tnXNT_0U5dWF2oIThYAKJnqVDMU9MmUY7T4CXYEYbu4QMA89bqmqm_g4RQNFksilz9VCSIXCWHV8=w1274-h717-no


_q5w8FY5wvSKC4zoa7DPPf1UEZEzPlGD38X_94n9GJLuAvDXoM8doBkV-i-QXXqamqtX3_u8aTukdpjDmy_-WIop2l6-CiPOUcGGiMCF3tWzzUSJeILZ-VXF4CrfkmyYTdMBE7CSdJ5mI3ZfNTkmNAXoi6sNt1Zfh6sOzy0JmG0ZBgMwdJ7QXR3PYilTg_R3IVyzLPR09zyyqSmSK6vbi8Z3O0EBsDfsym72ojcUA1v_nFZI1Jds83TisNZaoYUGgNdOozGQEJA2Ufx5eWhoSL8kAIc4Utdm3yhCqmyA_IqW4zfTroDLsGFDCDtaTdI0ciuL0mpDscX9SfgLkYEsnyo-NrQKmgtsvr0XVggNm0Dn5kFsImvCz8Xmcj9rc9rmNR0-8FEMXfEsz-IMVB04gv-n-8HkEV3V2DGdhiOWWq5XlkKwOkcjKifaZpKN_XTKaion9oPqfbRFrrrf9RKMZGNjxlGn-mL5Y8CwRvAMIJ8EkcE6F49aDWwdJJKJu-8VGlhmNs4s6NjKvejGR15BCNcezpx5HDa2NoZmc0EQPcoNQpcTNKSit7iHW4hN7VKg8c1DKG8sRpSivESy6TdkOrjYptiL2JI=w1274-h717-no
 
Re:

..an expert at work.
I'm a big fan of leather covers, have some on my battered Sarconni 'nago and am planning on wrapping some AT4 MTB bars.
Once you've experienced it (and laboured to fit it) it's very hard to return to tape.
 
you're getting the radius and the stitch alignment perfect!
Gettin better, learning from mistakes, but far from perfection..., but thanks :)

..an expert at work.
Thanks :)
Once you've experienced it (and laboured to fit it) it's very hard to return to tape.
Hard work, but a lot of satisfaction and completely different quality and aesthetics than ordinary bar tape. Absolutely worth the effort.

Here's full bike:
KavA9wK-mWk8eEAHUJrjV_jU2_MQ3MQQJlbWraPDsephl6KflPDnHiulC6w8w4PJGcJ0dcyxlhFYfHrzZjl2dV80i2Jbcka_6SKk96VwC_udhYLvGKYE86d7YOdvBi72RILUX4gscVk3MeF-5T1VCTAAU_nFgseV21rcWrYeaL3aqS683vUArrsu6wYk_TXSMI-PePMEQvl8m6UUOVbSAZ7qZund7aATcEm_iq4V6BCS-0eLqCSvjK3BGBTMP4rjDWSYAb1cIP6Tt0HsWRqffRXqIPCC6CFCWvp23Uy5euw4i-f2YEkk9eNE4HzhbYRp42M___nfPOpTAWpGDbSj_Nx7APO7k4Yqf1AzDjNksP5yVavFwi0joMT4muqwfIYaXabNT2u5K3VHEJCGgi5yFZANl0ryDsL8LtkSqXhIEmYYIlFu6b8HTuJlzpnOYwEppdkbjDYEGN6VzpvPqtZ8_PxvPNoJcn58eHAPsPc17Bz_pi8qt5yC9EN-DSv1cukaCixk0bEEQPQcoItFh-DFX0-LqXY5weGbIzIDJJChEiPxt8HZNRNzSgcCY7Si7-uiGl2TdNFlxagrQGOd46pH6yBcMK677SU=w1274-h717-no


1XNAd-rFpANvWC6LbsFoH6BGUhHrP-zmDKl0ySRZxHHvp4hj6yc-sZd-s86jlmv7LfPStcwd6yKKiyQJzyDis-7RczjDgMPrKUk9YHVw_d5D3SSWfN9N97bD1E0QPc7gHJ9uZLhKJ5lvuPi8LEQowgquuXDP4cOpTQB2SAIcP5QqEgArp4y18prz9YbuOkB_4ZRNvmWCy0o4t1PnurwLIRe8aGBXl6aLHVwTLjUmfieFl2_spQVf5CfFkfaXiPf5zGQMjca_Z96qHxXXp_ZI2i3nuzh_FHjp_iDx3PG8i6xMXuESWHK9X0dpzxlYtV1nfEPrY2C-0j0iW_mbD6LbsO9aUFTYAd9jjhOOChrE_85xeh0sJReYxxhNSaGvCaHu729bZ6sN7PaZ8kpxTUAjuwCXncBqetWhbA6HAEemB_yKypbrZ5_soGvGeeZSkAsF8vRw1mjjkzvzEWKHXH9cEmDezKWRS8FvKWhEZWXZANMzADUkBk5XIX5liLEWJpvTStQ5yA_8qqbj8ixdLT4SXf8Yk4LV-oUyIUcPdJN2NzT0BPo1lpNPGBaRLMryORzfnANg72GP-roHYwn-gPkbj5ymKVZN0PM=w1274-h717-no
 
Re:

[edited picture links]
Since this thread seems to be one of the best practical resources for this type of project I thought I would add my experience. I am covering the bars of a 2012 Dawes galaxy with Tektro aero brakes and bar-end shifters.

I used a 1.8mm leather described by the vendor as "quite pliable for the weight" (here). I got a 30x60 cm sheet which is plenty for three attempts. I used a 1mm synthetic waxed thread.

My bars have a wide flat section on the flats so I cut a strip that varied between 10.5 and 7.5cm with 8.5cm widths for the sections that include a brake or gear cable. I pierced holes at 5mm pitch at 5mm from the edge. I had a go at burnishing the edges with a mixture of water and Brooks proofide with limited success due to the flexibility of the leather. In the end I just applied a little proofide to most of the edges.

I removed the cork tape. The bars were already pretty clean and the insulating tape securing the brake and gear cables was still fine. I marked the position of the brake lever mounts with a permanent marker and removed the lever (leaving it hanging by the cable from the insulating tape). After soaking the leather I started to apply it. I found almost immediately that it was too wide with the stretching from being wet so I sliced around 12mm off one side and redid the stitching holes. At this point I ran out of time so I roughly placed the strip, stretching it around the bends and bound it with string and left it.

The following weekend I re-soaked the (by now quite stiff) leather and started again. I started out with a cross stitch but quickly abandoned and unpicked it because it looked rubbish and began a baseball stitch. I found that the leather was a pain to manoeuvre until I had sewn far enough to stabilise it on the bar. I'm not sure if the short pieces of double sided sticky tape on the trailing edge of the bars made much difference. After a couple more unpicks I got the thread in the middle, reasonably tight and got into a groove with the stitching.

I say got into a groove but in reality it was hard work, slow and frustrating. My first problem came at the first bend where I discovered that the effective bar diameter gets a bit wider and I struggled to stretch the leather to meet at the seam. I managed in the end with some pulling and retightening. The bunching on the inside radius at the seam seemed to resolve itself as I went through the stretching process.

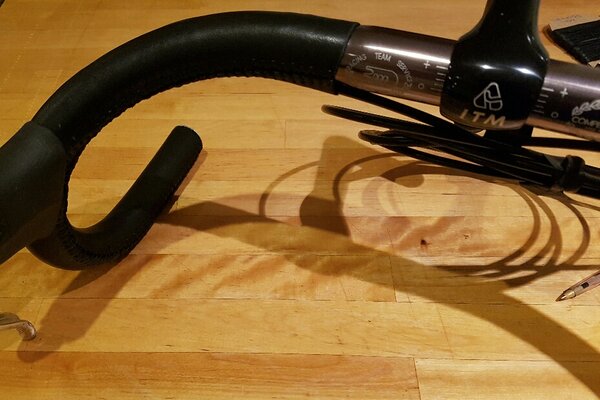
Next challenge was the brake lever mounts. I didn't feel confident cutting the leather so I sewed as close as I could manage and cut a small X at the top of the mount. I cautiously extended the cuts, adjusting the position as the leather bedded in around the posts and trimming it to allow the levers to sit correctly on the post. I ended up cutting a very small nick into the edge of the leather to aid the transition of the brake cable from under the leather into the brake hood. I ended up looping the thread under and around the top of the brake cable for the stitch that would have gone through the hole that was removed by nicking the top edge. It wasn't perfect but it was at least partly covered by the hoods. Incidentally the hoods (Tecktro RL340s) seem to be sized for extra thickness of a cork tape wrap around and are slightly loose now.

I ran out of thread here despite having allowed approx four times the length of the seam. Fortunately finishing and restarting alongside the brakes wasn't to visually intrusive.

As I continued round the bend below the brakes I found that the leather was barely meeting at the seam (similarly to the first bend) and the seam was also riding upwards around the bar which was a concern both for aesthetics and also for meeting the bar-end shifter cable which follows the bottom of the bars until they start to curve upwards and exits the cork tape at that point. I had taped the gear cable towards the inside edge of the bars and was hoping the a solution would suggest itself as I got closer. Stretching improved the first problem (but didn't completely solve it). The cable exit ended up being the least satisfactory bit of the job and I am considering cutting a radial slice into the leather to allow the cable to exist at the bottom of the bars and sewing the slice shut around it for the other side. I may redo the first side.

Lessons:
Allow for wet stretching of the leather
Allow a slight widening at the bends
I am going to try a bend to one side (rather than two straight parallel sides) to counter the seam twist near the lower end of the hooks. I need to think a bit about what this means.
Make your stitching holes plenty wide enough. Mine were only just big enough and made the stitching hard.
Think hard about switching to non-aero brakes. That would have been easier.
I am not sure about how to best handle the bar end shifter cable.
Curved needles helped I think.
Use plenty of thread even though this is a pain at the start.
Don't attempt this unless you are patient and commited. Stitching the first side (not including cutting the leather and other prep) took me about four hours.

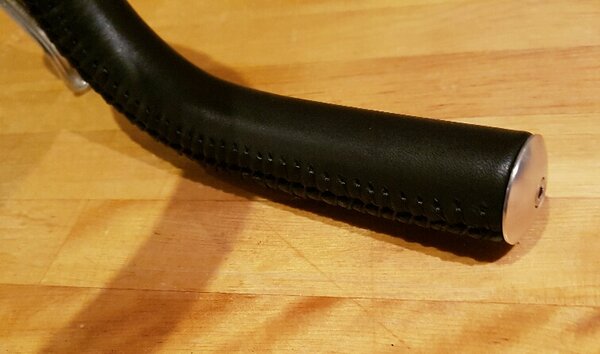
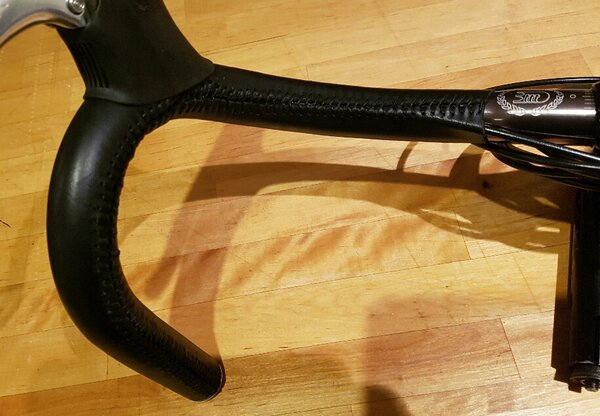
And now some pictures:
Qf0Rh2SXAu9G3EnkAIzjXkJReLibYcxPiWTGnYdO4HH5WoH1X8nlvHCKfouIdhBFM0xjASwOceZzi3oBI8inw1TjDIs4laeqZoDFbFiuderkd1zUuHYuxbBV--d_qs2zZqzRxJROBjwncRp00HUHqCGXybOvaPucvfjWUv_SvR4qhGqZoVvVYj3W8nSMPvGg8y7RqYQ7Et52PhecAD2HQRHEwtdF1CMBfM_B8hrp8BTtk0b_tAw8vczyI_rya2wpVJ5U76fandHAQ9YAlsx4qmfv_cPCg09_p80YMjqbL4AQhFqR10PUU1WzAKAPlQuZ9irZxLYiJ7e5aOByAM0PWniabC2bhNar69S71lzB7n_hsoe3CSW6fGKT2ensEj5u-_MZvTriXACTbUJpXggBkvyJJI81WLDKE3VXwW1qKHmwC1EHYSlgaMy8qNTGmhCynctvaFTDsgV7EZvViO0c6SHc06kSGvlZWu2I2JdBd2Vh5eZkqUTFFidGRpxc577AOKmB-W2Hwiu2UzGe37OTpNkINS5So29L1utc5j0bEIDoYty_fwG_GhGug2RrGHv0L56eoJYVXhU5MBgChabrE4oHke48FQqU=w1087-h612-no

2iAWisJ7fvX_BRrK871vhWZUReovjUIVOntpwWZDs6vD849fhcLifa8rn_ub0UTXVlw77GwgiRPYDyO-lEuJRcysqqD2YRmwKWo9mE4Ibw1fzqnI85eWlYUcrrbLscFSzHvE6tNdBOPY8wDrlO6T0fSDtxElAdgkZ04Ul0oRTY49zyMWhSnRjiePtWR-t63VUM7O6EQ9Byxi82-dsg2mY2cYbYvCA1J9EjuRa9NpAx7xjMqwyHKKA4OAMNcoiyOhCeFN-k4m-n_Ax2-gVmhxL9mb_tRL7uAPBvSs6UEMJrknPsr1dMVOW3bmnval9qJplmhJx0iLmZI2rkwPQYAPfqQHwC5oRavki9esNygRZ-u1OgRaAtAh_g1bmD2kMEq4LUc9ceFfcPaUvWvkoohPYwqmJRZqN2HdCNPT_QvgJLpOTi7rPvl7rblM0Ak2RkrXOXMPqDQSVIaUD9-G9ECpvk_xtjlPXmzxYy6Lq7tASxUDe5Uqq479OEKRMg-VTHQytgvVxJcg7duK3H5_RgJ0lF5Fu9yZ5Q8wPg73q81wrt2qHkCPoMp3fy89hPh9YzEF7CUlupWRd1NknATZpaNw_4D6lScyyN9Z=w1087-h612-no

HoKcI-fQnFbYfwxmL46y1rv0VoRMAnjrbRhtAwZEJk2ZerkydhN-6AC2SAcLMgHOLrPBjEeCh5OFpqzmFMGMdoecx5XbX60OrlZ6cHW_yi7NkXyzsYHIkY4T7NAkJ8tGmDaZCRvMn_bm9WfdKRL4UrAuUcsXE67OhJ0bzzr1Nnvz3Wko3bkgypjmM9rKmFa9qFkUkx5oHbf813SydbUGZWdXc4BWZUTYq1YXtxbGrKeQDNHKO1S8fQuFR9JCFLSibaSujBcntl6zs4pt8vMSBQde551EJontYDFsedDPzYbtwzemrCXVK2EXGUBbnBfv5VS8bQErUYbCnZZzNzLWRVFi-l1i3ANa6QQRF-dyWWgCoMRSeumBgwTOkju8p21yr33cgquiOELWSzUvjySeMd7nc71I_5grdbxCEEIPnz8BHpC8ddVXv_D7OXVtru4cpcTi15FxpXGSGl_e9jSoBpxzihITjNLvJ12NIRq5_9jmDi2mXi-blszZIFrQHRfu5lDUdspfPUGO7hwQidsED8TWyH46YnCOot1oUCAh31uH0bWyjKR3BmIDF0qLlvqVZY9IbY2tcK2Ez1J8fq7rBfp6a4-D0TcJ=w1087-h612-no
 
Exactly :)

Photos don't work, you need to upload them on an image hosting site and post the link to them.
 
When you click on links to various merchants on this site and make a purchase, this can result in this site earning a commission. Affiliate programs and affiliations include, but are not limited to, the eBay Partner Network.
Re:

Gave this a try not perfect but looks tidier in the flesh so reasonably happy with it.
Aero cable setup made it a bit trickier:
 

Attachments

  • 20161130_114100_resized.jpg
    20161130_114100_resized.jpg
    40.1 KB · Views: 644
  • 20161130_114030_resized.jpg
    20161130_114030_resized.jpg
    102 KB · Views: 644
  • 20161130_113953_resized.jpg
    20161130_113953_resized.jpg
    88.5 KB · Views: 644
  • 20161130_113919_resized.jpg
    20161130_113919_resized.jpg
    92.8 KB · Views: 644
Back
Top