Hi,
This is probably going to get really confusing now as I have been asked about polishing ally and ti via PM on a few occasions. I have copied / pasted my responses below but removed any personal info (names, love n kisses etc

).
The response about Ti was sent to ‘mousemat’ (and should appear in bold blue text).
The response about ally was sent to ‘guybe’ (and should appear in bold red text) although this is at the bottom it may make more sense to read this bit first.
To summarize quickly : Ally = easy but time consuming. Ti = ball ache and very time consuming. Note that everything I have written is based on my experiences / methods and achieving a chrome / mirror / blemish free finish. I have no doubt what so ever that there are other methods that work better / quicker / cost less / cost more etc

WD
Hi mousemat,
I wrote this (below the solid line) for another forum member (guybe) when he asked me about polishing stuff in reference to him doing his XT bear trap pedals.
I know a lot of it is irrelevant for you as you will be working on Ti but it saves me typing it out again
The Ti bits I did I followed the same method but compared to ally it is VERY time consuming … 
Also bear in mind that the Ti bits I did I was only looking for a good (mirror) finish on a small area as the rest of the item was getting blasted. I would not like to tackle lugs / welds / dropouts etc.
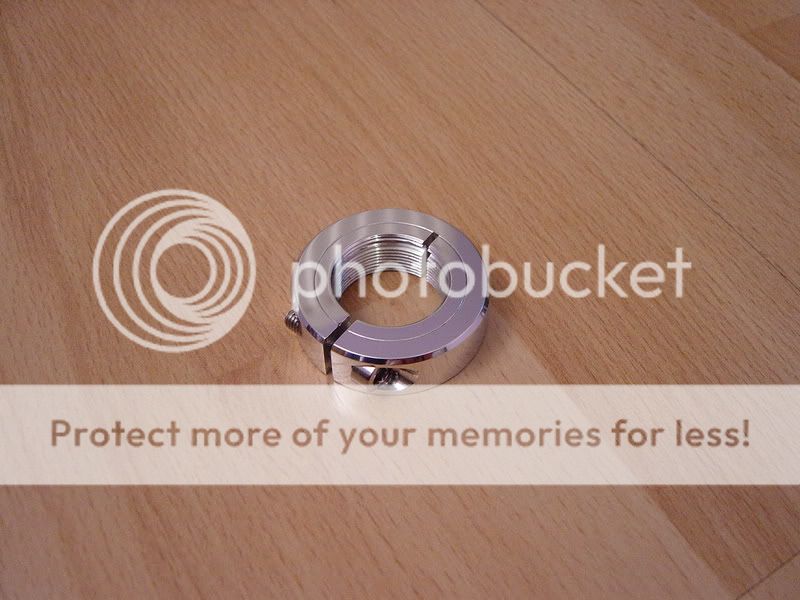
What finish is on the Ti now ? My bars and post were brushed and these were the hardest bits to do. It seems the more you flat them off / polish them the blacker / bolder the lines from the brushed finish appear – then all of a sudden (just as you are getting really pissed off) they are gone
The bar ends were easier as they were just ‘natural’ so a quick flat and polish was enough to get them good.
Note that I still only used 1500’s to flat of the areas first – a rougher grade may have helped but I didn’t want to mess up / scratch the finish more than I could polish out with the NXT so I persevered with the smooth grades …
The polishing of ally is easy by hand just holding the components but the Ti is harder and hence takes longer. I found if I held the bits in a work bench (wooden jaws) and used a cotton webbing strap (like what you would fasten an apron with) easiest – cover it in NXT metal polish, drape it over the item and then holding onto each end use a push / pull motion to do the work. A lot of pressure can be applied so it works quicker (but it still takes a while).
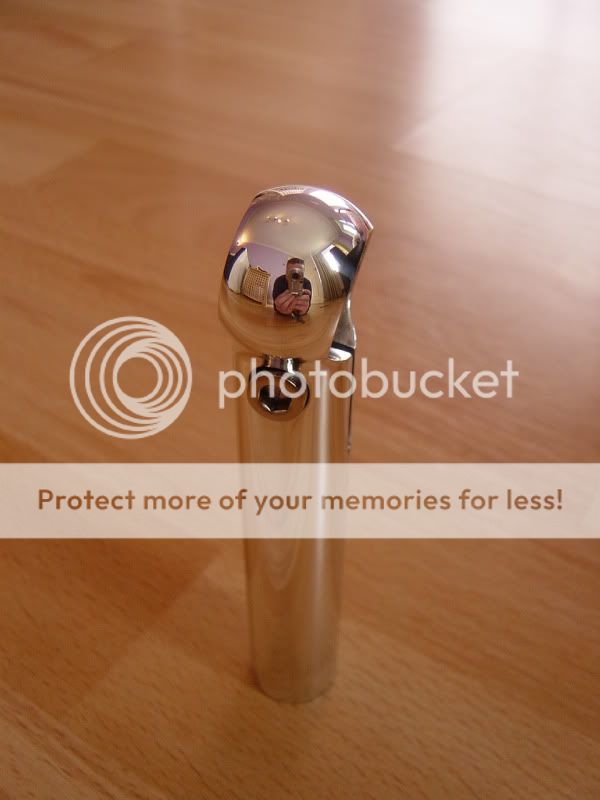
On the post (the last item I did) I tried the felt bob and polishing soap (came free in one of those sample / selection boxes you get) on the end of the Dremel. It worked OK but still needed a final polish by hand, I am not sure if it saved time but it was certainly easier on the fingers / thumbs, and a bit more interesting.
For a guide I reckon I put 2+ hours into the four small sections that I polished for where the stickers were going …
In all honesty (and probably not what you wanted to hear ) I probably wouldn’t tackle a full Ti frame (I ‘might’ be tempted on ally). I think I would bite the bullet and pay for it to be done professionally. The metal polisher I have used for my car bits charges his time out at £25 per hour and has the correct machinery – but I would guess he would be quoting 3 hours + to do a frame ‘properly’ – I have seen some very poor work done by some renowned professionals - Some bits look good from a distance but you can still see sanding marks close up. To me, a proper polished surface (especially if you’re paying a pro) should look like and be as smooth as a mirror, even upon close inspection ")
I hope you get on well with it and make sure you post some pictures up
WD
-----------------------------------------------------------------------
First things first – I am no expert on it but with patience you can manage most things !
I was actually after some of those pedals until I saw how much they went for second hand and then I decided on SPD’s.
If I got some my original plan was to :
• remove the cages
• Polish the bodies by hand
• Flat off any big scratches on the cages by hand
• Get the cages re (hard) anodized in satin black
This would have meant losing the white lettering (but that wouldn’t have bothered me) but got me something that looked almost new. The only give away would have been the missing logos and on close inspection – some marks under the anodizing.
I defo wouldn’t want to mirror polish the cages by hand as I think that would be a lot of work due to the complex shapes and holes etc :shock:
I have polished anodizing off by hand but its hard work and that has only been on basic shapes …
If you do choose to have a go use a rougher grade of paper but switch to a much lighter grade as soon as the anodizing starts to thin / fade so as not to mark the soft ally. I used 600’s (this can be got from B&Q) to break though the anodizing.
I know you can remove it chemically (saw a thread on the forum) but I have never tried it and don’t know how easy it would be to polish up the etched surface.
The bodies would be dead easy to polish – an hour max per body – sat in front of the TV
Looking at your picture I would go straight in with the NXT polish (from a good car shop for about £8. Any light scuffs / gouges should be removed with wet n dry. I favor 1500’s or 2000’s (about 30p per sheet from a car body paint suppliers) as even though it feels like paper it works very quickly when used wet on bare ally and the matt finish it leaves polishes up very quickly with the NXT.
As a guide I cut the sand paper into small pieces (1” x 2”) for curved shapes as it seems to go further that way and I would estimate 1 piece max per pedal body. If I use bigger pieces I just seem to waste it Use it dry and it will clog very quickly rendering it useless
In my experience a course grade will work quicker but you spend longer overall trying to polish out the marks that it leaves – Some of the pictures on the forum (NOTE FROM WD TO MOUSEMAT – There was a thread on some BMX pedals that had been done – they looked really good) have obviously been done by a professional with the right equipment to quickly remove the initial sanding marks 
A standard green 3M kitchen pad will also leave a nice matt even finish if that’s what you are after.
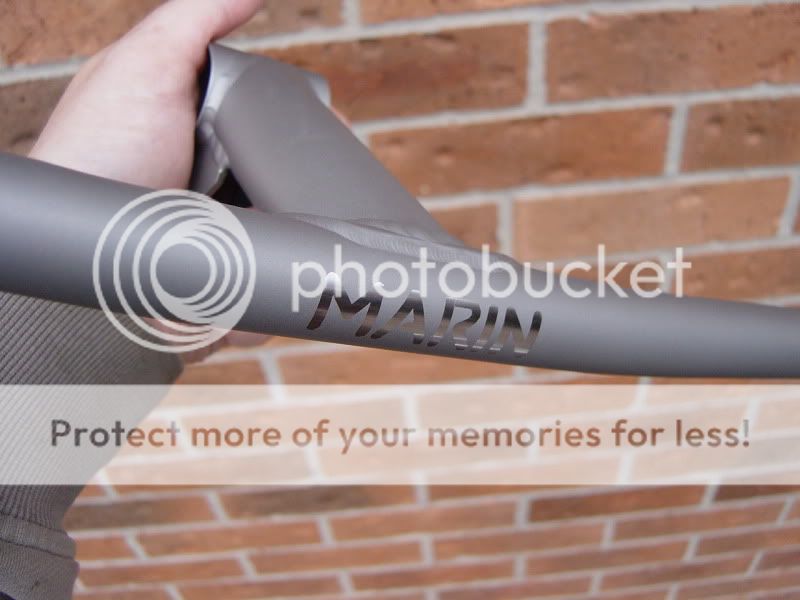
If you look on my Marin thread the x lite caps are the finish the 2000’s leaves when used wet. They were done on the kitchen work surface – clean the top (no Crumbs ! ) wet the top – Stick a full sheet of paper down – worked wet and just rubbed the cap in straight lines until the anodizing, logos & scratches had completely gone. Probably about 20 mins per cap. Leaves a lovely black residue to clean up …
The X lite bar ends were done under the tap, small pieces of wet n dry and finished with a 3m pad. They took much longer to do as I had to get through the anodizing first. Seemed like longer but probably 1 hour, maybe 1.5 per item.
Cheers,
WD
")
 :
: