Never ending Basso Build

hi, i reckon that looks much better.please forgive the misunderstanding of the 200mm height required .
my first impressions were' nice original paint, i must get a better look at one of those head tube badges !
 
oonaff":2b55lmpz said:
hi, i reckon that looks much better.please forgive the misunderstanding of the 200mm height required .
my first impressions were' nice original paint, i must get a better look at one of those head tube badges !
paint is pretty much suffers from the "original symptoms". ie.: looks cool in the blazing sun (changes colour, the red turns into something purpleish-blueish-reddish mixture, dependent on the angle you look at it) and started to peel off some places (especially the top tube where droplets of sweat "finished it" during the long summer rides)

the decals are above the lacquer, therefore the top tube decals are peeling off.

The whole picture is still great from afar, but at closer glance you can see these imperfections. :(

The brake bridge and dropout are stamped with basso, therefore I don't think it's an imposteur. The frame weighs some 2220 grs+- a few on kitchen scale.

If I'd ever repaint it, I'd hit the ever-great pearlescent white. : )

btw, I've got a spare seatpost, mirror polished by a friend of mine. He gave it free for the time I have the new post. And I don't really like the look of mirror polished post in the frame. At least the post is long enogh :)
 
Re: Never ending Basso Buildmare

m m that paint sounds like a nightmare to ' touch in' i see your idea to repaint in the future . pearl white and blue decals i reckon looks really good .
in the near future i would do as 'bikenut' suggests and blk cables/h bar tape/saddle although the h/bar tape seems to be growing on me,perhaps a winter vision safety aspect .
if you do get a good deal on paint particularly stove enammeling please do let us know.
 
For painting, I two options.
1. Blasting and powdercoating at a nearby village. They do quite good job, but it's still a powder coat, therefore, limited to RAL colours. That would cost something like 20 pounds.
2. A Friend of mine who lives in the nearest large town can repaint the frame by hand for a 30-35 pounds or so. I've seen his works, looks hundred times better than the powder coat. But then I have to make it in the very near future, because he's about to leave the country again.

If I'd go with the pearlescent white idea, it'd get black cable casings, black HB tape as well. The silver-black-white always looks classy.

: )
 
So, I'm after someone to give me advice.. :D

The frame will be repainted, just there's a question, what colour.

Seatpost-Stem is anodized dark gray, quite "gunmetal" in tone.
Bar: plain black
Crankset: Black
Saddle: Black

Rest of the stuff:
tyres: black with red sidewalls
hubs-rims-spokes: silver
brakes-dérailleurs: silver

What colour should I go for? Currently have an unopened Jagwire cable kit, unfortunately, in blue colour, but I think I can get either white or black. The handlebar tape is lime green, but I'll change it later, as it has quite hard touch-feel.

My thought was something like darker saronni reddish or just pearlescent white or pearl gold.

Or I had another idea, which would enable me to use the blue cable kit with red tyres: a blue-white-red colour scheme, inspired by the modernish Basso Reef frames.

http://shop.bassobikes.com/en-UK/reef-990-00.php

I have nothing wrong with white-red-blue.

The painting would be done by my friend's relative as he has great experience with bike frames. =)
 
Managed to inquire about the re-furbish. Today I should have gone for a spin, but missed it. Tomorrow my frame will travel to another town for a little repainting.

I'd like to hear what colour I should go for. I'm pretty thrilled by the colour scheme of the autumn as a season, so, orange-brownish red, reddish colours are pretty nice. Especially as I have some blue accessories which could make a nice contrast (warm-cold colours) with orange or darker red stains.

Any opinion would be welcome.

by the way, the BDW seatpost looks very nice. High quality glossy black finish, ovalish cross section, albeit the description is faulty.. The manufacturer claims that they'rwe 350 mm long, though in reality they're closer to 300 (approx. 320). The weight listed is totally spot-on precise, I've measured and weighed exactly 254 grs.

This black glossy colour would match well with a similar stem. The HB-s and crankset is also black, though sand blasted, matt finish.

The price for the repaint would be something like 35 pounds : -\ bit expensive for my taste, but could not find any cheaper alternative (only sand blasting-painting, which would cost half, but I don't have the neccessary tools to remove the BB-Cranks and the headset, whereas the painter assured me that he'd take care of it.)
 
£35 is not expensive for a repaint. before you repaint i would obtain an identicle decal set inc the columbus id badge.
why not do some scaled drawings of your frame and equipment and photo copy.
use coloured pens and experiment by cutting the equipment shapes out and moving them around and stick them
on the frame drawing and ask the opinion of your friends if you cannot decide,
if you would rather all the metal components silver polished and protected with car wax through the winter do that, and flog the black or visa versa. safe ones mate .
 
Ignore the saddle, I'll get it horizontal as soon as there's some light in the cellar.. : )

http://www.flickr.com/photos/97878439@N06/

So, I'll sum up:

-sandblasted and powder coated, lacquered by "Omega Colour", for approx. 18 euros.
-The decals were made by "Bringadekor" for approx. 11 euros.
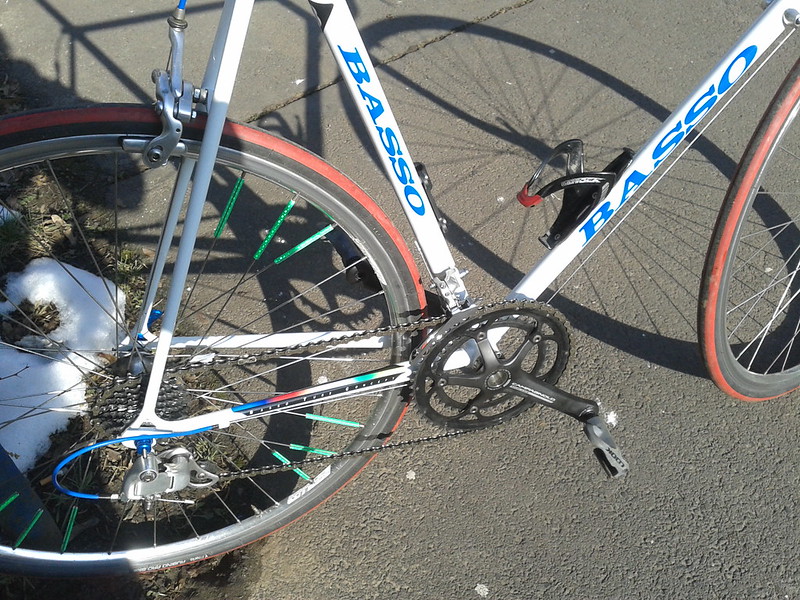
-The centaur dual pivot brakes were purchased on "Vatera" (auction site) for approx. 20 pounds with shipping.
-The jagwire cable kit cost something like 2.5 pounds, auction, china, ebay.
-Quick Release Skewers for 0.99 dollars. Actually won 2 pairs, so I sold the others.
-New Bar tape to match the colours, BBB BHT-05 Gellypad. Very-very comfortable compared to the old.

Only one annoying mistake.. :( :( The seattube, albeit, was stuffed with a protective rubber coat, somehow some paint found way, and even though I've managed to scrape off everything in the end of the tube, the middle portion was a bit rough. So ended up with scratching 1-2 cm-s of the lowest portion of my seatpost (BDW X-xeries). The seatpost is 330mm long, therefore, probably I'll opt for cutting down that section which was damaged. I regret that I haven't used my 0.25 buck old "kalloy uno" post to scrape the tube first..

Oh, also needed a new chain, fortunately, I've had one boxed, unopened Shimano HG50 at home, so, ended up with that.

Totally like the white-blue-red scheme, although the spoke reflectors are a bit out of synch.. : )
 
well done, decals/tape/cables/ skewers all coordinated blue and looks good with the white frame and the snow! :D a massive improvement on previous , :D :) ;)
 
Thank you :)

Well, this is a drivetrain:
-8s campagnolo cassette
-8spd campa derailleur rear
-10s campagnolo crankset
-8s shimano chain
-double shimano front derry
-8s SRAM quick link

12320121154_b722aeca76_c.jpg


just taken some photos in the sunlight, and I must tell, IRL looks very good.
http://www.flickr.com/photos/97878439@N06/

THe most significant upgrades are the sram quicklink, to save the effort of using a chainbreaker every time I clean my chain. The jagwire cable casing protector rubbers (those black somethings which are applied for the casing and they are to protect the painting of the frame from rubbing).

I'm very pleased with the stopping power of the calipers. The former Monoplanars were nice and heavy, but lacked the bite. :) These are at least very-very powerful and actually a good 20 grams lighter than the old single pivots were.
 
Back
Top