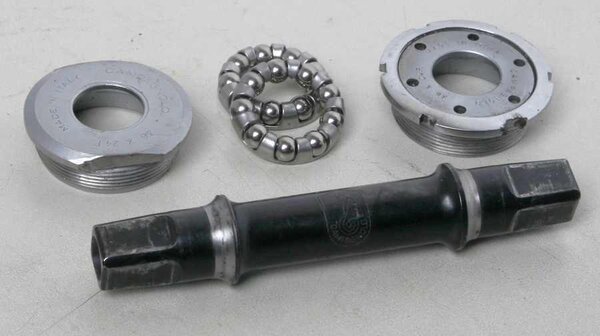
Assuming the OP has got the correct bracket for the frame, thet may want to know how to fit it? This is what I do:
First, spend some time cleaning inside the bottom bracket shell on the frame, especially the threads. The BB is like the main sewer of a bike, the lowest point, to which dirt, water, and anything else tends to accumulate. If the frame has a perforated BB shell, it might be advisable to get the plastic sleeve that fits between the cups, or improvise one.
Try threading the cups in the frame, fixed cup in drive side, and see how the threads feel. Tight or loose? BB threads are sometimes far from perfect, especially since there is a big hole in the thread each side, where the chainstays are brazed in. With clean threads, and a little lubrication, you may be able to get the cups all the way home by hand, or you may not. Either way, it's good to know what to expect before installing the BB, which goes as follows:
1) Make sure all the BB components are clean and free from foreign bodies.
2) Get some grease all over the inside of the bracket shell, including the threads, and up the tubes and chainstays too as far as your finger will allow might not be a bad idea. Not a thick cake of grease- just a good smear.
3) Get some grease in the fixed-cup, and on it's ball-bearings- enough so that it holds the bearings in the cup against gravity, and put the bearings in the cup. Grease the threads of the cup, and screw it into the drive-side of the bracket shell. Tighten it with the appropriate tool.
4)Insert the plastic sleeve, if you've got one, inside the bracket shell. Try to make sure it's snug against the perimeter of the fixed cup.
5) Get a layer of grease- again, not a thick cake of grease- on the axle- at least all the parts of it that will be inside the bracket shell and cups-- and then insert the axle, from the non-drive-side of the bracket shell, through the axle-hole in the fixed cup, being careful not to dislodge the bearings. If the axle is an asymetric one, for multiple chainrings, make sure that the long end is on the drive-side.
6) Repeat No.3 with the adjustable cup, but (obviously) screwing it into the non-drive-side of the bracket shell. Tighten the cup until there is no play in the bearings.
7) Screw the lockring onto the adjustable cup until finger-tight.

Fine-tune the adjustment of the cup with the two-peg adjustable-cup tool, and the lockring tool, simultaneously. You don't want any play in the bearings, but neither do you want the 'crunchy' feel of overtight bearings.
That's what I do- There may be a few variations and lubrication strategies out there, along with different opinions as to how tight bottom-bracket bearings should be...

