DIY headset installation

mrcpea suddeny brought back a memory of someone way back when trying to fit a fork race with just a hammer.........tapped one side home, turned around fork, tapped the other side home and the original side flipped up, turn around fork and use hammer again........repeats until you can stand it no longer and hand the new kid a pipe of the right size :D

Shaun
 
I think I'll have a go at it.

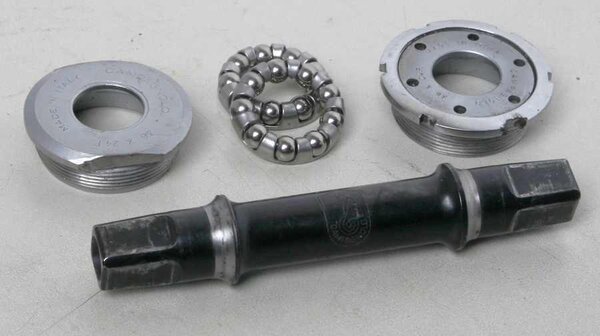
Whilst I'm at it, can I pose the same question for this item?
 

Attachments

  • image.jpg
    image.jpg
    33.4 KB · Views: 314
Shaun, those cups are italian, so hopefully the spindle has 70-SS, not 68-SS on it! :LOL: BBs are easier to install than headsets, if you have the right tools. Homemade tools for BBs usually don't get much further than a hammer and a screwdriver, which can mess up the notches and holes in the NDS cup and lockring. The correct tools aren't that expensive, and are well worth buying in the long run (unlike headset presses which are usually expensive)
 
http://www.sjscycles.co.uk/park-tool-hc ... prod18677/

This tool will insert both the fixed cup side (the side with 2 flats on) that is 36mm, and also the adjustable cup on the other side. You can buy a tool to do up the lockring, but I normally just tap it home with a screwdriver, but then again, I'm not that fussy :roll: ,then again, none of my bike are collectors pieces either!

HOWEVER! removing the said items can be a different story, depending how they were put in and how long they've been in the frame! It's usually the fixed cup that I've always had the most trouble removing. Spraying with a release agent like plus gas & putting the whole frame via the fixed cup in a good quality bench vise & turning the frame albeit the right way has never failed me yet :)
 
Hi Foz

Well spotted :)

Looking at the pics on the a lappy with a poor screen so couldn't work out what was on show apart from a black axle with some cups with a campag logo.

Italian / likely a nice frame / already a notch bent on the lockring........I'd pay a good LBS to sort out the BB with the correct tool to get it home so it stays put (possibly facing the BB) and thinking about a new lockring.

Shaun
 
Assuming the OP has got the correct bracket for the frame, thet may want to know how to fit it? This is what I do:

First, spend some time cleaning inside the bottom bracket shell on the frame, especially the threads. The BB is like the main sewer of a bike, the lowest point, to which dirt, water, and anything else tends to accumulate. If the frame has a perforated BB shell, it might be advisable to get the plastic sleeve that fits between the cups, or improvise one.

Try threading the cups in the frame, fixed cup in drive side, and see how the threads feel. Tight or loose? BB threads are sometimes far from perfect, especially since there is a big hole in the thread each side, where the chainstays are brazed in. With clean threads, and a little lubrication, you may be able to get the cups all the way home by hand, or you may not. Either way, it's good to know what to expect before installing the BB, which goes as follows:

1) Make sure all the BB components are clean and free from foreign bodies.

2) Get some grease all over the inside of the bracket shell, including the threads, and up the tubes and chainstays too as far as your finger will allow might not be a bad idea. Not a thick cake of grease- just a good smear.

3) Get some grease in the fixed-cup, and on it's ball-bearings- enough so that it holds the bearings in the cup against gravity, and put the bearings in the cup. Grease the threads of the cup, and screw it into the drive-side of the bracket shell. Tighten it with the appropriate tool.

4)Insert the plastic sleeve, if you've got one, inside the bracket shell. Try to make sure it's snug against the perimeter of the fixed cup.

5) Get a layer of grease- again, not a thick cake of grease- on the axle- at least all the parts of it that will be inside the bracket shell and cups-- and then insert the axle, from the non-drive-side of the bracket shell, through the axle-hole in the fixed cup, being careful not to dislodge the bearings. If the axle is an asymetric one, for multiple chainrings, make sure that the long end is on the drive-side.

6) Repeat No.3 with the adjustable cup, but (obviously) screwing it into the non-drive-side of the bracket shell. Tighten the cup until there is no play in the bearings.

7) Screw the lockring onto the adjustable cup until finger-tight.

:cool: Fine-tune the adjustment of the cup with the two-peg adjustable-cup tool, and the lockring tool, simultaneously. You don't want any play in the bearings, but neither do you want the 'crunchy' feel of overtight bearings.

That's what I do- There may be a few variations and lubrication strategies out there, along with different opinions as to how tight bottom-bracket bearings should be...
 
Thank you for taking the time to explain that - extremely useful.

Would you mind elaborating on what you mean. By 'play' with regard to the bearings. If there is play does that mean the axle will b a little too mobile I.e. wobble from side to side a little?
 
@torqueless, that was excellent, very detailed and it will be a great help to many.

@RobWJL, You're spot on, that's what "play" is. Side to side movement of the cranks. Undo the lockring & tighten the adjustable cup slightly, then re tighten the lockring again. It will be a little trial & error to get in right. I might invest in a proper lockring spanner instead of a hammer & screwdriver for this. :)
 
Back
Top