ADVICE ON A SALE..

Ill post some when i get it back...

The frame is brand new....Built by one of the best craftsmen in the business..

The frame should be on its way back to me shortly...Has soon as i get it, ill take some pics and post them..

If its a crack or if I for some reason completely missed an extremely visible blemish(hair) It will be sent back to where to it came from in the USA....

The frame has never even been built up..it was crafted from TANGE ULTRASTRONG tubing, a very high quality tubeset....

Going to get an eyetest booked this week just to make sure my eyes arent failing ;)
 
There's only one sure way to be find out if it's a crack or not and that must be to remove the paint. I could try picking at it with a needle or something to see if it's a hair? Don't really want to do that.
You can see the adjuster resting on the frame. At the moment it's screwed all the way in, as you screw it out it will take the paint off. Because of the angle it's moving at it will dig in a bit also. The other side is fine.
I don't like aggro either, it's been very upsetting for me and I know Joe feels the same way. If only the 'crack' had been checked out and found to be a hair and the defects mentioned to me. I'd have gone in with my eyes wide open.

Steve
 

Attachments

  • RL.JPG
    RL.JPG
    41.7 KB · Views: 1,066
  • RL (1).JPG
    RL (1).JPG
    52.9 KB · Views: 1,066
  • RL (2).JPG
    RL (2).JPG
    36.2 KB · Views: 1,066
Hard to tell what it is..

Steve, i really do not know what that is but it appears to be dark like an hair....
if it was cracked im sure it would be a faint straight edge under the paint..

I e-mailed you last night asking if you would send it back to me..

Please do not pick at the paint..I will send it back to the USA for a professional oppinion...

Let me know by P.M. if this is ok.
 
Slimjoe,

The line appears to be a condensed pigmentation line, a variable that sometimes occurs when spraying. These can typically occur on the bottom of the tubes (gravity lends a hand) and are typically sanded out and recoated by the painter prior to clear. Simply looks like this one was missed.

As for the tension screw, that's either a fabrication error on the builders behalf or the rod is bent, tough to tell from the one pic. If in fact the builder placed the chainstay too high on the dropout, you'll need to replace the thumb screw set up with a small hex head bolt; takes a bit more to adjust but is minimal and will solve the crisis.

cheers,

rody
 
RODY you are a star..

Thanks for your comments RODY..If anyone on here should know about this stuff its you ;)
Has far as im concerned that info you have passed on settles my mind completely..
I have had full faith in the frame all along and do not doubt the frame builders work at all :roll:
Heck, he replaced a seat-tube on my YO and it is now perfect!
Rody will i be able to gently rub out the paint blemish and touch in with lacquer?
Again thankyou :D
 
Well I don't know about the pigmentation thing, I've owned lots of bikes and never seen the like of it before. Put it this way, if you run your finger over the crack/line you can feel it.
The tensioner isn't bent, if you screw it in and out there's no wobble at all, it's mis-aligned.
I personally wouldn't want to fit bolts to rectify it, I'd want it just how it should be.

Steve
 
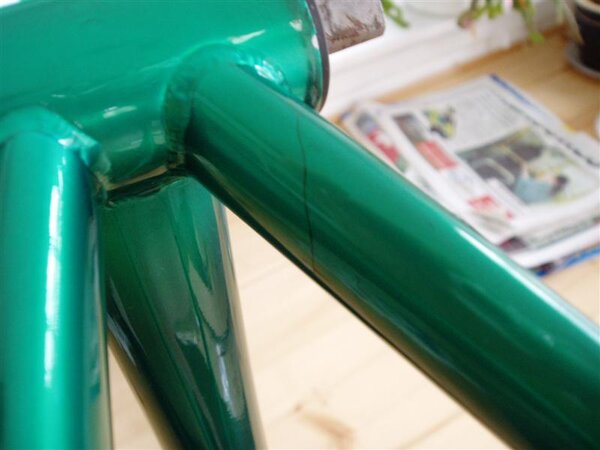
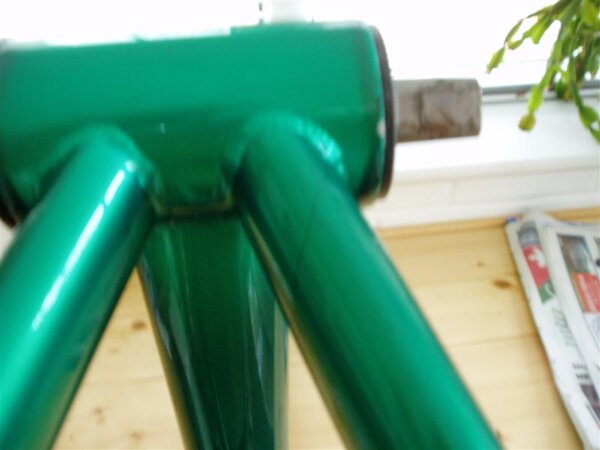
Well Steve, it's hard to tell from the pic, but you should not have seen it before on other bikes as it is usually corrected early in the finishing process. It will be palpable, as it is a mechanical imperfection...kinda like an edge where the pigment builds due to sag in the paint. Common in tight areas or end of spray patterns like around the seat cluster or bottom bracket. This will not be something that can be sanded out now, as it is beyond that point.

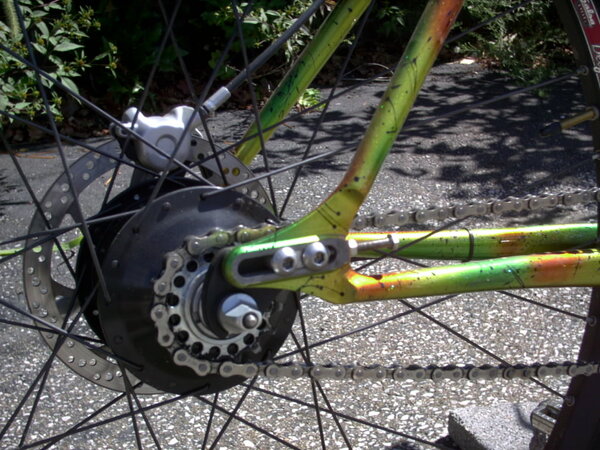
If the thumb screw is not bent, then the dropout is just plain misaligned...no excuse, but sometimes happens.

Paragon sliders use hex head adjustment bolts, very clean and a simple correction short of cutting out the dropouts, refixturing, rebrazing, and new paint. Here's a pic...

Unfortunate errors, but they do occur.

cheers,

rody
 

Attachments

  • 016.JPG
    016.JPG
    152.7 KB · Views: 998
Thanks for the info Rody, I do appreciate it.

I've seen that adjuster arrangement before, there might not be the access/room for that style though, because of the bracing strut on the brake caliper side? Anyway, like I said before, I'd really want it how it was supposed to be with the thumb style adjusters.

I know that mistakes happen, we're only human.

To be honest, all I want to do is put this whole episode behind me.

Thanks
Steve
 
Back
Top