Yeti ARC restoration - My #1 'want' bike since 1991

Re:

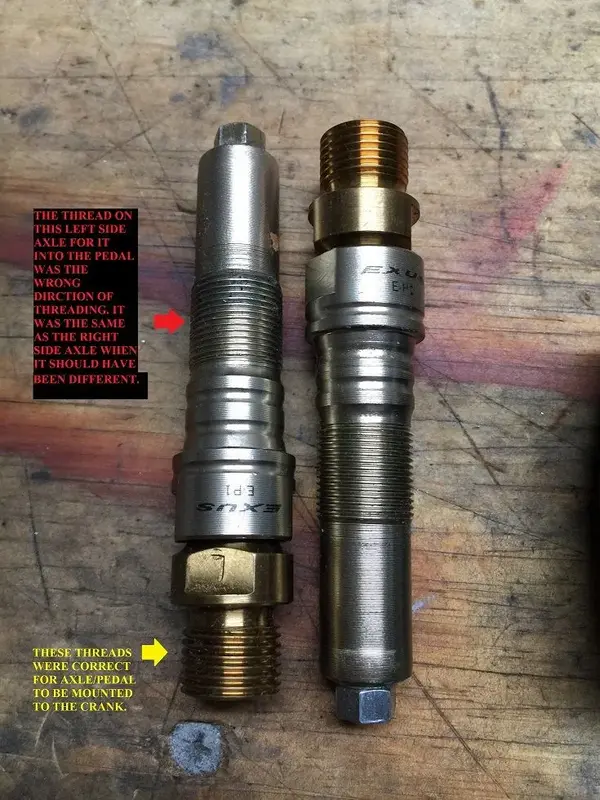
In the end, one axle was good to go. The other axle had the correct thread for it to be mounted to the cranks, but the wrong threads for the axle to go into the pedal. Since this was a NOS part from 20+ years ago, I just ended up with one Ti axle and a neat Ti paperweight.

Oh, well. I guess it will be the small things like this that will set my bike apart from others and make it uniquely mine. :lol:
 

Attachments

  • IMG_8428.webp
    IMG_8428.webp
    59 KB · Views: 666
  • zIMG_8415 - Copy.webp
    zIMG_8415 - Copy.webp
    130 KB · Views: 666
Nice!

If I've read the previous page corr frog you've just pushed the rivnuts in and used glue to secure them?

Rivnuts do need to be set using a tool which compresses them in a similar way to a conventional rivet which gives a tight fit.

There are a few different tools and it's an easy enough process if you take it steady
https://youtu.be/KeaMsvai0FA

This bike is going to be awesome!
 
st":3s3ytf0y said:
Nice!

If I've read the previous page corr frog you've just pushed the rivnuts in and used glue to secure them?

Rivnuts do need to be set using a tool which compresses them in a similar way to a conventional rivet which gives a tight fit.

There are a few different tools and it's an easy enough process if you take it steady
https://youtu.be/KeaMsvai0FA

This bike is going to be awesome!

----

Huh. Whatta know. Ya learn something every day. Thanks st!!!!
Much appreciated on sharing the knowledge. I thought they were just a press fit in. I've got it done right now. Found another YT video that showed a tool that I could make myself and not have to fork out even more $$$. Here's a link to the vid I watched for those looking to do the same and to do it cheap. I copied their 'special' installation tool design, went to Lowes Home Improvement and spent less then $3 to make my own tool and it worked perfectly!

https://youtu.be/3Og-tHIR_0I
 

Attachments

  • IMG_8440.webp
    IMG_8440.webp
    32 KB · Views: 619
Re:

Making progress and getting closer to being ridden.
Task for this weekend is to install the headset.
 

Attachments

  • IMG_8342b.webp
    IMG_8342b.webp
    109.4 KB · Views: 613
  • IMG_8342a.webp
    IMG_8342a.webp
    118.5 KB · Views: 613
Re:

....and headset done.
In regards to how often they pop up for availability & sale, I'm not too up to date on the availability and conveniences of picking up a threaded 1 1/4" headset (h/s). I spent some time looking for an old black no logo h/s, but no luck at the time I was looking. So, I just went the easy route and found one on Amazon. To keep it genuine, it should be a no logo CK or a Kingsbury, but all that's available at this time is the sotto voce. But no regrets cuz it's a quality CK h/s.
 

Attachments

  • IMG_8395.webp
    IMG_8395.webp
    104.9 KB · Views: 581
  • IMG_8394.webp
    IMG_8394.webp
    144.8 KB · Views: 581
Re:

...getting there, making forward progress. Just some small items left.
...chain, cables, grips, etc.
 

Attachments

  • IMG_8401.webp
    IMG_8401.webp
    67.6 KB · Views: 580
  • IMG_8400.webp
    IMG_8400.webp
    86.2 KB · Views: 580
  • IMG_8399.webp
    IMG_8399.webp
    66.4 KB · Views: 581
  • IMG_8397a.webp
    IMG_8397a.webp
    59 KB · Views: 581
  • IMG_8397.webp
    IMG_8397.webp
    64.5 KB · Views: 581
Back
Top