Rock Shox Judy XC re-build

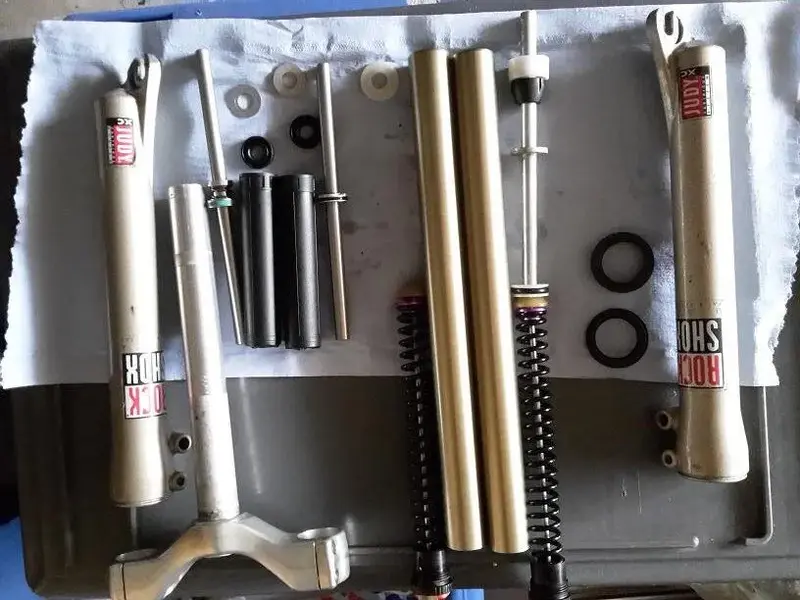
So, a busy weekend means little progress here. I managed to get the forks fully stripped and all the gubbins out. As expected its a plastic cartridge and comments above indicate that once they leak they are no good and cant be repaired, so not sure where to go with that. Got some spares from the forum so had a rummage through that, they are for the later model (the holes don't go all through the elastomer, so '96?) but it gives me some options and there are some potentially useful spacers, bump stops, end caps etc.
Its going to be a couple of weeks until I get them all cleaned up and can start testing the cartridges etc. On the plus side I think I now have a good idea how these are supposed to work so a better idea how to get them back together. Its looking like the cartridges are the weakness in the system so that's my first job, if I cant sort that then its plan-b time.
 
Right then. Internals all cleaned up and all the bits of fluff and muck scraped out. Garden cane wrapped in kitchen roll and soaked in degreaser made quick work of inside the legs. All the other parts were simple. New set of kronos springs ready to go, just need to sort the damper.


As you can see in the above image there is more than one damper in the parts bin now, one out of my forks, and one which came with a load of spares. By the looks of it this one is adjustable as it seems to have a spring loaded rotating part in there. Hmmm.


Its also a fraction longer than mine. Which brings me on to the plastic outer case. I have two types, both identical on the outside but inside one has the seal right at the top, the other the seal is held almost an inch further down. I'm guessing the combination of the higher seal position and longer post give the longer travel? And with a matching length dummy post obviously. Anyone got any pointers here?

Anyway, I trial-filled the damper cartridge with some oil and popped the end back in. I left it standing for a while and no sign of leakage so I started playing about a bit putting gradually harder and faster compressions through it and it seemed to work OK. The question is will it work in the real world?

Now I'm just waiting for some fresh damper oil and a tub of grease and I can get these put back together and finally get the RC200 build back on track.

The forks are cosmetically OK but not perfect, I was thinking about stripping and re-painting the lower legs and brace but will leave that for now. They are good enough and I want to check they function correctly before spending any more on them. If the dampers hold up to real riding (fingers crossed) the rest should be easy.
 

Attachments

  • judy internals clean.webp
    judy internals clean.webp
    56 KB · Views: 1,302
  • dampers.webp
    dampers.webp
    65.3 KB · Views: 1,302
  • dampers 2.webp
    dampers 2.webp
    30.1 KB · Views: 1,301
These are the old plastic dampeners. Those used to pop open on the sides quite often. If you buy a replacement, try to find the aluminium Version.
There are 2 identical seals per dampener.
The adjustable dampener is filled by screwing out the little inbus screw, that is inside the rod.
 
Watching this thread with interest as I am potentially going to go through the exact same experience, although I really don't fancy stripping the damper cartridges so will avoid if possible :(
I've just bought a set of NOS Kronos springs on here so that's one big element sorted.
I've also got another pair of Judys en route from scant as I have a scratched stanchion and dodgy wiper seals, so hoping that his will provide the necessary tidy replacements and also that his damper is in slightly better condition than mine!
I won't be reassembling my own set until the outer legs come back from having a fresh lick of paint so I hope yours are fully sorted by then and maybe get some more tips from you! :P
Good work and I'm keeping my fingers crossed for you :)
 
Tub-o-lube arrived in the post so time to get these slippied up and reassembled. Went for the rock-n-roll super slick, it aint pretty to look at but it feels like it would do a fine job. Ran a layer around the inside of both upper and lower legs using rag-on-a-stick, and smothered all the internals before sliding them home. Everything went together smoothly starting at the bottom with the damper/dummy, bottom cap and circlip to keep that in. then slide the springs in from the top and screw down the top cap. Quick rub with goop on the outside of the upper legs and they drop in to the lower legs with a reassuringly tight fit, two bolts in the bottom. Top seals, dust boots, reattach brace and slide into the crown. Much easier than I had feared, and satisfying (my first fork strip and build job!)

Now the forks are back together I can get on with the project pace rebuild and try them out!
 
Minifreak":2l43virq said:
I have some Judy internal parts spare if any good.

I think the black disks and smaller rubbers are from a Manitou fork I once rebuilt but the springs, white plastic packers and clear disks are definitely RS Judy.

Is this offer still open? I think I can use the springs and white packers to rebuild a complete fork using other spare parts. I think. Maybe.
Definitely missing the lower brace, but think I have everything else I need, including a set of inner legs and internals that should take those springs.

Will pop and pm over...
 
Back
Top