PhillB
GT Fan
I like the idea of restoring bikes that were built near where I live, which, as I live in SW London, is lucky as I have quite a few builders to choose from  I'm particularly interested in the less well known frame builders (who am I kidding, I like them all !!) so when I saw this Cyril Wren frame for sale on Golden Age Cycles I bought it after a couple of glasses of wine one evening....

I'll totally admit I hadn't heard of him before, however there were three things I liked :
1: Lovely 60's 531 frame with Nervex Lugs
2: Cyril Wren's shop was in Kingston, which is the other side of the park from me.
3: My Grandad was called Cyril.

I 'think' it is a 1967 frame, but that's only based on a rudimentary interpretation of the frame number.

It doesn't look in too bad condition in these photos which I took back in February, but in reality whilst the frame was sound it had rust worms and the metallic finish was worn. I doubt it had been used much in the last 20 years or so...maybe longer...
I know lots of people say 'preserve the patina' - 'clean it up and clear coat it' and I understand why. But I also like the idea of bringing back the soul of the bike, trying to make it look again like the prized possession it was when it was new.
'You'll lose the value if you repaint it ' - I don't really care to be honest... and in any case, what value? So many bikes in this condition would be taken to the tip or thrown in a skip.
So, not everyone will agree, and that's OK, because....

Anyway....
There's not much information about Cyril Wren's bicycles online. ( I know his grandson on on Retrobike) It is believed his frames were perhaps made by another local builder and then painted and built-up/finished in Cyril's shop.
What I will say is that the frame is built really well. The lugs are finished really nicely, the frame gives I nice 531 'ping' and the forks resonate like a tuning fork!.
Prep is everything when repainting a frame. So the frame was stripped using PeelTec paint stripper.. This took a while, and also required some hand sanding. The frame was also treated for rust, externally and internally. Then, time for some Primer....

The eagle eyed ones will notice that this frame once had a derailleur hanger that has snapped off... I only noticed this when I was stripping the frame (never mind)
It then sat for a while as I worked on other projects and sourced parts for it, including some metallic green paint from Kustom Canz.
I don't have a photo, but the next stage was to spray Battleship White and mask off the head tube and a band on the downtime. Then it was time of the metallic green - four coats to get a deep metallic colour.
Remove the masking when the top coat is touch dry.
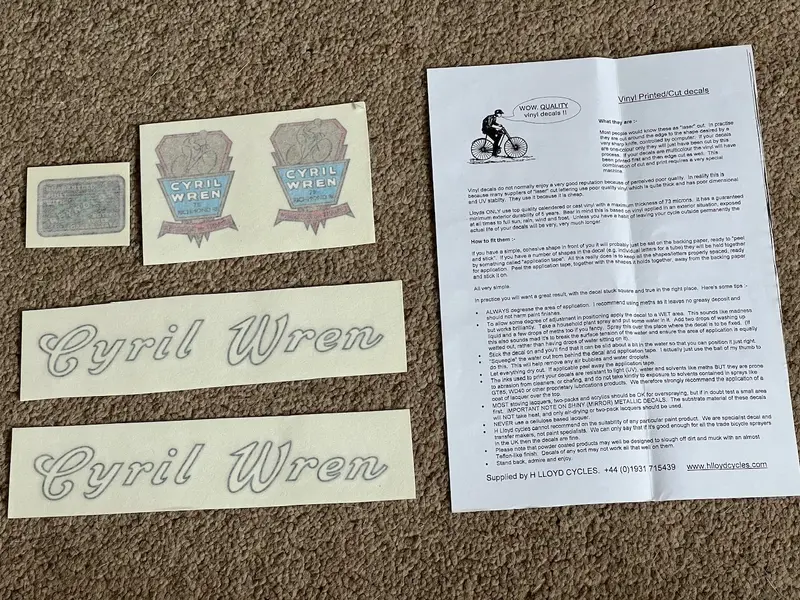
One of the challenges is replacing the decals - Cyril Wren is not a builder that HLloyd carry decals for, which also attests to how few of these old Cyril's are about, I guess. So I thought I would have a go at making my own.
I had tried making some decals for the Radior I am restoring, which turned out to be a complete failure - but served as good practice") .
.
I took me a week or two to finally draw some reproductions I was happy enough with to print.

I then printed them on Waterslide paper and clear coated them. Applying them to the frame was a real pain and I screwed up a couple of them, but I kinda expected this in advance so had made several !
After applying the decals, I clear coated the lot and hung it up to dry.
I'm particularly interested in the less well known frame builders (who am I kidding, I like them all !!) so when I saw this Cyril Wren frame for sale on Golden Age Cycles I bought it after a couple of glasses of wine one evening....
I'll totally admit I hadn't heard of him before, however there were three things I liked :
1: Lovely 60's 531 frame with Nervex Lugs
2: Cyril Wren's shop was in Kingston, which is the other side of the park from me.
3: My Grandad was called Cyril.

I 'think' it is a 1967 frame, but that's only based on a rudimentary interpretation of the frame number.

It doesn't look in too bad condition in these photos which I took back in February, but in reality whilst the frame was sound it had rust worms and the metallic finish was worn. I doubt it had been used much in the last 20 years or so...maybe longer...
I know lots of people say 'preserve the patina' - 'clean it up and clear coat it' and I understand why. But I also like the idea of bringing back the soul of the bike, trying to make it look again like the prized possession it was when it was new.
'You'll lose the value if you repaint it ' - I don't really care to be honest... and in any case, what value? So many bikes in this condition would be taken to the tip or thrown in a skip.
So, not everyone will agree, and that's OK, because....

Anyway....
There's not much information about Cyril Wren's bicycles online. ( I know his grandson on on Retrobike) It is believed his frames were perhaps made by another local builder and then painted and built-up/finished in Cyril's shop.
What I will say is that the frame is built really well. The lugs are finished really nicely, the frame gives I nice 531 'ping' and the forks resonate like a tuning fork!.
Prep is everything when repainting a frame. So the frame was stripped using PeelTec paint stripper.. This took a while, and also required some hand sanding. The frame was also treated for rust, externally and internally. Then, time for some Primer....


The eagle eyed ones will notice that this frame once had a derailleur hanger that has snapped off... I only noticed this when I was stripping the frame
(never mind)It then sat for a while as I worked on other projects and sourced parts for it, including some metallic green paint from Kustom Canz.

I don't have a photo, but the next stage was to spray Battleship White and mask off the head tube and a band on the downtime. Then it was time of the metallic green - four coats to get a deep metallic colour.
Remove the masking when the top coat is touch dry.

One of the challenges is replacing the decals - Cyril Wren is not a builder that HLloyd carry decals for, which also attests to how few of these old Cyril's are about, I guess. So I thought I would have a go at making my own.
I had tried making some decals for the Radior I am restoring, which turned out to be a complete failure - but served as good practice
.I took me a week or two to finally draw some reproductions I was happy enough with to print.

I then printed them on Waterslide paper and clear coated them. Applying them to the frame was a real pain and I screwed up a couple of them, but I kinda expected this in advance so had made several !

After applying the decals, I clear coated the lot and hung it up to dry.


 and the derailleur hanger converter I have is missing the retaining 'bit' - so going to have to think again on those items!


