97 Marin Riftzone, Project 2000 Spec. FINISHED!

Re: 97 Marin Riftzone, Project 2000 Spec.

Here is today's work ( not that much because I'm not in a massive hurry )
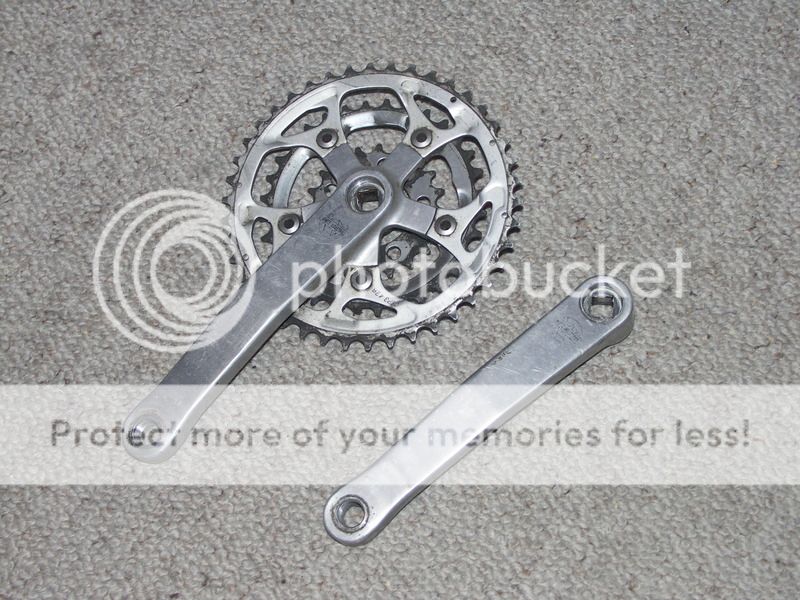
Crankset before cleaning and polishing:
crank1_zpsh0h1wfkg.jpg


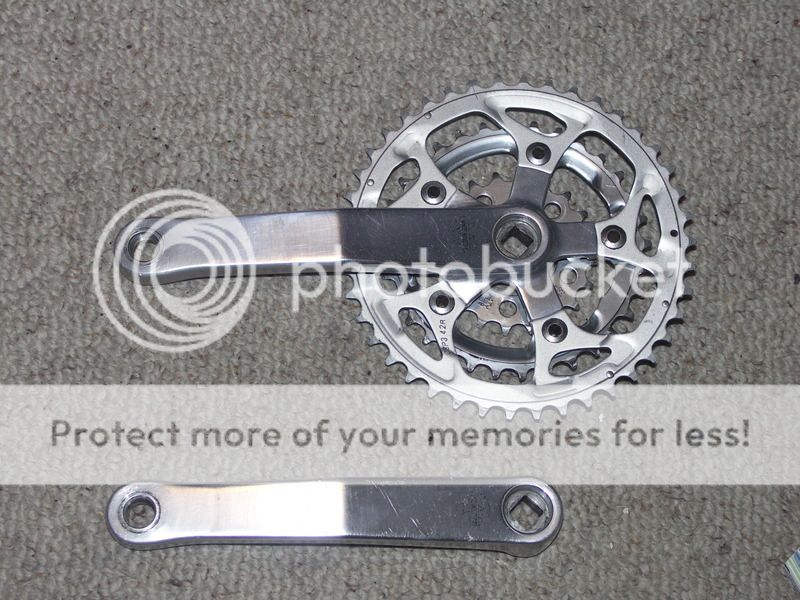
And after a good scrub and a couple of hours with the Autosol:
crank4_zpshlffkqxc.jpg


It's not super shiny but it'll do me. Of course when I took the chainrings off I forgot to note their orientation. Happily I had a few pics I could use for reference.

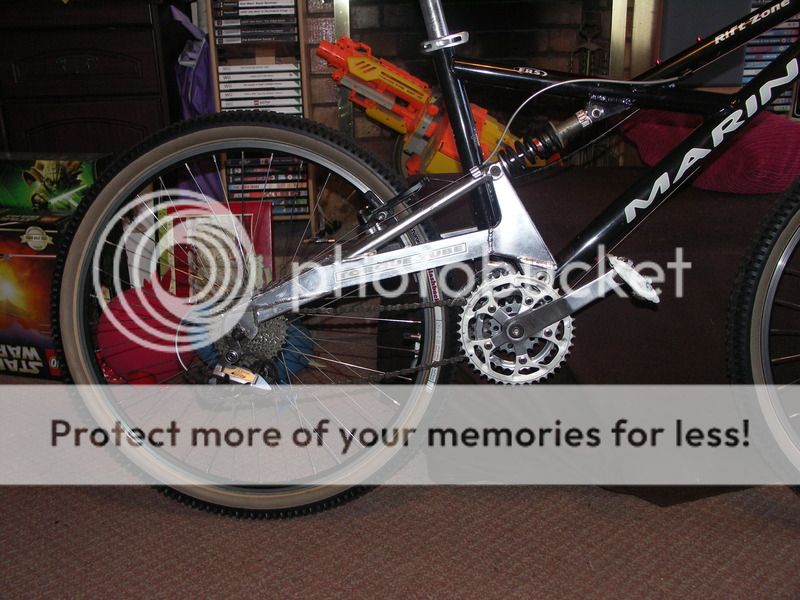
The donor bike seems to have been looked after pretty well: all the steel/alloy joints I have found so far have been greased or anti siezed.

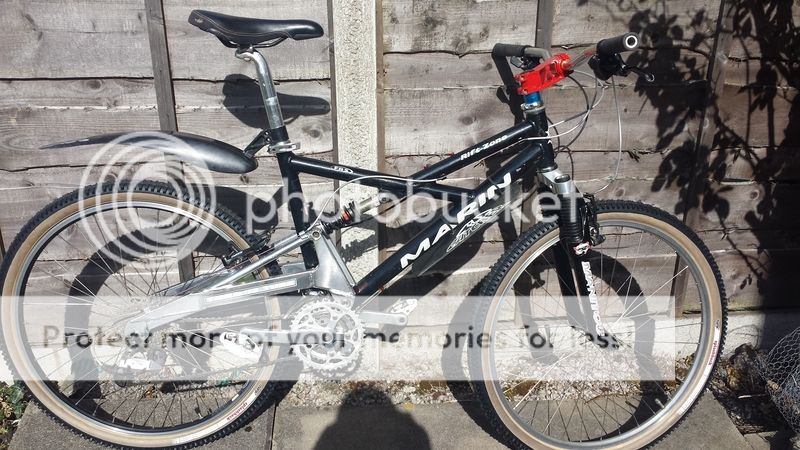
I was thinking of stripping the whole thing down before doing any other work, but I'll probably just take the bits off the donor as I am ready to work on them, then store them till they are ready for the recipient.
( Who's name, btw is Marian the Marin. This at the suggestion of my girlfriend who has a Spesh called Sherman. Cos he's a little tank.)
 
Re: 97 Marin Riftzone, Project 2000 Spec.

So today I sorted the front wheel: Stripped and regreased bearings, cleaned and polished the whole thing. It'd dead shiny now.
Frankly, reporting this sort of thing is a bit pointless - there's no one here who doesn't know how to do this, so it's more a preamble to a couple of things I discovered:
Continental Vertical Wire Bead: 690.
Wheel W/O Skewer: 810g.

Inner tube: 725g. :shock: :shock: It's a 2.2 tyre with a 2.4 downhill specific tube in it.
The tube felt really unpleasant. Sort of...clammy and alive. :shock: I can only assume it's because of the extra thick material but...ewww.
 
Re: 97 Marin Riftzone, Project 2000 Spec.

Today I have been mostly stripping and cleaning the fork. It's in really good condition and the damping cartridge still works perfectly ( if a little slow on rebound ) Having consulted the manual (http://www.digitalimit.de/wp-content/up ... Manual.pdf) I think I shall give it some fresh oil and see what happens.
As you can see the elastomer stacks look fine and overall the fork seems well looked after - apart from anything else this one ( unlike the one on the original bike ) MOVES. This is a good thing for suspension forks. Even the bottom out bumpers are fine.
IMG-20150503-WA0003_zpsffqzqfow.jpg


IMG-20150503-WA0001_zpsflt9konu.jpg


Tomorrow I'll be starting on refinishing the brake levers with masking tape, an airbrush, acrylic paint, Finish floor polish, and some ordinary household bleach.*

*The Bleach, like the cake, is a lie.
 
Re: 97 Marin Riftzone, Project 2000 Spec.

Crikey, nearly a week and no update.
The original plan was to sort the Avid Levers out ( very scratched as opposed to the cantis which after a clean look great ) but I got bogged down with the fork, life, the universe and everything.
So, the fork.
The elastomers were in suprisingly good condition, as I noted in the stripdown.
The job wasn't hard and everything came apart nicely and was cleaned thoroughly. The thing I noticed last time was that greasing the stanchions before putting them in the sliders required removing the wiper seals and taking them to the top under the crown to stop them cleaning all the grease off, and even then, a lot of it gets wiped up the stanchion.
I am sure there are better ways of doing all of that but being er, an induhvidual I decided to do it my way.
The drummer's way.
I got a drumstick ( A Vic Firth as it happens ) and put a couple of nice thick lines of grease down it and rotated it inside the sliders, distributing the grease nice and evenly.

stick2_zpsz0ryv3xo.jpg


( Sorry about the sock and biscuit box)

Then reassembled the fork.
Forgetting the boots. Because of course I did.

fork10_zpsxojnq2sl.jpg


It's much nicer looking than the one that is on the bike now - for a start all the paint / powdercoat isn't peeling off around the arch.


fork6_zpsfbo6zvur.jpg


I have a cunning plan for the decals, involving some white waterslide decal paper, a printer and some clear acrylic top coat. We will see about that though, I might just leave them.
Lovely butted alloy steerer. I am easily pleased.
Also I put the White Ind cranks on:

drivetrain_zps7fjlzw1u.jpg


Much nicer than what was on before ( a black Truvativ which had no place on this bike. And I don't like companies that think that leaving out the E where there should really be one is a good thing. ( Also peers accusingly at Renault and their stupidly named Captur amongst many others. Sorry, rant over)

I also recieved a rather wonderful wheel from Kaz: ( this made the day a very good one ) She karma'd it to me and it's lovely.
Also Kaz knows how to pack. You could have hit the box with an RPG and the wheel would have been fine.

Thanks Kaz!

It's got a WTB rim and an STX RC hub.Thus getting the bike ever closer to the spec I want
It needs an axle and cups so I thought "no bother, I'll take them off the donor bike's Deore Hub. piece of cake."
They don't fit - the seals attached to the cups are the wrong size, so I will have to have a bit of a rummage. Not a problem.
Cup faces cleaned up lovely:
hub1_zpsawpawrfo.jpg


I've also been weighing as I go:
Main frame: 1820g inc BB and headset cups. 17 in. ( The BB is a bit, er, stubborn but it will be evicted soon )
Swingarm: 1155g
Front Wheel: 810g with skewer. 750 w/o
Chainset (White Ind by Sugino) DS 530g NDS 225g
Marin Stem replaced by Girder stem: 195gm
Seatpost: 30mm 30cm, 310g
Avid Cantis per wheel inc blocks: 160g
Avid Levers: 90g each
STX shifters: 145g Each
Cassette 260g ( Shimano 8sp)
Conti Vertical tyres: 690g each ( Going to fit Splashbacks though at 490g each)
Oh and don't forget the joke 2.4 inner tubes fitter to 2inch tyres at 725g each. I will be replacing them.


Today I will be rummaging for axle/cone/seal bits and rebuilding the rear mech.
Tomorrow begins the Avid restoration: I would like to get this finished by Tuseday as I am off to Wales on Wednesday to see the Beloved for a few day's riding action.

And probably some cycling.
 
Re: 97 Marin Riftzone, Project 2000 Spec.

Right just a quick update - I have finished restoring the brake levers but the pics are on my proper camera while I am away in wales. I have been able to get in a short ride on Marion the Marin with the new stem, bars and chainset.
I have still to do the rear wheel ( thanks again Kaz!) and install the Avid brakes ( now looking much better ) and STX shifters, and install the donor fork ( the same but better cosmetic condition )
For now though, here she is:
20150513_0953241_zpslby9lwyi.jpg

The Race guard isn't bolted onto the seatpost in the pic - I have it about 8 inches above the wheel to allow for travel and still being able to drop the seat on the downs/hairy bits.

There's also a set of DX spuds on the way
She is still a lovely bike to ride, fast, smooth and a brilliant little climber with that 20t granny ring and suspension that digs into the ground.

I am hoping to finish all the fettling the week after I get back - next Monday, and I'll post what I did to the brake levers to get them looking nice. Well, I think they look nice anyway.

After that, two more builds to keep me occupied :)
 
Re: 97 Marin Riftzone, Project 2000 Spec.

Oh yes, my original BITD had bar ends as well as the Answer risers, ( ( I figured with bars like that bar ends would be ok ) what do you reckon? Good idea or style sin, or worse, mechanical / stress folly?
 
Re: 97 Marin Riftzone, Project 2000 Spec.

Right, I've been playing with the Brake Levers. They were really scuffed up and although I like a bit of patina they just looked too scruffy.
Because of budget restrictions but also because I wanted to do as much work myself as I could, I decided to tart them up myself: I build models and have an airbrush so I decided to see if I could adapt some model finishing techniques to the levers.
I did all this a few weeks ago but for reasons of mentals I have been a bit up and down as far as getting things done goes, and I have been away to visit my GF in wales.


Anyway, here's what I wanted to do, and how I did it. You can judge for yourself if I got there.
The issue for me was the amount of scuffing on the brake lever bodies: I wanted to restore the black finish but keep the Avid logos.
I thought of a few ways to do this: the easiest being to grab the logo and print new decals, but I can't print white. It wasn't until I did all the following that I realise I should have printed a black background onto white decal film and just done it that way. we live and learn, I suppose.
Anyway: I started by sanding the whole lot down with wet and dry, used wet and then masking off the logo. To do this I used Tamiya masking tape: it's very fine and used mostly for modelling. I layered it on to the lever and traced around the logo, lifted it off and put it on a steel rule, then cut around it.

PICT0288_zpsywyd37mh.jpg


PICT0292_zpsdvh3kv0f.jpg


PICT0293_zpsah0msov9.jpg


Then I lifted the masking tape and placed it over the logo.

20150509_212817_zpsszkzsmlc.jpg


Once all that was done, I primed the lever housings. With white primer. A stupid move and one I should have anticipated: I was in too much of a hurry though and had white in stock.

20150510_125021_zpskxgurwz6.jpg


Then airbrushed the housings matt black and removed the masking tape. ( Note 2 coats of primer and three of black) :

20150510_192354_zpshsc2jhkl.jpg


As you can see there is a change in finish and a very definite dividing line - I was expecting this, but it would have been less obvious with black primer.
I painted over the dividing line with thin black paint, to start blending it in.

20150510_192410_zpsfhjozv8l.jpg


20150510_192803_zpsu7q73oxf.jpg


And once that was dry, I had a nice lever housing but with two definite finishes. On models you can "Unify" this sort of thing, or basically give the whole thing a consistent finish by using clear varnish. So I gave them a clearcoat.

This kind of did what I wanted.

PICT0004_zpsu95n10g0.jpg


You can still see the masked area but they are ok from about 6 feet away.

Not a brilliant result, but not too bad and I learned a bit from doing it: not least think a bit more before diving in. Something I usually have no trouble with, but I am not particularly well at the moment and my brain isn't running on all four cylinders. I normally do better than this but hey. First bike lever resto and at least I did it myself.

Next time though: white decal paper, black surround, acrylic varnish over top :)
 
Re: 97 Marin Riftzone, Project 2000 Spec.

Also these arrived:
edb9b0f3-94c2-4039-8f72-59b55cc14e7d_zpsqw3tqm51.jpg


Very nice. They need a clean and the bearings need the play removing but fine otherwise. My old bike had the red ones, but these were a bargain and I actually like the grey colour.

I'll soon be sticking all the final bits on - Brakes, 8 speed shifters, cassette and wheel and the better condition fork ( I am going to put the old one on a newly acquired '98 Saracen Max Trax: a hilarious bike.)

I took it with me on my trip to wales and we had a short ride, and it rides beautifully. It's going to be a nice weather bike ( mostly ) and it's going to stay with me. More after the final additions.
 
Re: 97 Marin Riftzone, Project 2000 Spec.

The sock worries me.

But, these frames are just about the best value for money around at the moment.

I'd recommend Continental mountain kings over those splashbacks but thats me.

I have two pairs of the Welgo spd/flattie combo in red if you are interested in going from gey to red again.
 
Re: 97 Marin Riftzone, Project 2000 Spec.

Ah yes, the sock. It is alone. I think it's partner ran off with a pair of underpants. At least I have underwear missing and my housemate denies everything.

Yeah I love the Marin full bouncers: This one was really inexpensive - the stem and handlebar cost me nearly as much as the bike, and they were well priced. At some point when my bank balance has recovered I'll be looking for one of the post 2000 models - an East Peak or a rock springs, preferably with the TARA system. And I would love to find one of the 13 inchers for my girlfriend.

Hmmm tempted by the pedals I must admit, but I am going to have to be careful for a while now :)

I understand you've had a few of these?
 
Back
Top