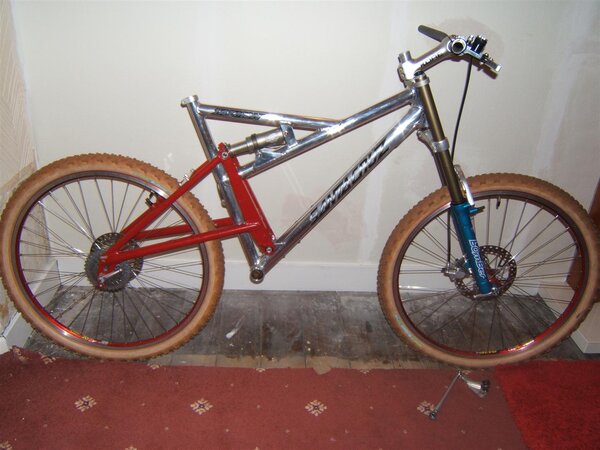
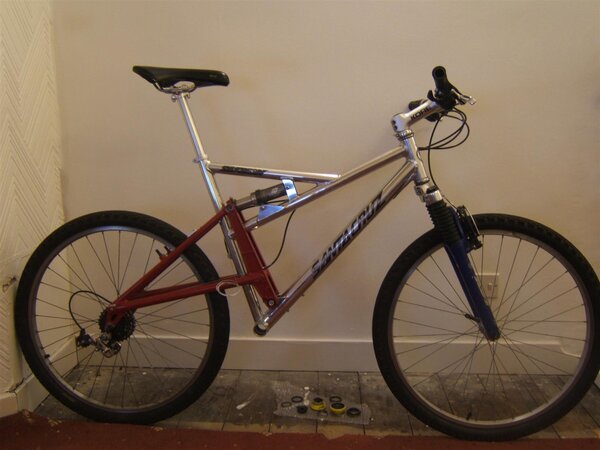
Thank you ever so much for that link ive been looking for that info for the last few days,not easy to find so ive copy and pasted it here in case we lose that info for whatever reason 
----
I've been in contact with Santa Cruz regarding the Tazmon and they have provided me with a number of useful specifications and details on the frame, so i figured i would post up what they provided me with (along with other useful data i've collected over time). I hope others find it of use. See below. BTW if anyone has other useful data on the Tazmon thats not included below please PM me and i will add it in (i'm looking at you Logbiter.
__________________________________________________ ________________________
SANTA CRUZ TAZMON Frame Specifications
The Tazmon was manufactured by Santa Cruz Bicycles from 1994 to 1998, their first mass produced MTB frame. Discontinued in 1998 due to its high manufacturing costs.
Frame Travel: 3" / 70mm
Sizes: 16", 18", 20", 22"
Colours:
Paint: black, lime green, metallic green, orange, polished, red, Sid blue, Transparent Blue, Transparent Red, white, yellow.
Other: Clear powder coat,metallic blue powder coat,clear green powder coat,metallic green powder coat, clear blue powder coat, polished.
Weight: Unsure of frame weight. Complete bikes range from around 24lbs/10.9kgs (hi spec) to 27lbs/12.2kgs (mid to low spec).
Frame material: 6061 T6 aluminum, double-butted, TIG-welded.
Component Specs:
Seatpost - 26.8mm (If it is a late 1998 model it could also be a 27.2mm post. You should measure it to be 100% sure)
Front derailleur - 1995-96 model - 31.8mm Traditional Top Pull, 1997-98 model - 31.8mm Top Pull/Top Swing
Headset - 1-1/8 inch
BB spec - 68mm shell, 47.5mm to 50mm chainline spec, 107mm spindle.
Bolt Torque Settings:
1 - Front Shock Mount (To Frame) - 40 inch lbs.
2 - Brake Plate Bolts - 20 inch lbs.
3 - Rear Shock mount (To S/A) - **60 inch lbs (**Make sure the e-link can move freely)
4 - Main Pivot Nuts - 80 inch lbs
5 - Main Pivot Bearing Pinch Bolts - 40 inch lbs
Bearings:
Lower swingarm bearings were same as 96-99 Heckler ("big bearing") - 1.125 OD x .375 ID.
Upper swingarm bearings (At shock eyelet/e-link) are - 10mm OD x 6mm ID.
Brake Compatibility:
Santa Cruz never made a swingarm with disc mounts for the Tazmon, so only V/cati style brakes are compatible. If you do want to run disc brakes, you will need to go with one of the aftermarket "Universal Mount" options, made by Brake Therapy, Specialized, etc...
Rear shock info:
The only rear shock option for the Tazmon is the Risse Air (3 variants available – the Genesis, Astro-5 & Terminator), which was custom manufactured for the Tazmon’s 3 point shock mounting system with eccentric link (e-link) at swingarm eyelet. For product info visit http://www.risseracing.com/santacruz.shtml.
For rear shock air pressure the rule of thumb is approx 20lbs (psi) over rider weight. For Tazmon rear shock rebuild, and replacement options, contact the manufacturer at www.RisseRacing.com.
Shock installation instructions (courtesy of Risse Racing):
1. Put the damper on like it looked when you first got the bike, but keep all of the bolts loose for now. The eyelet (with the air valve) goes to the rear, the clamp on the body goes in the middle with the cable guide hole to the rider's left. With all the bolts on loose, continue to step 2.
2. Sit on the bike to set the bolts in their natural position. This is important because a bolt tightened out of place can inhibit the damper's performance.
2. Sit on the seat or lean on it with your chest when you tighten the back bolt and the front bolts. They need that weight to hold them in the proper spot when you tighten the front bolts on the body.
3. The rear bolt bolts through the E-link, which must be able to rotate slightly as the damper compresses. The bolt should not be too tight.
4. When you tighten the middle bolt, just make it a gentle hand tight. It should be able to slip a little if it needs too. Don't worry: the middle and rear bolts don’t have to be really tight to do their job.
Extra info/spec's (like geo) may be found here: http://airfreetires.com/Specs/Step2....and=Santa+Cruz
Jr T's are listed at 130mm[5"] possibly too much but im beginning to think its going to be ok albeit a tad chunky looking :?coomber":35k8s9ha said:So what is the travel on these then? Cant remember them too well
From what i can gather its the stabilize the shock more than your usual single pivot,at least thats more or less what the company blurp was saying :?coomber":35k8s9ha said:Being doubly thick here, whats the rocker part of the frame that seems to attach to the body of the shock, what is that there for?
----
I've been in contact with Santa Cruz regarding the Tazmon and they have provided me with a number of useful specifications and details on the frame, so i figured i would post up what they provided me with (along with other useful data i've collected over time). I hope others find it of use. See below. BTW if anyone has other useful data on the Tazmon thats not included below please PM me and i will add it in (i'm looking at you Logbiter.
__________________________________________________ ________________________
SANTA CRUZ TAZMON Frame Specifications
The Tazmon was manufactured by Santa Cruz Bicycles from 1994 to 1998, their first mass produced MTB frame. Discontinued in 1998 due to its high manufacturing costs.
Frame Travel: 3" / 70mm
Sizes: 16", 18", 20", 22"
Colours:
Paint: black, lime green, metallic green, orange, polished, red, Sid blue, Transparent Blue, Transparent Red, white, yellow.
Other: Clear powder coat,metallic blue powder coat,clear green powder coat,metallic green powder coat, clear blue powder coat, polished.
Weight: Unsure of frame weight. Complete bikes range from around 24lbs/10.9kgs (hi spec) to 27lbs/12.2kgs (mid to low spec).
Frame material: 6061 T6 aluminum, double-butted, TIG-welded.
Component Specs:
Seatpost - 26.8mm (If it is a late 1998 model it could also be a 27.2mm post. You should measure it to be 100% sure)
Front derailleur - 1995-96 model - 31.8mm Traditional Top Pull, 1997-98 model - 31.8mm Top Pull/Top Swing
Headset - 1-1/8 inch
BB spec - 68mm shell, 47.5mm to 50mm chainline spec, 107mm spindle.
Bolt Torque Settings:
1 - Front Shock Mount (To Frame) - 40 inch lbs.
2 - Brake Plate Bolts - 20 inch lbs.
3 - Rear Shock mount (To S/A) - **60 inch lbs (**Make sure the e-link can move freely)
4 - Main Pivot Nuts - 80 inch lbs
5 - Main Pivot Bearing Pinch Bolts - 40 inch lbs
Bearings:
Lower swingarm bearings were same as 96-99 Heckler ("big bearing") - 1.125 OD x .375 ID.
Upper swingarm bearings (At shock eyelet/e-link) are - 10mm OD x 6mm ID.
Brake Compatibility:
Santa Cruz never made a swingarm with disc mounts for the Tazmon, so only V/cati style brakes are compatible. If you do want to run disc brakes, you will need to go with one of the aftermarket "Universal Mount" options, made by Brake Therapy, Specialized, etc...
Rear shock info:
The only rear shock option for the Tazmon is the Risse Air (3 variants available – the Genesis, Astro-5 & Terminator), which was custom manufactured for the Tazmon’s 3 point shock mounting system with eccentric link (e-link) at swingarm eyelet. For product info visit http://www.risseracing.com/santacruz.shtml.
For rear shock air pressure the rule of thumb is approx 20lbs (psi) over rider weight. For Tazmon rear shock rebuild, and replacement options, contact the manufacturer at www.RisseRacing.com.
Shock installation instructions (courtesy of Risse Racing):
1. Put the damper on like it looked when you first got the bike, but keep all of the bolts loose for now. The eyelet (with the air valve) goes to the rear, the clamp on the body goes in the middle with the cable guide hole to the rider's left. With all the bolts on loose, continue to step 2.
2. Sit on the bike to set the bolts in their natural position. This is important because a bolt tightened out of place can inhibit the damper's performance.
2. Sit on the seat or lean on it with your chest when you tighten the back bolt and the front bolts. They need that weight to hold them in the proper spot when you tighten the front bolts on the body.
3. The rear bolt bolts through the E-link, which must be able to rotate slightly as the damper compresses. The bolt should not be too tight.
4. When you tighten the middle bolt, just make it a gentle hand tight. It should be able to slip a little if it needs too. Don't worry: the middle and rear bolts don’t have to be really tight to do their job.
Extra info/spec's (like geo) may be found here: http://airfreetires.com/Specs/Step2....and=Santa+Cruz


