1960 Peugeot PX10... Gravster!

Below the thick lock washer with its external/diagonal teeth
 

Attachments

  • IMG_20230404_174525.jpg
    IMG_20230404_174525.jpg
    243 KB · Views: 8
And to be perfectly complete I should also add that I would like to check the hanger alignment as well...
But first I would need to have a wheel which is perfectly aligned - and there is no way to be absolutely sure about this other than first checking the perfect whell alignment with a jig.

I cut out a bit of text just to get to the essential.

- Pretty sure your hanger plate will be 100% spot on since it was done professionally. They have jigs and control points for this work.
- You can be 100% sure a factory produced wheel from say Mavic is spot on too. These things are good to have in the toolbox rather than spending money on things like dishing tools etc. It's like having a perfect reference. A lot of available amateur wheel jigs lack stability and repeatability.
 
Pretty sure your hanger plate will be 100% spot on since it was done professionally
You're probably right...
But as I had to send the frame back again - once the hanger had been brazed, for the dropouts to be aligned, my imagination started to wander a bit and I wondered whether I should not check the hanger as well as I experienced some rear mech adjustment "issues"...
Actually adjusting the rear mech proved to be unusually cumbersome... A lot of pulley noise when the chain was crossed - involving the two smallest cogs and the granny.
There were a number of factors that could have contributed and I addressed them methodically.
The pulleys were not original Campy for a start but instead alloy pulleys with proper ball bearing. They seemed higher end at first but when replaced with original Campy the noise decreased... But remained.
The bottom bracket spindle (short) length and the triple crankset are also to be blamed for that noise... As discussed the chain line when crossed - small cog and granny, is stretched to the limit. Lowering the cage height - using the cage adjustment screw, helped as well...
But it's still not perfect... Hence I felt the need to check that hanger alignment.
But I guess fitting an asymmetrical 113mm spindle - as a replacement to the current 107mm symmetrical spindle should do a lot for that noise to cease.

You can be 100% sure a factory produced wheel from say Mavic is spot on too
Well quite ironically the wheel that is currently fitted is a Mavic Aksyum that I have been using on and off since 2007...
 
  • Like
Reactions: Woz
Eventually I removed the external teeth lock washer as its width was both "a tat too wide and... shrinking" 😂
Yes - that's a strange concept, a shrinking wide width... But that's actually what happens when using an external teeth lock washer... The teeth will flatten as the bolt is tightened... With all the consequences one can imagine in terms of cogs and rear mech alignment.
Initially the washer was 2.4mm-thick and after a few days - mostly spent trying to adjust the rear mech, it had slimmed to around 1.7mm. I guess that might also explain why a rear mech set-up that seemed to work fine one day was not working that well the next day...
The rationale for using this type of washer was to provide an additional retention system to avoid the DS sliding towards the outside of the dropout as a consequence of the pedaling pressure.
But obviously their unstable width makes this type of washer just not fit for purpose on a rear wheel axle other than a fixie one.
I therefore replaced that external teeth lock washer with a standard 1.2mm flat washer... extracted from a 1950 Exceltoo rear hubs - those with the round holes, a bit like the Campy Nuovo Gran Sport hubs.
That thinner washer also meant that eventually the wheel has a reduced DS/NDS ratio imbalance - and that makes this build a bit more accurate... Always nice to have.
 

Attachments

  • IMG_20230405_182516.jpg
    IMG_20230405_182516.jpg
    227.6 KB · Views: 5
Last edited:
  • Like
Reactions: Woz
Now the penultimate component of the drivetrain - the front derailleur.

My first choice was to fit a Huret front mech. Yes - that's a bit strange, a Huret derailleur on a Peugeot... That's usually regarded as sacrilegious since both marques seemed to ignore each other for most of their existence. However, that Huret front mech looked aesthetically spot-on and was much sturdier than the Simplex models from that era.
Technically however it was not meant to be fitted on a frame which had cable guides brazed on the bottom bracket shell. Instead - like the Simplex models, it was to be used with a cable casing stop device fitted at the lower end of the down tube in lieu of the brazed on cable guide.
As I had those cable guides brazed on specifically I didn't feel it was right to fit an additional cable casing stop clamp and leave the cable guide unused.
However I tried various solutions to try and activate the front mech arm without the cable casing stop setup but none would work satisfactorily.
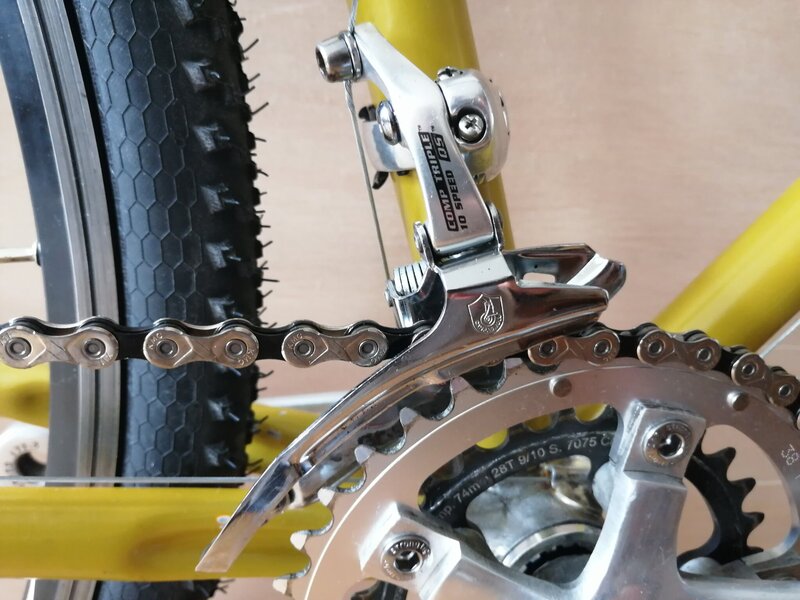
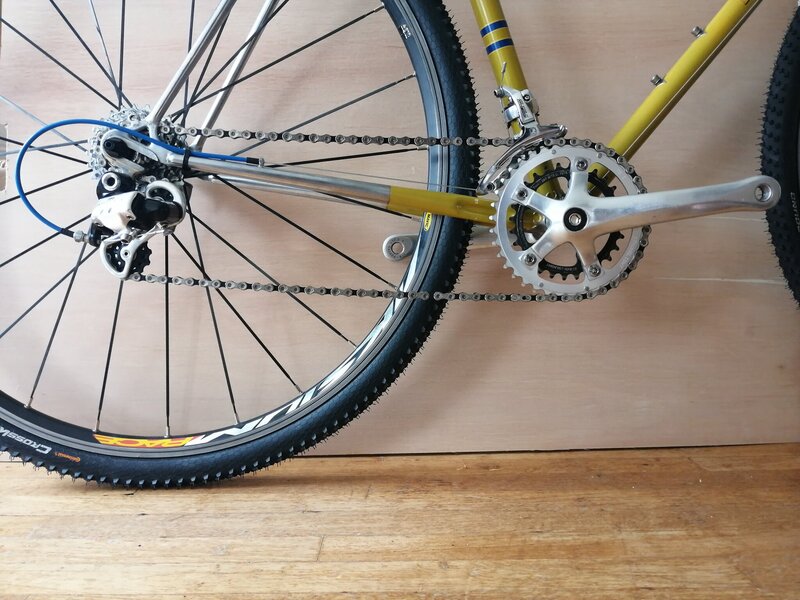
I therefore resorted to the standard modern front mech mechanism and picked my favorite one - Campy Comp triple derailleur. I have a few of them and they work really well as they have both a long actuation arm and a deep wrapping cage.
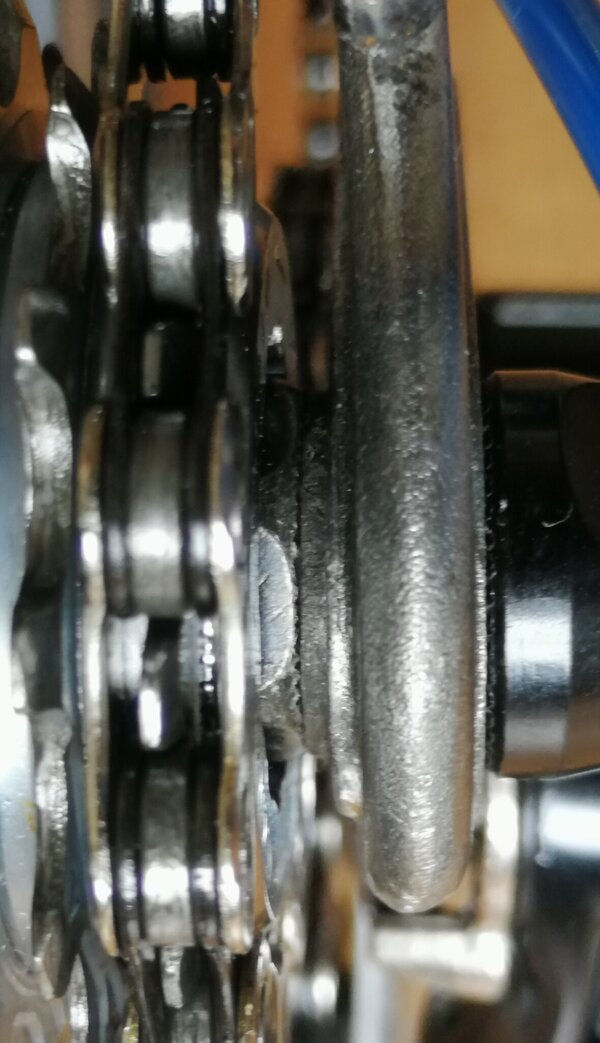
However I faced a small issue... As discussed previously the crankset used here is a super compact model based on a Stronglight triple with 110mm and 74mm BCDs. Nothing wrong here... Except that this type of triple crankset is meant to be fitted on a wide bottom bracket spindle - usually a 113mm one, asymmetrical preferably.
Here the spindle is 107mm. And the granny has 28 teeth.
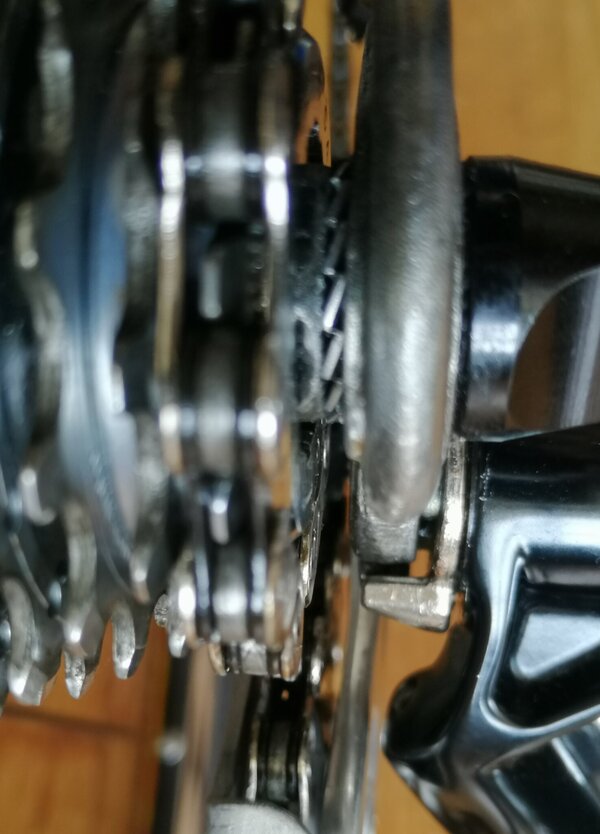
This means that the front mech has to be fitted very low on the seat tube - to catch the chain from the 28t granny, and the cage will be very close to the chainstay.
After many attempts I managed to fit the front mech so that it would be able to catch the chain from the 28t granny, carry it onto the larger ring - which sits in the middle position obviously, and have enough fast and ample actuation to bring it back onto the granny without being impeded - i.e. stopped, by the adjacent rear derailleur cable... That rear derailleur cable acted as an early - i.e. too early, cage stopper on most of my attempts.
Again what is at fault here is the short 107mm spindle. I am really adament to give it a try as I'm keen on reusing what I have in stock - especially if they are of high quality - it's a bulky sturdy oversized and yet light titanium spindle, and if these parts were used on previous memorable bikes and builds - I went across the Alps, the Pyrenees and the Dolomites with this bottom bracket. Not in one go though 😏
So yes, there are fond memories attached to it. But the amount of troubles, the extreme adjustment limitations are now testing my patience and I'm beginning to have second thoughts about this spindle...
I sound a bit emotional now...
Anyway, the front mech is fitted, it works ok... with a very fine setup and strict actuation margins though.
 

Attachments

  • IMG_20230405_143346.jpg
    IMG_20230405_143346.jpg
    320.6 KB · Views: 9
Last edited:
And now the last part of the drivetrain - the chain.

Although I keep and store previously used chains like any other part I've used previously, the odd thing about these used chain I have in stock is that I systematically refuse to fit them on any new build... Especially if I have high expectations from that new bike... And I always have otherwise I wouldn't be building one.
Fortunately I don't end up in Pip's situation... at least not always.
Anyway... I am now inextricably stuck in this situation where I have a very heavy box of used chains - box which keeps getting heavier and heavier as years go by, and I always end up on the internet looking for a new chain...
This time is no different.
I opted for a KMC 11-speed black and silver chain - the basic model, without any slot. I assume the extra material will induce a higher durability and the absence of holes will reduce the amount of mud and grease stuck into the chain...
Not sure this is the right approach.
I also like the black and silver style... It seems to recall the chains of the old days or the semi-rusty chain we get on a barn found bike.
As for its compatibility, an 11-speed chain has an inner width of 2.18mm which is identical to 9-speed and 10-speed drivetrain - no chance therefore for the 11-speed chain links to be stuck on the 10-speed cogs and rings teeth.
However the outer width of an 11-speed chain is slightly thinner than a 10-speed one - 5.4mm vs 5.9mm for the KMC models. 10-speed Campy chains have an even wider outer thickness - 6.2mm.
This narrower outer thickness is the reason why I always use 11-speed chains on my 10-speed build - they provide an additional guaranty against rubbing and jamming between the cogs, rings... and against the lower part of the DS seat stay when the first cog sits very close to the dropout.
At least theoretically... I just pretend to believe this.
 

Attachments

  • IMG_20230316_172948.jpg
    IMG_20230316_172948.jpg
    425.4 KB · Views: 0
Last edited:
  • Like
Reactions: Woz
And this is how the finalized drivetrain looks like...
 

Attachments

  • IMG_20230405_143249.jpg
    IMG_20230405_143249.jpg
    443.2 KB · Views: 12
And now, the last piece of the build - the brake calipers.

As the Gravster will be fitted with a pair of Campagnolo Athena ergo levers the most obvious and logical option for the brakes would have been a pair of side pull dual pivot calipers.

However the clearance available with such brakes would not allow for wide gravel or cyclocross tyres to be fitted.

In addition and most importantly these brakes would really look odd on a 1960 frame...
Yes I can hear people say that such consideration was not taken into account when opting for integrated shifting and braking levers and therefore the same rationale should apply for the brake calipers.
But those 1990s Campy ergo levers have a distinctive retro flair that makes them acceptable - aesthetic wise that is, on a classic frame.
That's a bit subjective, I know...

In my opinion the most suitable option both from a (subjective) aesthetic standpoint and to accomodate tyre clearance requirements is a pair of center pull calipers. Such as the originally fitted Mafac Competition.
To be perfectly honest I do not know it the Mafac calipers originally fitted were "Competition" or "Racer", but I found the engraved "Competition" cursive lettering more attractive and a bit less common than the "Racer" one.. Those little precious things...
The picture below is primarily posted here just to recall how the Racer calioers look (read? ) like as the following pictures will show the Competition version... And also because I haven't taken any picture of the Competition prior to modifying them...
 

Attachments

  • IMG_20220916_141758.jpg
    IMG_20220916_141758.jpg
    624.7 KB · Views: 3
  • Love
Reactions: Woz
And this is how the finalized drivetrain looks like...

This was interesting. I'm looking into lower gearing and possibly a double up front.

Looks like the front mech can't get any lower and would almost foul the cable? What size is that outer chainring?

What is the reason for the black stuff around the front mech clamp? Is it because of the smaller 28mm diameter seat-tube or just not to scratch paint?
 
Looks like the front mech can't get any lower and would almost foul the cable?
Absolutely!
If I wasn't currently in pain with a sore back I would post a picture from behind the front mech cage showing this later nearly touching the cable. It actually took me a lot of time to finely adjust the front mech to achieve this balance enabling to shift properly without touching the rear mech cable.

What size is that outer chainring?
38t.
That makes a 38x28 crankset and for the time being an 11-26 cassette.
At some point I might remove the 14t cog and fit a 29t cog - the 11-speed Athena rear mech will still have enough chain wrap to cope with this 38x28 & 11-29 setup.

What is the reason for the black stuff around the front mech clamp? Is it because of the smaller 28mm diameter seat-tube or just not to scratch paint?

Both! 😁
As soon as I started fitting the front mech I immediately damaged the seat tube paint with the clamp... That first attempt was with a Huret with a rough clamp.
Fortunately I had to look for another option as that Huret front mech wouldn't work.
All my other options were based on Campy devices and the good thing with these front mechs - like with most Campy parts, is that you can easily assemble, disassemble and mix the parts in order to build exactly what you need.
So in order to protect the paint I picked a 32mm clamp that was fitted on a Record front mech intended for a 53x39 crankset, and put it on this Comp triple front mech - after removing the braze-on clamp. And obviously I needed to add that black plastic shim - which also acts as a paint protection.
In order to protect the paint and to have a lean fitting I preferred that option instead of using a 28.6mm collar clamp in conjunction with the braze-on clamp initially fitted.
 
Back
Top