Shimano Deore Thumbshifter Rebuild/Mod Guide

lrh

Senior Retro Guru
Firstly thanks to the writer of this guide who provided inspiration and a couple of useful tips: http://www.allankelly.info/servicingthumbies.html

(EDIT: I notice that guide has gone)

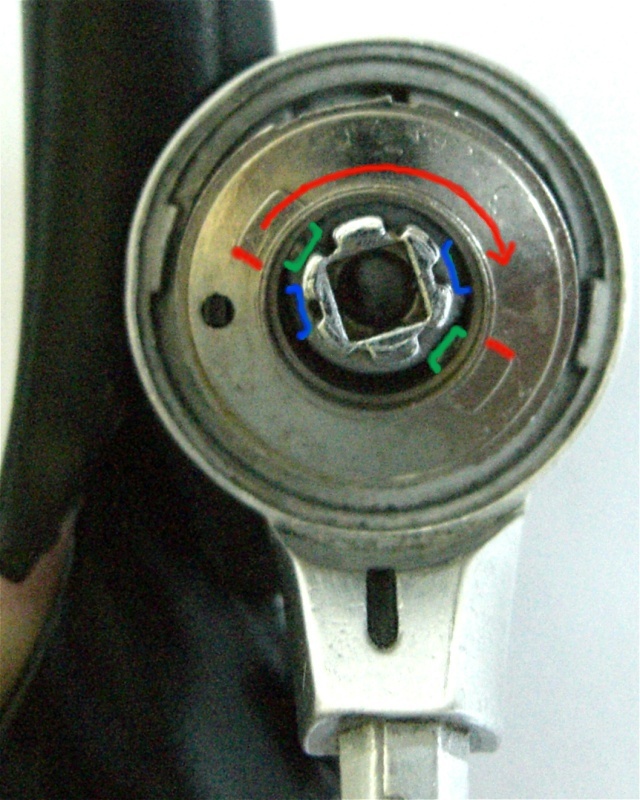
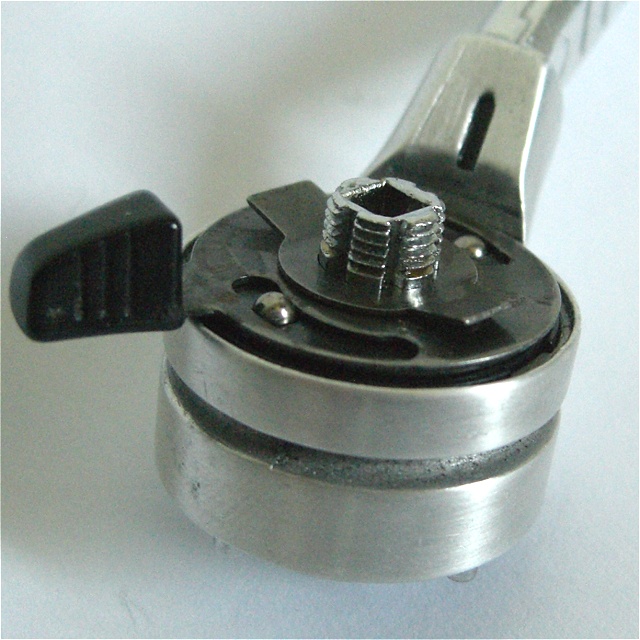
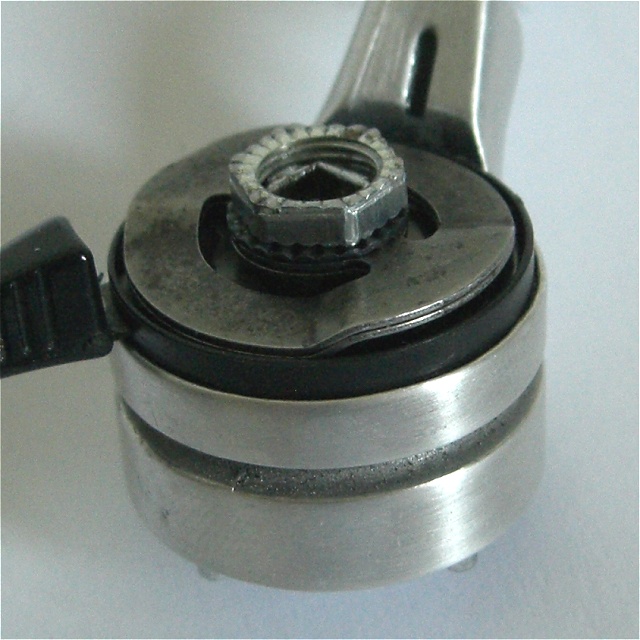
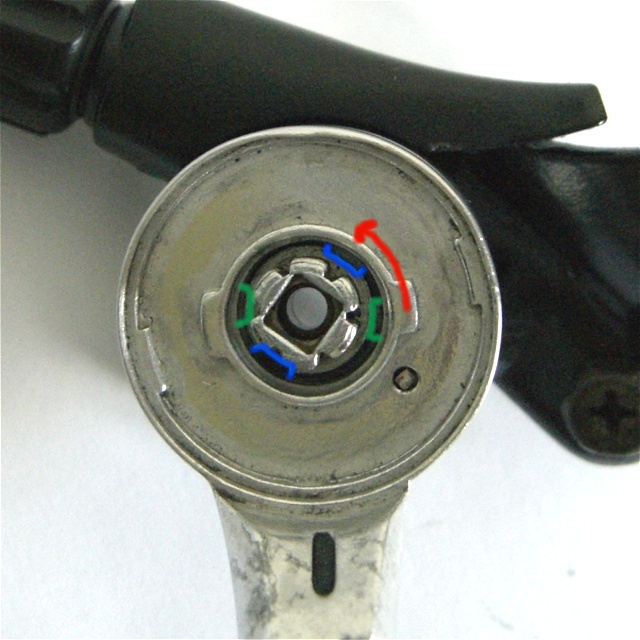
I wouldn't have guessed that the top cap is screwed on from underneath and the spindle nut has a left-hand thread. However when I came to re-assemble my shifters I found that guide lacking in detail and pictures. After a lot of trial and error I figured it out and decided to do more detailed build-up guide.

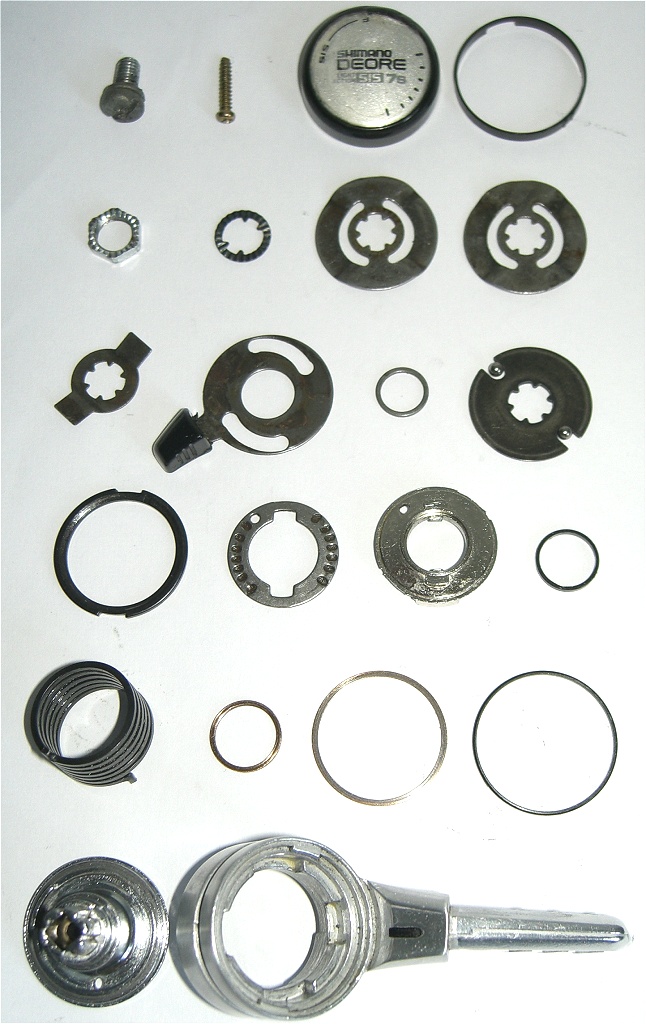
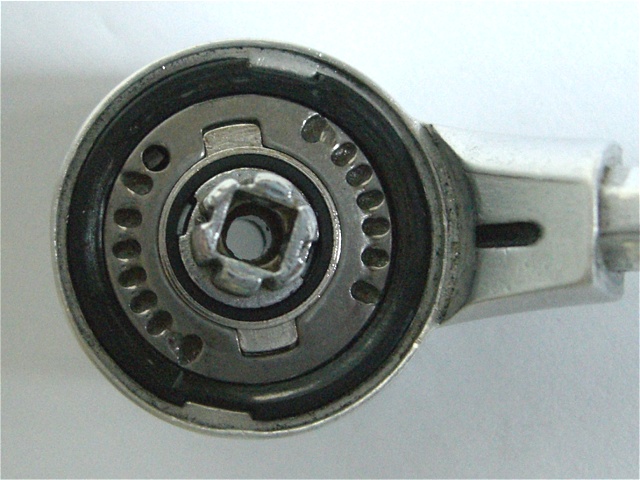
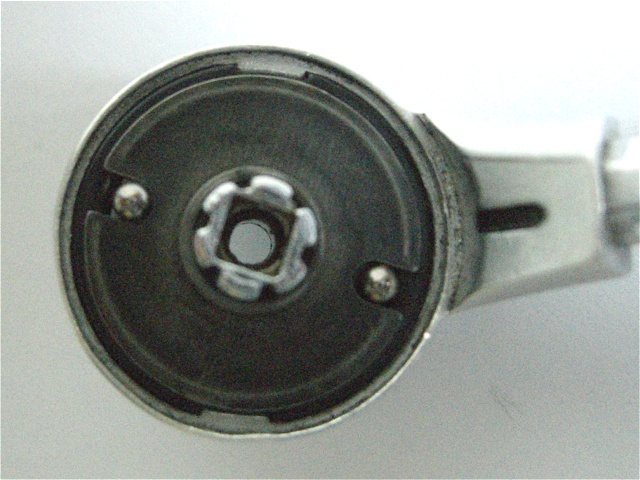
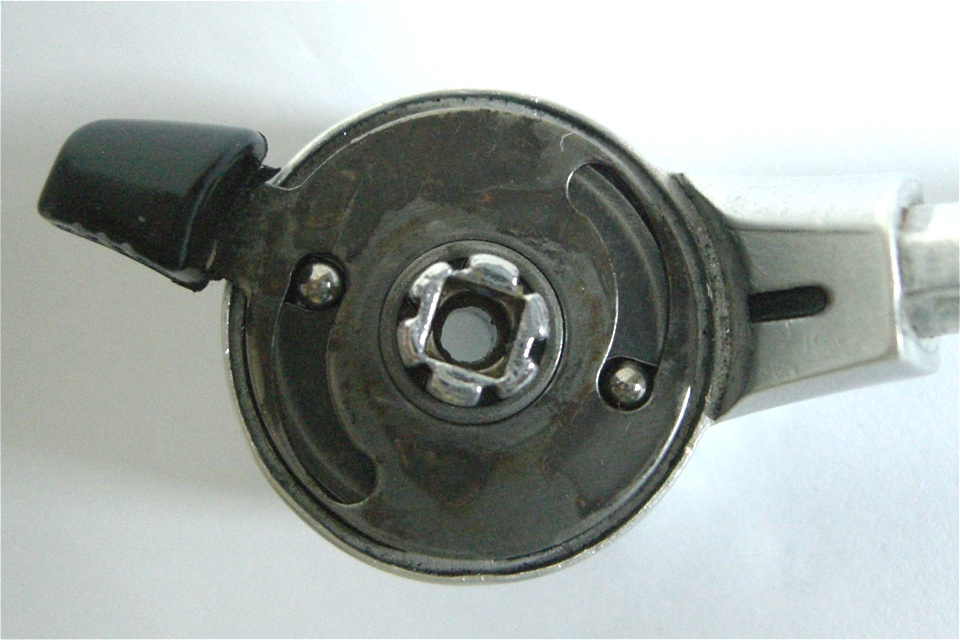
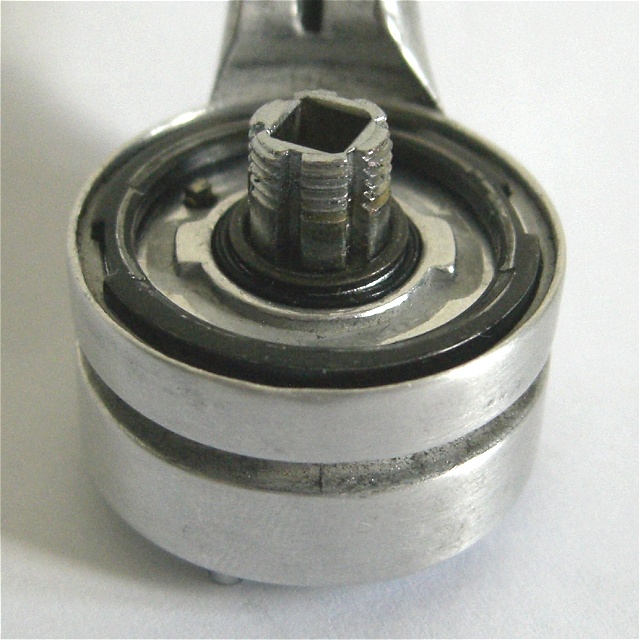
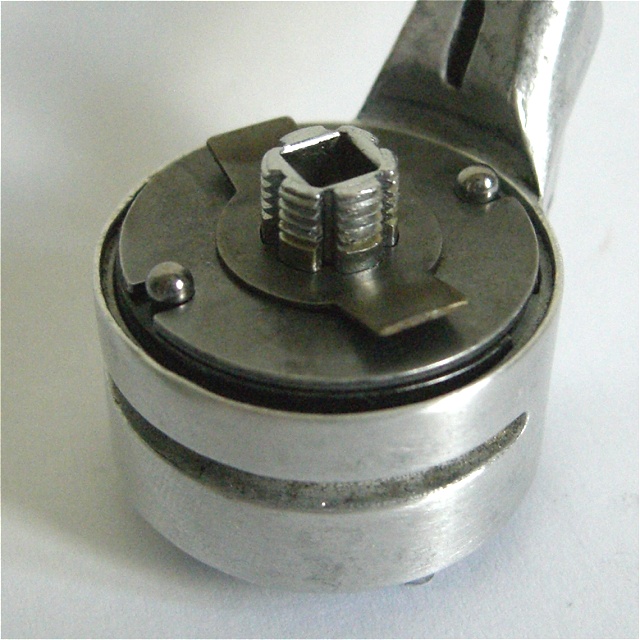
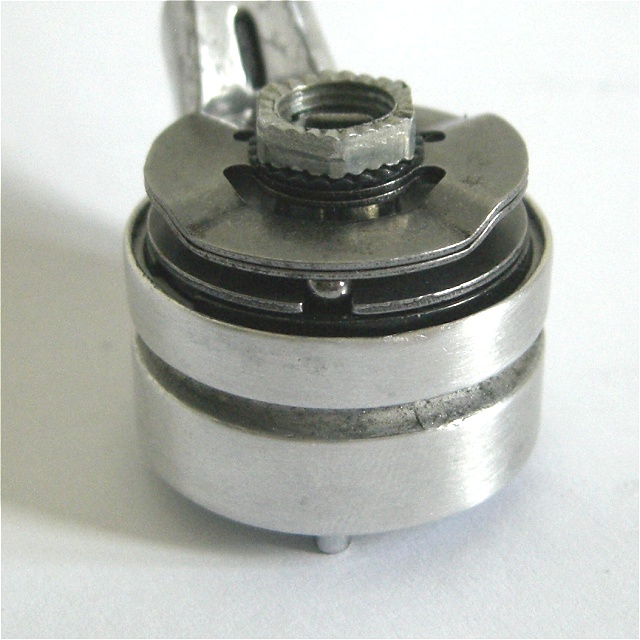
For clarity my guide shows how to build up both shifters from base parts, which means you can just pull yours apart without having to remember where everything goes. You can also follow the steps in reverse to safely take a shifters apart without bending or snapping anything.

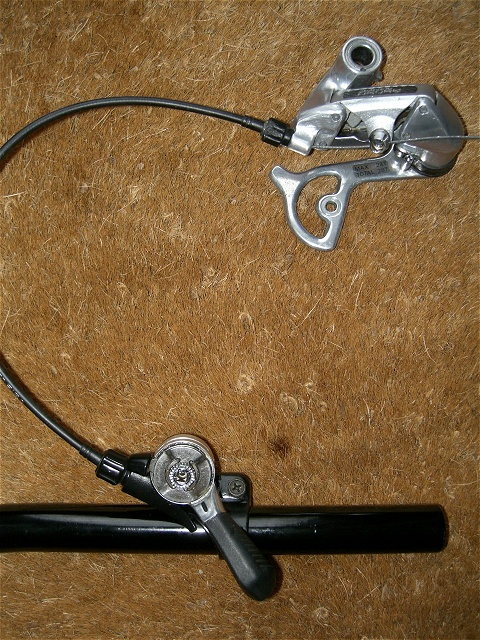
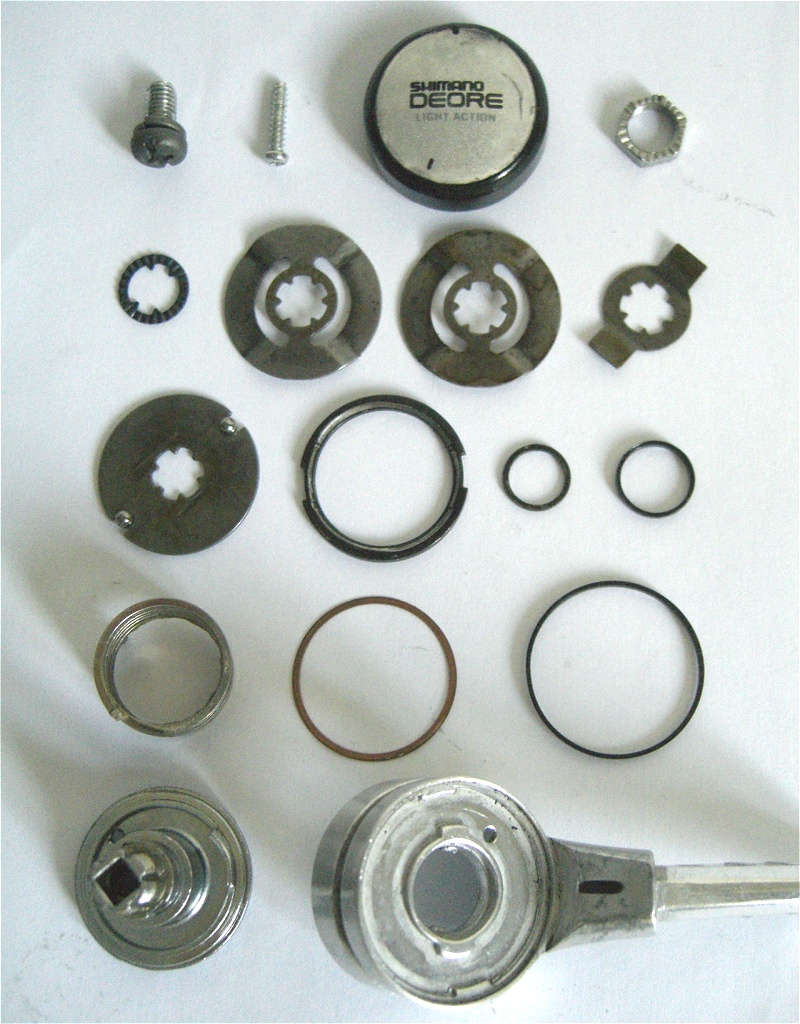
These are MT62 Deore II/DX thumbshifters but the M732 Deore XT are almost identical internally, only the right-hand shifter adds a tiny bearing at the base of the spindle (see page 3 for a pic, thanks Matthias). I've also rebuilt Mountain LX thumbshifters recently and the info here should cover you for those as well.

Note: I assembled the shifters without grease purely to make the pictures clear. You should cover everything liberally with grease.

Let me know your question, comments, experiences :)

Cheers, Lawrence
 
RIGHT-HAND SHIFTER

First here's the component parts in approximate order they come off (left-to-right, top-to-bottom). Some sit tight against or in others so you may not find them all at first.

DeoreRightThumbshifter-01.jpg


Take the spindle and fit the copper bushes and the big plastic seal. Then screw it onto the mount in the orientation shown, with the spring hole nearest the mount screw.

DeoreRightThumbshifter-02.jpg


Fit the spring into the thumbshifter lever (it will probably be tight) and position the end hook as shown.

DeoreRightThumbshifter-03.jpg


Slide the lever onto the spindle making sure the hook at the other end of the spring slips into the hole below. Be careful to not disturb the lower bush and seal. The red dot shows the end of the spring and its position relative to the spindle/lever.

DeoreRightThumbshifter-04.jpg


Pop the chrome plate on top so the spring slots into it. Now the fun part... Holding the lever in a fixed position and without pressing down, use needle nose pliers against the edges in red to rotate the chrome plate ~120 degrees clockwise, then press the plate down so it slots into the lever and its inner tabs (green) slide down the grooves in the spindle (blue). While holding it down, slowly let the plate/lever rotate back anti-clockwise under the action of the spring. This is the hardest part of assembly and might take a few attempts.

EDIT: See my post on page 3 for an easier method: viewtopic.php?p=2357482#p2357482

DeoreRightThumbshifter-05.jpg


You can now remove the shifter from the mount, it's not in the correct orientation anyway. The friction-mode bearing race and indexing plate go on along with the smaller plastic seal. Here you can see the "hidden 8th click" is actually created by one ball bearing popping into the spring hole.

DeoreRightThumbshifter-06.jpg


Next the bearing-locating plate, ball bearings and small metal washer go on.

DeoreRightThumbshifter-07.jpg


Now the SIS/friction mode plate (shown in SIS position).

DeoreRightThumbshifter-08.jpg


The winged washer goes next.

DeoreRightThumbshifter-09.jpg


Finally the two identical Pringle-shaped plates, ribbed washer, plastic spacer (with cut-out for the SIS/friction lever) and then the nut screws on anti-clockwise, left-hand thread remember!

DeoreRightThumbshifter-10.jpg


At this point you're wondering how much to tighten the top nut? The answer is you should tune it to the mech you're using, especially if you're using later mid 90s mechs that have much softer springs. Suntour and modern bar-end shifters let you adjust the tightness of the shifter externally but Shimano didn't give us the option on these.

Ideally you'd fit the shifter (minus top cap) back onto a bike, hook it up to a mech and adjust the top nut so the shifter holds position (in both indexed mode and friction) while being as light as possible. You'd then have to remove the main screw underneath the shifter to screw the top cap back on... A bit of a fiddle so if you've got a spare mech, cables and handlebar lying around you can tune the shifter like this:

DeoreRightThumbshifter-11.jpg
 
LEFT-HAND SHIFTER

The left-hand shifter is slightly simpler and easier to put together because there's no separate chrome plate to twist.

DeoreLeftThumbshifter-01.jpg


Fit the spindle to the mount as shown, adding the copper bush, large plastic seal and spring. Remember I'm not greasing anything for the photos!

DeoreLeftThumbshifter-02.jpg


Slide the lever over the spindle so it engages with the spring, then rotate the whole lever ~60 degrees anti-clockwise and push down so the inner tabs (green) slide all the way down the grooves in the spindle (blue). You can then let slowly let the lever rotate clockwise under the action of the spring.

DeoreLeftThumbshifter-03.jpg


Next add the small plastic bush, small metal washer and bearing race. Make sure you press the bearing race down firmly so it's on tight and level.

DeoreLeftThumbshifter-04.jpg


Now adding the bearing-locating plate, ball bearings and winged washer.

DeoreLeftThumbshifter-05.jpg


Finally add the two "Pringle" plates, ribbed washer and nut.

DeoreLeftThumbshifter-06.jpg


Ideally you'd hook the shifter up to a front mech and adjust the top nut but they have no cable stop so I just used the rear mech above to adjust the nut approximately. This isn't a perfect simulation and might need tweaking later but it won't be far off.
 
Now I've shown you how to put these back together as Shimano intended I can tell you I'm not that impressed with them! Mountain LX shifters contain half as many parts and yet work better. This is partly because of a slightly longer lever but it got me thinking about removing unneccessary parts from the Deore's.

"SINGLE PRINGLE" MOD

I've nick-named the curved plates "Pringles" hence the cute name for this mod. Mountain LX have only one whereas the pair in Deore's work a bit like a leaf-spring increasing the pressure on the ball bearings. This extra pressure isn't really required, especially if you're using a later 90s mechs which have lighter coil springs.

So just fit one of the plates when assembling the shifters. Don't expect a massive difference but moving to higher gears now only requires a flick of the lever rather than a deliberate side-of-the-finger shove. I often like to shift up 2 gears at a time for max acceleration and this mod makes it easier :)

NO SPRING MOD

This is simply removing another part the Mountain LX right shifter does without, the spring. This works against the mech spring but with the top nut tight I can't feel it doing anything. The spring is also tight inside the barrel and can only be adding weight and friction. Ditching it also avoids the most difficult step of re-assembly above.

Again the difference is subtle but even combined with the above mod the right shifter can still hold any gear, suggesting the extra parts are of little use.

The left hand shifter spring does seem to have more effect so it's worth leaving that in. The left Mountain LX shifter does have one and keeping it doesn't really cause any problems.

8TH CLICK MOD

Another I've just thought of but not tried. The extra 8th click is rather heavy because only one ball bearing drops into a position (the spring hole) on the indexing plate while the other sits on top making lever movement stiff. You could use a drill to make an 8th position on the opposite side of the indexing plate, making this a proper and more easily selectable 8th position. I wouldn't be surprised if someone has already tried this?

OTHER MODS

Who knows, you tell me... ;)

I'll update this post with any other bits and bobs I think of.

Cheers, Lawrence.
 
A thoroughly splendid thread !

Bookmarked for when I next think 'yea, I can fix that' when I plainly can't.....
 
It's not completely unheard of for people to make up 9 hole index plates to use the thumbies on 9 speed systems
 
Very nice job of documenting the reassembly process! If only this level of documentation were available for a dozen or so of the other shifter models/group lines.

Mods. Any benefit in creating an index in the archive of the shifter models (and other components), showing those that have this level of supplemental documentation? Imagine the index allowing the following:
  • A means by which members could "request" or indicate the level of interest/desire/need in a particular model's supplemental documentation?
    A means to indicate which ones are under construction and an ETA.
    A means of recognizing/appreciating those members that have contributed in this fashion. Documentation of the Month? Special avatar?
This kind of sefless contribution is invaluable. If the site and its members can encourage and nurture it, we are better for it. Maybe some of the members herein which have the skills and tools might gradually add to the collection.

May I encourage the site moderators to poll the members about this topic?
 
Thanks guys :) I've also done a mini-guide on later Rapidfires (see my sig) and I can see me doing a homage to Mountain LX shifters in future (when I get some Exage mounts for them).

There's already a guide to older Rapidfires here which I'm not sure I could improve on: http://www.cs.hmc.edu/~geoff/deoredx/index.html Thankfully I don't have a set because it looks like far more work!

I know there's a Workshop section on the Wiki (http://www.retrobike.co.uk/wiki/Category:Workshop) but that's a bit remote from the main forum. Perhaps we just need a "Technical" sub forum?
euphras_1":1gflyzxg said:
i did something comparable for SunTour shifters back in 2007, it was moved to another blog site in 2011: http://euphras.blogspot.de/2011/10/how- ... index.html
I've seen that and it also inspired me! I was surprised there was no guide of the same detail/quality for these so took up the challenge.
 
Back
Top