GearUp Oakrak
2 to 4 bike floor to ceiling storage/display stand.
Let us face it we here, have a problem with bikes. It will be the norm on a site like this to expect a member to have multiple bikes. Perhaps one for the road and one for the hills, one for the commute and one for best, it certainly isn’t uncommon amongst our kind to have one for everyday of the week and then a few spares.
Although we resist and ignore the complaints of our significant others regarding the quantity of bikes owned, we do genuinely accept there is a problem and that problem is storage.
Spare a thought then for people like me, city dwelling cyclists, there are lots of us. We lack the luxury of space more than any. A dank garden shed is something we visually caress on trips out of the city, a garage is a dream, nothing more. Rented accommodation only serves to compound the issue with the typical ban on wall mounting anything being used to keep chunks of tenant’s deposits where they have hung anything heavier than a Buffy the vampire slayer poster.
For the last year I have lived with two of my eleven strong fleet taking up space and looking ungainly in the corner of the lounge of our shared three bed, central London apartment, with thankfully only minor comment from my housemates. I wanted to improve things, save some space and show the bikes off rather than piling them up.
After two weeks research looking at various options from sub £40 lean to and free standing units, through to the bike shop style floor to ceiling telescopic pole products. However it was the timber GearUp Oakrak that got the vote. (Around £125-170 online, it’s worth shopping about)
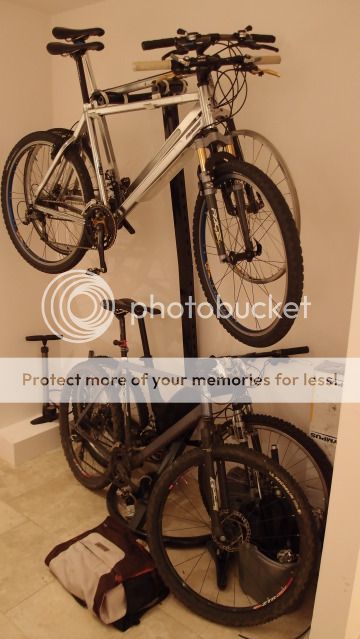
My only previous experience of vertical bike racks in the home has been a fairly agricultural looking lean to unit that is designed to carry two bikes one above the other by bearing the weight on the floor and resting against a wall. I still own this rack, it resides in an alcove in the hallway where I keep my daily rider and a couple of other bikes that are either being worked on, in need of a clean or not pretty enough to argue passed the housemates into the lounge.

The current hallway rack.
Wobbly, poorly made and visually intrusive, it was clear that another of the same would not pass muster in the lounge.
Made of solid Oak, I was hoping that the quality and aesthetic would be sufficient to fit into the room as a piece of furniture, getting away from the industrial/commercial appearance of the metal pole iterations, whilst allowing me to show my bikes at their best. The order was placed and 3 days later a large box arrived.
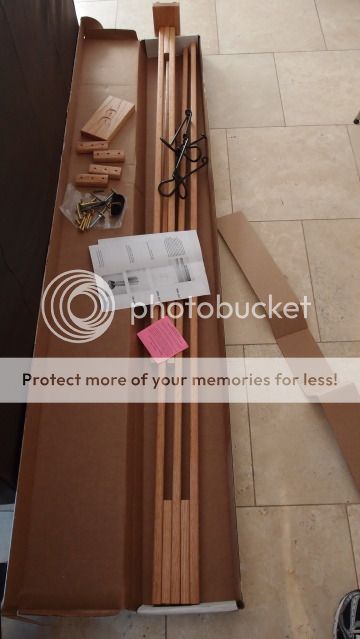
The flat pack
On opening the kit I was pleased to see relatively few parts, the bulk of the drilled oak uprights are already assembled. Two halves of the upright section, four bike hanging arms, a floor plate, a ceiling plate and a small clear bag of spacers and fixings. A quick glance at the instructions revealed a simple 7 step guide on how to finish the assembly and set up your new rack. (For the purposes of this review of course, clearly being a man I would normally scorn at the suggestion of looking for guidance on building an unfamiliar item.)
Helpfully there was a contents list making it easy to check off that you have all the components you require before the point you find yourself holding two bikes in the air by hand whilst attempting to contact B&Q to see if they sell the correct sort of threaded connector.
It turned out all was present but for one of the supposedly two included hex keys.
Doing my bit for the peoples of the US of A.
Don’t worry Doron H, I have hex keys.
The kit was assembled in good time and offered up to the 2.5m ceiling-floor gap, the art is to get it just shorter than the required height then use the adjustable feet to clamp the unit in place. It is important to state that GearUp do make clear that the unit should be assembled under a beam in the ceiling, not doing so could lead to a costly repair job when you punch the top end of the rack through the plaster board. In my case I decided to spread the load of the top plate a little using a handy flat non marking material. (No I have not let on that I know where the chopping board went)
Once clamped it was on to the bike holders. Thick formed wire hooked pieces, plastic-coated to protect your frames. These simply attach using the supplied fixings into the predrilled holes at whatever height you prefer. This for me is where things slowed to a crawl. Getting the heights right so they position your cycles at the best angles took a lot of trial and error, especially on the top holder.
The adjustment of the feet requires an 8mm spanner, a tool that is not supplied in the kit.
The bikes to go on this rack are some of my “wall hanger collection” bikes I have collected but keep as works of mechanical art and of historical interest (to like minded Pace geeks at least), a crime to some but to me a means of preventing some very rare metal being destroyed in my incompetent hands. So for me this stands primary function was to tidy and display two of my most prized bikes.
Yes I know it doesn't look straight but my iPhone spirit level app insists it is (good old fashioned spirit level on order!)
The DH bike is According to online specifications each holder can support a bike of up to 20kg, however this bike is a heavy old lump and I didn’t feel like testing any margin of error quite so soon, so although supported by the rack the bulk of the downhill bikes vast weight is passed on to the floor through the wheels.
The upper hanger presented more of an issue. Having screwed in the units once, building up my arm muscles like Popeye in the process, I tried the bike and the front wheel was about a foot lower than the rear, it looked a mess. Out came the hex keys again and adjustments made. Unfortunately the upper mount of the left holder arm needed to screw into the same point as the lower mount of the right holder arm, in order to get the wheels balanced. The fixings supplied for this purpose were too long meaning that one or other or both mount points could not be fastened up tight. This was resolved using a few bits from my parts bin, and although not visually a success I am confident in the structure holding long enough for me to create a more aesthetic fix (lets say 4 years?)
The bodged upper hanger fixings.
The kit included two lengths of Velcro to loop the front wheel to the frame to maintain alignment; however for my mountain bikes this strip was too short. For road bikes it would have been fine. And really that is my only criticism of the build process.
Summary
A nice solid oak display stand that can look the part in a home. Easy to assemble and a good back drop to a display bike. The result of the evenings tinkering is a good looking stand that seems to do its job. Don’t buy this sort of stand if your sole reason is to save space, the reality is that floor space gained is marginal, but to work as intended as a display, so far so good! If it collapses over night...I’ll update this review!
Pros
Quality material
Well made, obvious attention to detail in the components.
Adaptable (7’-10’ ceilings and plenty of position options for the bike hangers on the upright)
Cons
Price, far more costly than aluminium telescopic units from the likes of Rose cycles and the Edinburgh Bicycle co-op.
Can be difficult to obtain best angles to display your bikes on.
Additional bike hangers are relatively costly extra's
2 to 4 bike floor to ceiling storage/display stand.
Let us face it we here, have a problem with bikes. It will be the norm on a site like this to expect a member to have multiple bikes. Perhaps one for the road and one for the hills, one for the commute and one for best, it certainly isn’t uncommon amongst our kind to have one for everyday of the week and then a few spares.
Although we resist and ignore the complaints of our significant others regarding the quantity of bikes owned, we do genuinely accept there is a problem and that problem is storage.
Spare a thought then for people like me, city dwelling cyclists, there are lots of us. We lack the luxury of space more than any. A dank garden shed is something we visually caress on trips out of the city, a garage is a dream, nothing more. Rented accommodation only serves to compound the issue with the typical ban on wall mounting anything being used to keep chunks of tenant’s deposits where they have hung anything heavier than a Buffy the vampire slayer poster.
For the last year I have lived with two of my eleven strong fleet taking up space and looking ungainly in the corner of the lounge of our shared three bed, central London apartment, with thankfully only minor comment from my housemates. I wanted to improve things, save some space and show the bikes off rather than piling them up.
After two weeks research looking at various options from sub £40 lean to and free standing units, through to the bike shop style floor to ceiling telescopic pole products. However it was the timber GearUp Oakrak that got the vote. (Around £125-170 online, it’s worth shopping about)
My only previous experience of vertical bike racks in the home has been a fairly agricultural looking lean to unit that is designed to carry two bikes one above the other by bearing the weight on the floor and resting against a wall. I still own this rack, it resides in an alcove in the hallway where I keep my daily rider and a couple of other bikes that are either being worked on, in need of a clean or not pretty enough to argue passed the housemates into the lounge.
The current hallway rack.
Wobbly, poorly made and visually intrusive, it was clear that another of the same would not pass muster in the lounge.
Made of solid Oak, I was hoping that the quality and aesthetic would be sufficient to fit into the room as a piece of furniture, getting away from the industrial/commercial appearance of the metal pole iterations, whilst allowing me to show my bikes at their best. The order was placed and 3 days later a large box arrived.
The flat pack
On opening the kit I was pleased to see relatively few parts, the bulk of the drilled oak uprights are already assembled. Two halves of the upright section, four bike hanging arms, a floor plate, a ceiling plate and a small clear bag of spacers and fixings. A quick glance at the instructions revealed a simple 7 step guide on how to finish the assembly and set up your new rack. (For the purposes of this review of course, clearly being a man I would normally scorn at the suggestion of looking for guidance on building an unfamiliar item.)
Helpfully there was a contents list making it easy to check off that you have all the components you require before the point you find yourself holding two bikes in the air by hand whilst attempting to contact B&Q to see if they sell the correct sort of threaded connector.
It turned out all was present but for one of the supposedly two included hex keys.

Doing my bit for the peoples of the US of A.

Don’t worry Doron H, I have hex keys.
The kit was assembled in good time and offered up to the 2.5m ceiling-floor gap, the art is to get it just shorter than the required height then use the adjustable feet to clamp the unit in place. It is important to state that GearUp do make clear that the unit should be assembled under a beam in the ceiling, not doing so could lead to a costly repair job when you punch the top end of the rack through the plaster board. In my case I decided to spread the load of the top plate a little using a handy flat non marking material. (No I have not let on that I know where the chopping board went)

Once clamped it was on to the bike holders. Thick formed wire hooked pieces, plastic-coated to protect your frames. These simply attach using the supplied fixings into the predrilled holes at whatever height you prefer. This for me is where things slowed to a crawl. Getting the heights right so they position your cycles at the best angles took a lot of trial and error, especially on the top holder.


The adjustment of the feet requires an 8mm spanner, a tool that is not supplied in the kit.
The bikes to go on this rack are some of my “wall hanger collection” bikes I have collected but keep as works of mechanical art and of historical interest (to like minded Pace geeks at least), a crime to some but to me a means of preventing some very rare metal being destroyed in my incompetent hands. So for me this stands primary function was to tidy and display two of my most prized bikes.

Yes I know it doesn't look straight but my iPhone spirit level app insists it is (good old fashioned spirit level on order!)
The DH bike is According to online specifications each holder can support a bike of up to 20kg, however this bike is a heavy old lump and I didn’t feel like testing any margin of error quite so soon, so although supported by the rack the bulk of the downhill bikes vast weight is passed on to the floor through the wheels.
The upper hanger presented more of an issue. Having screwed in the units once, building up my arm muscles like Popeye in the process, I tried the bike and the front wheel was about a foot lower than the rear, it looked a mess. Out came the hex keys again and adjustments made. Unfortunately the upper mount of the left holder arm needed to screw into the same point as the lower mount of the right holder arm, in order to get the wheels balanced. The fixings supplied for this purpose were too long meaning that one or other or both mount points could not be fastened up tight. This was resolved using a few bits from my parts bin, and although not visually a success I am confident in the structure holding long enough for me to create a more aesthetic fix (lets say 4 years?)

The bodged upper hanger fixings.
The kit included two lengths of Velcro to loop the front wheel to the frame to maintain alignment; however for my mountain bikes this strip was too short. For road bikes it would have been fine. And really that is my only criticism of the build process.
Summary
A nice solid oak display stand that can look the part in a home. Easy to assemble and a good back drop to a display bike. The result of the evenings tinkering is a good looking stand that seems to do its job. Don’t buy this sort of stand if your sole reason is to save space, the reality is that floor space gained is marginal, but to work as intended as a display, so far so good! If it collapses over night...I’ll update this review!
Pros
Quality material
Well made, obvious attention to detail in the components.
Adaptable (7’-10’ ceilings and plenty of position options for the bike hangers on the upright)
Cons
Price, far more costly than aluminium telescopic units from the likes of Rose cycles and the Edinburgh Bicycle co-op.
Can be difficult to obtain best angles to display your bikes on.
Additional bike hangers are relatively costly extra's