Regina extra freewheel removal

justridecycles

Dirt Disciple
I am in the process of stripping a rear wheel to replace spokes for an old Bob Jackson. It has a regina freewheel that I dont have the tool for and a quick internet search hasnt helped much. I have managed to remove some sprockets but not much more. Any tips? If anyone has the tool I will gladly pay postage if you would be willing to lend me one. Photos attached. Thanks
 

Attachments

  • Bob freewheel.jpg
    Bob freewheel.jpg
    28.7 KB · Views: 3,835
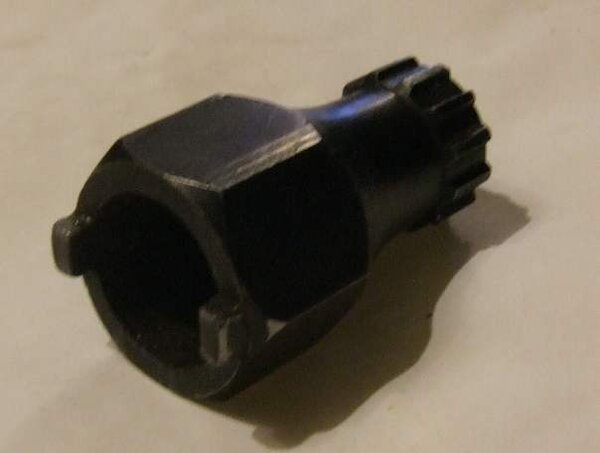
I've got one of these you can have for £4 posted (First Class Packet) - payment via Paypal.

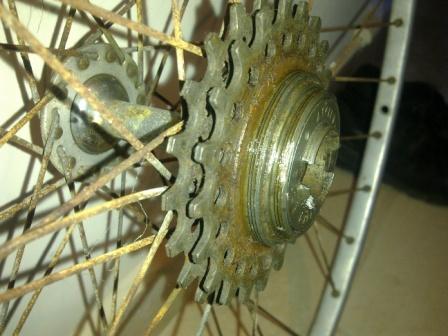
However, you need to know that those things could be a nightmare to remove - the Regina Extra was the worst things ever created when it came to getting it off the wheel! The notched fitting into which the tool fits disintegrates with ease, and the tool therefore needs to be clamped very securely onto the hub axle (QR skewer, e.g.). These were the freewheels that resulted in manufacturers moving to splined tools...

Even if you are really careful it's still possible to destroy the dogs with the tool - I've seen that raised section peeled right back until there's nothing left! If you do this the freewheel is obviously finished anyway. My suggestion would therefore be that you dismantle the freewheel:

Knock the cover plate off - the two holes turn clockwise to undo (LH thread)
Holding the freewheel over a large bowl or similar pull the bit with the sprockets on it off of the wheel. Tiny bearings will shower everywhere (hopefully into the bowl...), and two pawls plus their leaf springs will probably also fall out.
The fitting for the pawls can be clamped into a vice; turn the wheel to remove the remaining bit of the freewheel.

Personally, I'd then replace the freewheel with a modern Shimano or similar.

However, it's perfectly possible to rebuild the freewheel. It's not an easy job, though. Fix the bearings in place with grease (not too much, or your freewheel will work both ways...), place the pawls / springs in place and hold them flush by wrapping cotton thread right around the freewheel boss and over the pawls, and replace the bit with the sprockets on it. It's much easier to explain this than it is to do it; you need about seven or eight pairs of hands and considerable precision to avoid another display of exploding balls. :x

PM me if, after reading all this, you still want the remover!
 

Attachments

  • DSCF4017.JPG
    DSCF4017.JPG
    15.6 KB · Views: 3,825
Yes, the old two prong jobs are a real PITA, I've got a 15" adjustable spanner for such occasions enables me to get plenty of purchase.
I stand over the wheel so can push down whilst keeping the tool straight using the QR lever which you screw on quite tight to hold it in place(remove the small coiled springs)
When you get it going just a small bit unscrew the QR a little then it should be plain sailing after that.
I always always put on copper grease on the threads so no chance of it ever sticking again.
Just a thought, wouldn't it be cheaper & far less hassle just to buy another wheel? :)
 
I am sure that I used an alternative approach. Clamp in the vice a bit of flat bar that fits the slots well. I have used big flat headset spanners doubled. Plenty of length means that even if everything slides, nothing falls out. Whilst maintaining some downward pressure turn the rim anti clockwise. Much easier than using the correct tool and a spanner
 
My freewheel is a regina 6 speed, i'm not sure if it's a different mount but bike-oloygy in leeds soon whipped it off after evans spent 3 hours trying to find a tool that fitted. While I was calling around spa cycles in harrogate said they had the tool too so maybe give them a try?
 
Thanks everyone - going to try the tool first. Will let you know how I get on. The rest of the bike came apart quite easily so I am hoping........... :roll:
 
I've got an odd size two-slot Unity freewheel. I couldn't find a tool anywhere but my local shop were able to get it off without damaging the wheel or the freewheel. They didn't have the right tool, but he said it's easy enough to get off with a hammer and chisel. No idea how they did it but it took them a good 10 minutes and there are no signs of it being hit with a chisel.
 
Well I am either a naturally talented cycle mechanic or very very lucky. I got the tool from Simon and the freewheel came straight off. No problem. I have to say that the bike it was off has been stored for over 20 years, and must have been cared for in the past as everything came apart with ease. Thanks for all your help everyone.
 
Back
Top