HELP!!! I've broken my Vitus FCK9 Carbon Singlespeed!

spscho

Retro Newbie
My new city hack :D:


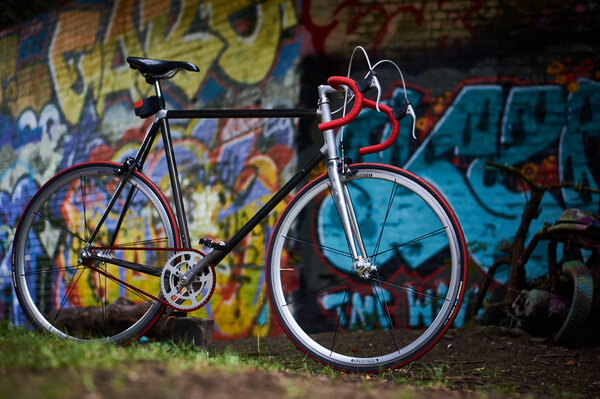
I finally managed to get together all the bits for my Vitus FCK9 singlespeed conversion, and I reckon its gone pretty well! The chain is a little crackly sometimes, which I guess is a tension/alignment issue. One that I'll have to live with when the dropouts are almost vertical... Unless i get one of those ugly tensioners :?
Total cost of the build was about £250 (a fair few of the parts came from free donor bikes)

Full details are below, what do people think?

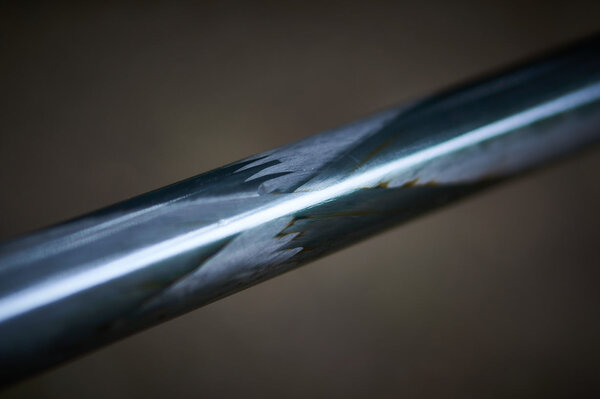
Frame: Vitus FCK9 Carbon Kevlar

Fork: Schwinn Alloy

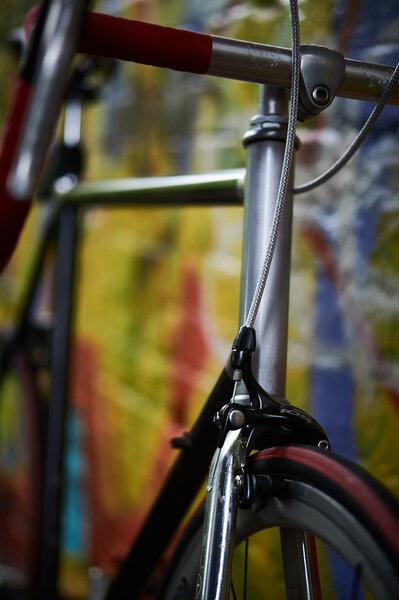
Headset: Tange Seiki Threaded 30.3mm Stack
Stem: SunRace Quill
Handlebar: Tange Road Champion
Bar Tape: Velox Cotton Red

Brake Levers/Brifters: Shimano 600
Brake Calipers: Shimano 105
Brake Pads: Shimano 105
Brake Cables: Jagwire Braided
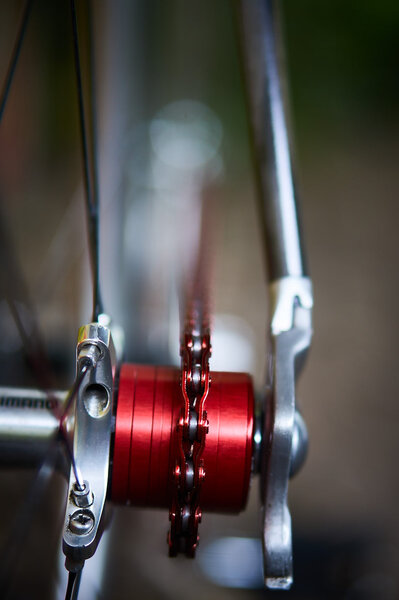
Cassette: 14T
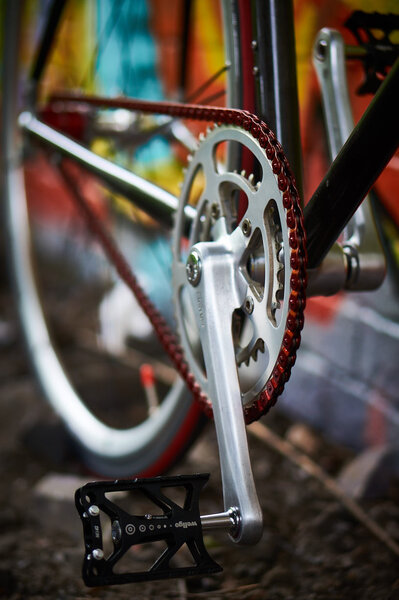
Chain: Gusset Slink Half-link Red
Cranks: SunRace 50T/30T Double
Pedals: Wellgo M142

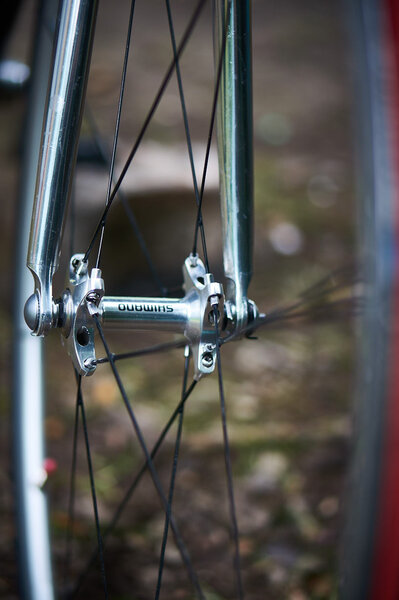
Wheelset: Shimano Ultegra WH-6500
Tyres: Schwalbe Lugano 700x23C Red Stripe
Tubes: Continental Race 28

Saddle: Kona Race
Seatpost: Peugeot 23.0mm

Extras: Knog Strongman Lock/Bracket

Weight: 8.5KG (Excl. lock)
 

Attachments

  • DSC03763.jpg
    DSC03763.jpg
    154.7 KB · Views: 1,278
  • DSC03753.jpg
    DSC03753.jpg
    98.7 KB · Views: 1,277
  • DSC03754.jpg
    DSC03754.jpg
    85.4 KB · Views: 1,276
  • DSC03755.jpg
    DSC03755.jpg
    63.7 KB · Views: 1,276
  • DSC03765.jpg
    DSC03765.jpg
    82.6 KB · Views: 1,277
  • DSC03768.jpg
    DSC03768.jpg
    38.9 KB · Views: 1,278
Ok, Here's the deal, the seat tube has separated from the aluminium lug that holds the BB (its a clean separation along the bond-line). Anyone have any recommendations for places near London who could fix it at a reasonable cost (bearing in mind the frame only cost me £70...), or ways to do it myself? I'm pretty experienced with 3M's DP490 structural carbon glue and know how to prepare my surfaces, but i'm more concerned about how to clamp the whole thing together while it dries!

Thoughts and advice would be much appreciated!
 
Re:

The chain is a little crackly sometimes, which I guess is a tension/alignment issue.
I can't offer any advice regarding carbon fibre repairs, but that chain does look bloody tight, and thus could be a major contributing factor to the fracture, or delamination, or whatever it is.
 
Unlikely to be the chain tension.

I've cut open a crash damaged 979 so I can tell you how it's made. The lugs are a loose fit inside the tubes for most of the length. There's about 0.5mm gap all the way round for adhesive. The 979 tubes have about 1.6mm wall thickness and carbon ones are going to be about the same because they didn't really understand what they were doing. So I'm guessing they bonded them up with the lugs and tubes jigged to maintain that gap. You'll need to apply some heat to get it apart, around 120-150 degrees c to break down the adhesive but no hotter or you'll damage the resin in the carbon tubes. Carefully file out the old adhesive, key the surfaces, degrease, jig it up and re bond it at room temperature. I was going to suggest Scotchweld 9323 which is what we use at work for bonding composites and is strong enough for mechanical testing. It's the same colour once cured as the adhesive in the 979 tube too, so might even be what was used originally.

image.jpg
 
Re:

Unlikely to be the chain tension.
I still maintain that no good thing can come from running a chain that tight, especially on a 'bonded' frame- Something is gonna give, and, at least in the short term, it is unlikely to be the chain.

I'm running single speed on vertical dropouts myself atm. I was hoping not to have to mess about with chain tensioners either, but imo it is the lesser evil..
 
I think it's really very unlikely. From mechanical testing I'd say you'd need about 40-50kN in tension or compression to break one of those tubes, which is about 4-5 tonnes. Shear force to twist a tube out the adhesive I wouldn't want to guess but it's orders of magnitude higher than you could ever get the chain tension. You might be able to break the bond with leg strength if you were really forcing down and pulling up hard enough but you'd need legs like Chris Hoy. Defective/old/failed adhesive and nothing more imo.
 
Re:

So would you care to comment on the chain tension, Jonny69? I'd be interested to know whether or not you think such tension to be altogether harmless, and, if not altogether harmless, where you think the stress from such an arrangement is likely to manifest?

Afaict from the pics there is no hint of a gravity induced catenary arch on that chain. The only way to get a chain that tight that I know of is to take out the last (half) link, rejoin the chain, get it 'round the chainwheel and sprocket, and then force the wheel axle into the vertical dropouts against the chain tension. I don't know how anybody could do this and remain unconcerned by the resultant creaking and grumbling- the unmistakeable 'feel' of a machine in bad adjustment? ...and all those vibrations are passed on to the frame.

I'm not saying that "the chain broke the frame" in a simple cause and effect way, but for my money it sure isn't helping it to remain intact?
 
Re:

In an effort to end this pointless squabbling, let me offer my actual experience of how tight the chain is.
It's tight, that's obvious from the pictures. The order of the assembly is indeed to set the chain length, wrap it around the chain rings and the push the wheel into the dropouts, something which I do with the weight of the bike(ie, about 10kg maximum) The result is a chain which deflects 1-2cm when pressed in the centre of the chain with one finger at its tightest point on the chain rings, which is what was recommended by guides I've seen online.
Now the real problem comes with my weight on the bike. The wheel isn't fully into the dropout when properly tensioned, so I'm relying on my titanium skewers (which I bolt together, rather then being QRs) to hold the wheel in place. It's happened a couple of times that the wheel has moved in the dropouts when I've gone over potholes, and the result of course will be that the chain tension changes, potentially getting tighter.

However, given my knowledge of basic physics, it would surprise me if two halves of a chain under tension, with a chainstay between then under compression, could cause any significant force at almost 90degrees to a tube that lies completely outside the region of force transfer. My chain tension is by no means a good situation, and when the frame is back in shape I'll be trying various different setups, unfortunately I only had a week or two of riding before this happened

In the meantime, the info I'm really in search of is how deep into the carbon tubes the aluminium lugs extend, and also what sort of bond thickness is available (thanks for that photo, Jonny!) and then any advice people have on how to separate and close the gap in the frame without completely dismantling it... It's far too stiff to make any changes by hand unfortunately
 
Re:

If you haven't already, check out Reah's threads- She seems to have much experience with dismantling/reassembling this kind of frame:
http://www.retrobike.co.uk/forum/viewto ... 2cb00b6806
However, given my knowledge of basic physics, it would surprise me if two halves of a chain under tension, with a chainstay between then under compression, could cause any significant force at almost 90degrees to a tube that lies completely outside the region of force transfer.
OK have it your way. I give in. There couldn't possibly be any connection.. :)
 
I did some research into Vitus frame repairs a few years ago. It seemed then that the best course of action was to place the bare frame on to a suitable flat surface ( thick MDF is ideal ) and then support the various tubes with blocks and clamps. You are in effect reverse engineering a frame assembly jig so time spent here will be rewarded later.

If you then place the complete frame into an oven at between 120 and 150 C the adhesive used to bond the joints will weaken and allow you to literally pull the frame apart. You will then have to completely remove all traces of old adhesive before placing the parts back into the jig to confirm that everything fits together OK. The next bit is the tricky bit, you will have to decide the best order in which to assemble the parts together, I presume that the main triangle would be done first, and that after curing the rear triangle could be added.

I should say that this is only an outline plan for a frame repair, there are many details to sort out,and that I have never done it. However it seems to be a reasonable assessment of the sort of problems anyone attempting this type of repair would face

I would also like to know the length of lug inserted into the tube, Jonny 69 ? I have presumed above that it is not possible to soften/melt a previously cured bonded joint with a heat gun so that the bond is re-activated ? and that any repair would therefore require a complete strip down and rebuild

With regard to chain tension, surely it would be sensible to place the axle as far back in the dropout as possible and then work out your chain length ?
A small amount of catenary sag may not be acceptable to you from a purely aesthetic point of view but in the real world certain compromises have to be made. So fit a red anodized chain tensioner ! I'm afraid that at the moment chain tension is the very least of your problems !!!!!!!
 
Back
Top