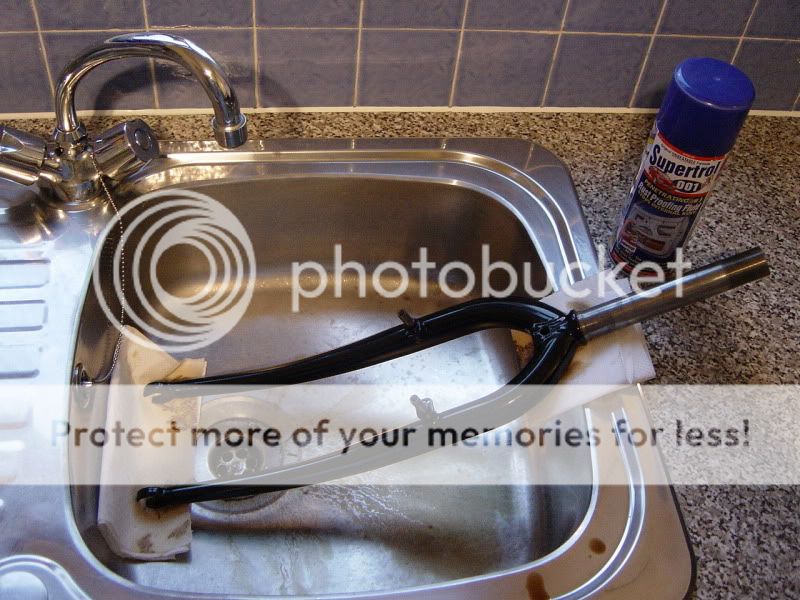
It’s a good job we have a stainless sink and that I was in bed later and up earlier than the GF

Now, can you imagine what the kitchen floor looked like in the morning after doing the frame …
------------------------------------------------------------
On another subject I have been asked about the process I used for filling the dints with braze, I will post it below so there is a record on the forum for future reference
I am a bit late in writing this but I wanted to be sure the stuff I had done was back from powder coating and looked good before advising others what I had done ;-)
First things first, I am not an expert and had never done this before having a go at the Marin forks. My stuff turned out great but don’t hold me responsible for any of your stuff / attempts that go wrong
Also if an expert tells you I did anything wrong, I would be inclined to listen to them ;-)
1 : I started by paint stripping the forks A) to see just how bad the damage was B) so I didn’t stink the house out with smoldering paint and C) they were getting powder coated anyway.
2 : I cleaned the dinted areas up with 600 wet n dry paper (used dry) A) to remove any burrs around the dints B) to degrease / clean the area and C) to provide a bit of a key for the braze.
3 : I worked over the kitchen sink to heat the forks (using the torch pictured above). I did this as A) there is no breeze inside to cool the part I was heating B) I was hoping it would reflect / catch some of the heat and add a bit of protection to surrounding areas and C) it would catch any runs etc from spoiling the floor if it all went wrong
4 : The GF helped by holding the forks in the right position for me. Holding them at the opposite end to you are working is OK (even without a glove) as the heat isn’t on for long enough to dissipate that far and get uncomfortable.
5 : Torch in right hand (on full heat) and pre-fluxed rod in the other I heated the central area of the dint (from about 6” away) using kind of a sweeping motion to get an even temp around the dinted area without just nuking the middle. I held the tip of the rod in the outer plume of the flame to start getting some heat into it.
6 : I watched the metal go through it its colour changes (easy to see as it’s clean / polished from the wet n dry) and used the colours to determine that my heating was in the right area, adjusting the torch position as necessary.
7 : Around the ‘straw’ colour I started to poke the rod onto the surface of the fork.
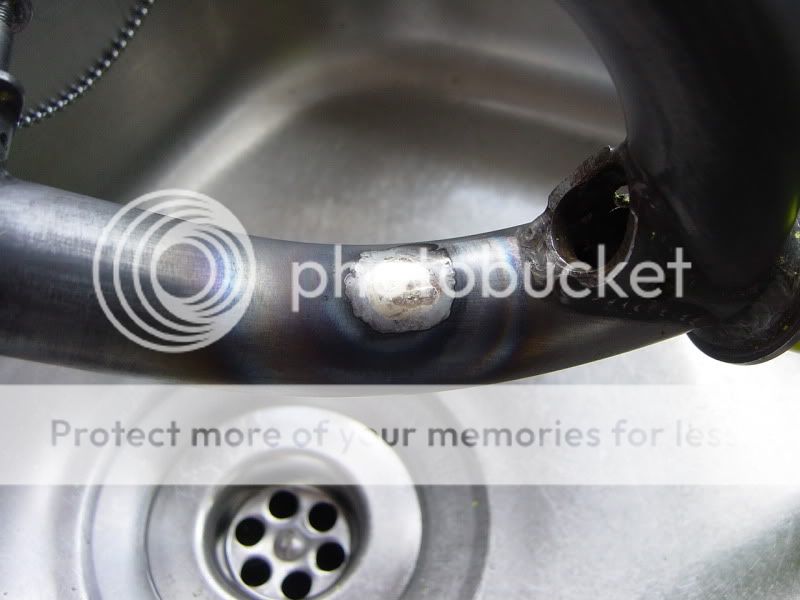
8 : Very soon after that the flux on the rod melts and goes like a water, dripping / running onto the surface of the fork and instantly ‘cleaning’ it to a very bright silver.
9 : Very soon after that the braze follows and floods the area that the flux coated.
10 : During point 9 I was pulling the torch back to maintain the temp rather than continuing to increase it (didn’t want to overheat anything or take the flux past its operating window).
11 : The braze is very runny at this point so you will soon see if your assistant is holding the forks correctly i.e. dint uppermost
As soon as I was happy that I had filled past ‘level’ I removed the heat.
That might sound a bit long winded but it’s actually quite a quick process. I would guess that steps 5 to 11 took no more than 60 secs per dinted area. I let the forks cool naturally (in the sink / no draughts) and dressed each area up before I did the next. I think the quicker you can be the better as there is less chance of oxidizing the braze / flux etc any more than is needed.
Once they have cooled the flux (that now covers the braze and surrounding area) sets like glass. It even looks like glass and breaks off like glass if you tap it or attack it with a screw driver. You can hear it crack as the forks cool and contract at a different rate to it.
I guess these pictures are good ones as they show the heated area pretty even around the repaired area and you can see the flux (even the little cracks in the flux from cooling) :
Dressing up was just done with standard files and needle files to remove the excess ‘high’ areas. These can be seen by holding the fork at eye level and ‘rolling’ the tube around whilst looking at its silhouette. Once a large area is found I used a wide file to take off the top being careful to only take off the top. Once the big bits had gone I used the same process for the smaller bits and marked them by holding my thumb on the edge of it and then filing (smaller files now) up against the side of my thumb nail (‘safe’ edge of the file against the nail
). This stops the files natural tendency to ride down the high spot and file the surrounding areas instead.
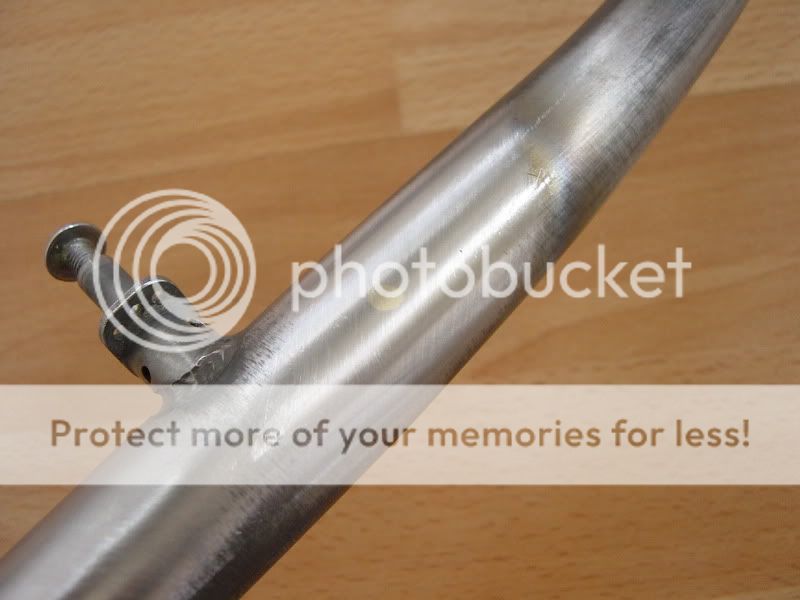
When that’s done I just moved onto 600 Wet n Dry, cut into 1” strips and pulled back and forward around the diameter of the fork. This does the final leveling and leaves a good enough surface to see some basic reflections. Any distortion in the refection is a distortion in the surface and indicates you either cocked up with the filing or need to do some more filing. The darker / more glossy colour the item is being finished in will determine how anal you need to be to get it looking good when completed.
You can see the reflections I am talking about in these pics :
Hope this helps.
WD