- Feedback
- View
Back when I was a kid I loved watching motor racing whether it be formula 1, touring cars, motocross, etc, etc. I liked the different racer personalities and how they were so easily recognisable by their helmet colours. You instantly knew it was Ayrton Senna in that yellow helmet, Damon Hill in his fathers rowing club colours or Nigel Mansell in his union jack colours. These colours were important to them and were a unique design that they had created for themselves.
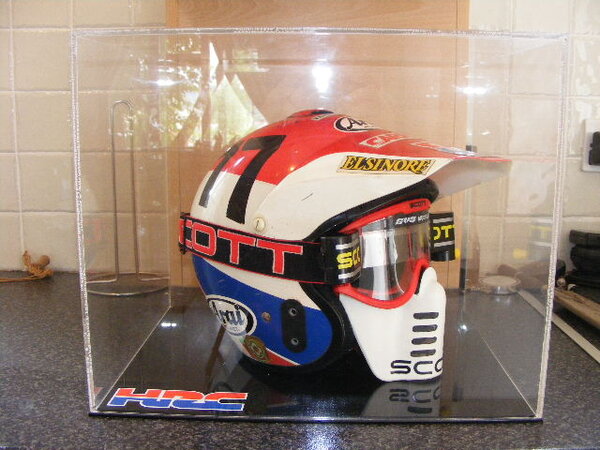
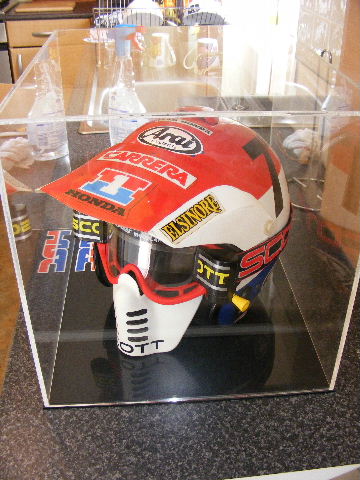
So when I started racing motocross I decided that I too should have my own unique colours, this might sound a little self indulgent, but it makes you identifiable out on the race track and stands out from the usual familiarity that is now the plague of racing IMO. I was racing twinshock Honda’s from the 1970’s at the time and so utilised those colours, mainly red, white and blue. For this helmet I sent it away with a very open ended description to a professional paint sprayer and the results are shown in the picture below. I liked the design and through 12 years of racing and many different crash helmets I kept the design going (with a few tweaks) and I’m glad I did.
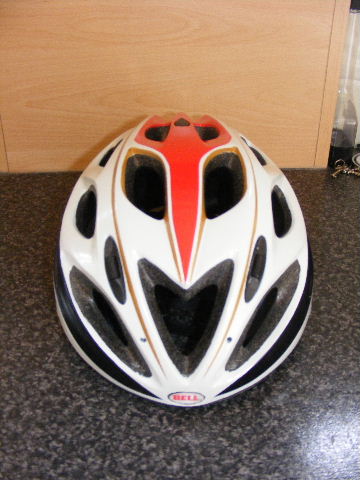
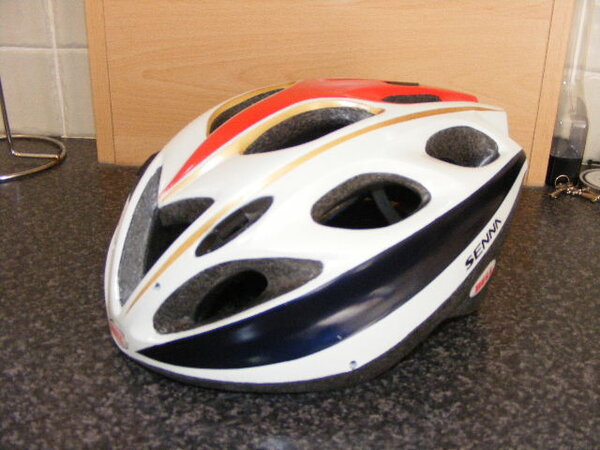
I now plan to return to racing, but without any horsepower on my soon to be ready alpinestar. I thought how nice it would be to continue on this now tradition and so set to work on my £25 Bell Avanti from Halfords.
http://www.halfords.com/webapp/wcs/stor ... yrn_31433#
This is how I managed it for those wishing to do their own:
-I purchased some spray aerosol from my local car supply shop (filler primer, red, alpine white, gold metallic and blue) and got to work.
-Firstly removing the Bell stickers carefully and then rubbing down the shell with 120 grade paper. I then carefully masked the vents and helmet internals with masking paper and carefully cutting around with a craft knife.
-A couple of coats of the filler primer later and it’s ready for a light rub down with 600 grade wet and dry.
-Next I applied 2 coats of the white before masking the detail needed for the first colour in case it was the gold detailing. Allowed it to dry and then repeated with the red and the blue.
-Rub away any imperfections gently with 1200 grade wet and dry and then reapply your stickers and any other decals.
-Wipe down to remove any dust and your ready for two coats of clear lacquer.
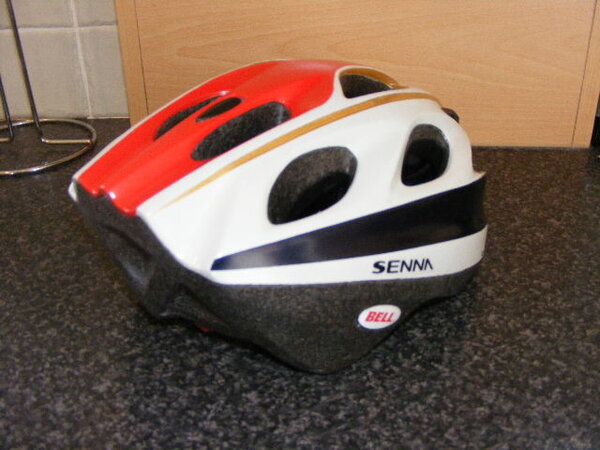
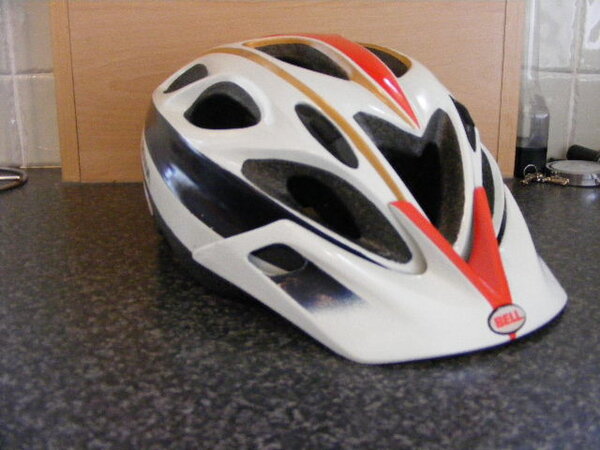
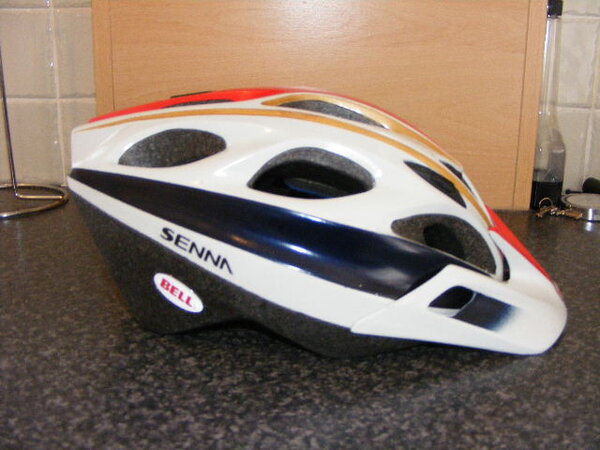
That’s it results shown below (not too sure about the peak).
So when I started racing motocross I decided that I too should have my own unique colours, this might sound a little self indulgent, but it makes you identifiable out on the race track and stands out from the usual familiarity that is now the plague of racing IMO. I was racing twinshock Honda’s from the 1970’s at the time and so utilised those colours, mainly red, white and blue. For this helmet I sent it away with a very open ended description to a professional paint sprayer and the results are shown in the picture below. I liked the design and through 12 years of racing and many different crash helmets I kept the design going (with a few tweaks) and I’m glad I did.
I now plan to return to racing, but without any horsepower on my soon to be ready alpinestar. I thought how nice it would be to continue on this now tradition and so set to work on my £25 Bell Avanti from Halfords.
http://www.halfords.com/webapp/wcs/stor ... yrn_31433#
This is how I managed it for those wishing to do their own:
-I purchased some spray aerosol from my local car supply shop (filler primer, red, alpine white, gold metallic and blue) and got to work.
-Firstly removing the Bell stickers carefully and then rubbing down the shell with 120 grade paper. I then carefully masked the vents and helmet internals with masking paper and carefully cutting around with a craft knife.
-A couple of coats of the filler primer later and it’s ready for a light rub down with 600 grade wet and dry.
-Next I applied 2 coats of the white before masking the detail needed for the first colour in case it was the gold detailing. Allowed it to dry and then repeated with the red and the blue.
-Rub away any imperfections gently with 1200 grade wet and dry and then reapply your stickers and any other decals.
-Wipe down to remove any dust and your ready for two coats of clear lacquer.
That’s it results shown below (not too sure about the peak).