DIY Paint Spraying

More pics. I brought the bits in from that garage as it's cold and damp out there.
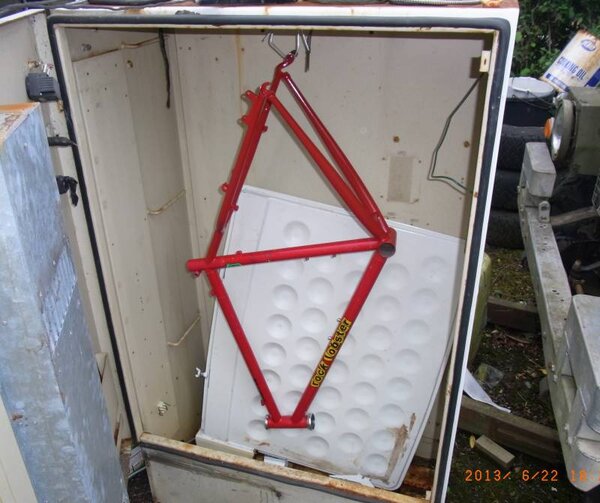
It's drying off with a nice finish. I have a few runs and drips to take care of.

It's tricky to spray all those angles and corners and the round tubing does gather the thinner paint as it hangs. I've read about doing the colour sanding coat, but they all use a block on car panels, I guess it'll be tricky to keep a smooth pressure on a tube.

Further on from my pulsing clear coat spray it seem my gun only has a 0.8mm nozzle and may be too small for clear coat. It came with the Ebay buy and seems to be a cheapie, but it's done me OK so far:
http://www.amazon.co.uk/Compressor-H-V- ... B007HANCPG

Might be temped to buy another gun, 1mm to 1.4mm maybe. Bergen guns seem to be cheap on EBay, it's only a hobby after all, not looking to spend megabucks. I'm also limited by the air comp. 7.8cfm.


drying%20(1)%20(Small).JPG


drying%20(3)%20(Small).JPG


drying%20(4)%20(Small).JPG


drying%20(5)%20(Small).JPG


drying%20(8)%20(Small).JPG


drying%20(9)%20(Small).JPG


drying%20(13)%20(Small).JPG


drying%20(14)%20(Small).JPG


drying%20(12)%20(Small).JPG
 
Final, Part 9:

I'm done with the spraying now.

I tried to take care of the previous clear coat runs with a colour sand:
800 - 1200 - 1500 - 2000 - Colour restorer polish.
This didn't leave a shine as nice and wet as the clear coat went on, I didn't polish any further I decided to shoot another clear coat on just to be satisfied.
I sanded back with 800 to scuff up the paint a little and allow for adhesion. I shot another 2 coats of clear on the F&F and bars. This went on well, without any runs. I turned the material down a little in the gun and set the pressure to 30psi for the 1st coat and 40psi for the 2nd and final clear coat. There seemed to be a lot of spray into the air, but the finish is OK.

I could see the finish melting together and looking quite smooth, I sprayed the frame hanging one went and once finished turned it around to hang the other. I don't know if this helped, but, I have no runs.

I'll let this dry well and then build the bike back up.
I think the clear coat needs weeks to dry proper before some polish and wax.

I've properly enjoyed this is it's given me some practice for the bike I planned to paint before buying the kit.

Last pics to document all steps, not much different then the previous step's pics.

Final%20Dry%20(1).JPG


Final%20Dry%20(8).JPG


Final%20Dry%20(7).JPG


Final%20Dry%20(6).JPG


Final%20Dry%20(5).JPG


Final%20Dry%20(4).JPG


Final%20Dry%20(3).JPG


Final%20Dry%20(2).JPG
 
looks like a good job from what I can tell!

you won't be able to use a block on it you'll have to just do it by hand p1500 then p2000. when you polish it back up 3m fast cut plus is prob the best as it is very quick even by hand. its not cheap though!

Kyle
 
kyle888":19fefgxf said:
looks like a good job from what I can tell!

you won't be able to use a block on it you'll have to just do it by hand p1500 then p2000. when you polish it back up 3m fast cut plus is prob the best as it is very quick even by hand. its not cheap though!

Kyle

Looking much better.

You can still block it, I blocked the epoxy on my RL.
I baked my frame after painting a bit of it. I put an old heater in an old electrical cabinet I have and used it as an oven. I wasn't sure of oven schedule so I whacked it in the "oven" for an hour at 60ºC, turns out 15mins is enough, I started putting it back together immediately it came out of the oven.
 

Attachments

  • rl-ghetto.jpg
    rl-ghetto.jpg
    64.4 KB · Views: 407
integerspin":5xkenaho said:
kyle888":5xkenaho said:
looks like a good job from what I can tell!

you won't be able to use a block on it you'll have to just do it by hand p1500 then p2000. when you polish it back up 3m fast cut plus is prob the best as it is very quick even by hand. its not cheap though!

Kyle

Looking much better.

You can still block it, I blocked the epoxy on my RL.
I baked my frame after painting a bit of it. I put an old heater in an old electrical cabinet I have and used it as an oven. I wasn't sure of oven schedule so I whacked it in the "oven" for an hour at 60ºC, turns out 15mins is enough, I started putting it back together immediately it came out of the oven.


well yes technically you could use a block but on round tubes there's not much point in using a flat block!

obviously if you have a run then it may be usefull personally I would just use one finger to apply the main pressure directly on the run!

bake times vary depending on what you use.
 
stewlewis":18112ubn said:
I sanded the bars as a tester and polished them with a t-cut restorer before the final colour coat.


I would be wary of using a product such as T-Cut or any kind of cutting compund on the paint prior to painting again..... Not only is it a bit of wasted effort (T-Cut is much finer still than even 1200/1500grit, so will be doing very little at this stage), but there is always the risk of leaving some contamination on the paint, that the new paint or clear coat will react to.

Any new coats will easily take out any flatting marks or scratches left by 1000 - 1500grit if it goes on thick enough


Good job all round tho.
Once Ive rebuilt them, I will post pics of my repainted Z2 Superfly's, and matching P2's


G
 
I've build the bike back up.

Lesson learned:
  • The base/colour coat can be dead smooth, whether sprayed like a boss or sanded back, the clear coat sticks.
    The clear coat is sticky and thick. Mixture and pressure make a big difference. Keep the gun clean!
    Don't spray in the wind, however little there may be, the finish shows it, a lot.
    Enough paint to cover, enough clear to shine. Not too much, too think it chips too easily.
    Getting even coverage around too many angles and tube shapes is a pain.
    Get some decent lighting.
    It's addictive, not just the fumes!
    Watch the youtube vids, etoe etc. and the web galleries of custom frame paint in awe.
    Recommended paint ratios are a guide, plenty of messing with the gun/material/pressure/temperature is needed. I guess this'll come with experience, in 10yrs or so.
    Some cars have crap factory paint jobs, yes I started to look at such things.

So now it's back together it looks OK. I had no runs and no orange peel so I didn't feel the need to sand, although I will try a colour sand/cut/polish on something for curiosity's sake, just to see how good a finish is possible.
I sanded a couple of blobs of clear, looks like grains of sand gathered the spray, the clear wasn't dry enough and the sanding went too far, and I had no red left. It's not obvious just on the back of the seat tube, nothing a sticker wont fix.

Decal designs and DIY stickers next too.

I built it back up with the old parts, whatever I had left at the time. This was my spray play, not a restore job cleaning and polishing parts.

Cheers for any tips, I'll look forward to seeing other folks' DIY paint. And, to doing my next one.

DSC07563%20(Small).JPG


DSC07558%20(Small).JPG


DSC07554%20(Small).JPG


Before:
2003_Planet_X_Jack_Flash%20(Small).JPG

After:
2003_Planet_X_Jack_Flash%20(Rebuilt_Small).JPG
 
Back
Top