Caustic Soda to melt stuck seatpost: COMPLETED!! (see p.2)

It's not 'melt' in either of the cases, it's react and form something else. you do not get liquid aluminium.

Not sure how the Ammona solution works, I think it's the water being there that's the important part to get past the oxide. I'll ask a chemist if I see one.

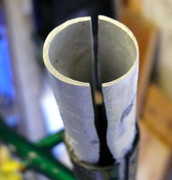
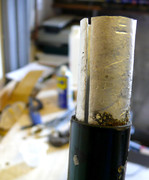
If you can get the bottom bracket out and it's not too messed up (yes you do get Alu cups... Try chopping the seatpost down to teh frame height, bunging the nd up (large corks or whatever ?)
and pouring the caustic soda or ammonia solution in from the bottom bracket, it's keep it in contact and possile aid it getting between frame and post.

I've oddly never needed to try any of this.
 
melt.jpg
:D


Yeah I'd love to get the BB out - would be way easier to do it upside down and plug it properly. I did try it upside down a few months ago, feeding the CS through a straw into through the bottle cage holes but it was a nightmare... soda went everywhere!

The cups don't look like aluminium so hopefully the risk'll pay off... :shock:
 
You can also use a caustic soda / water solution to remove anodising, but you need to stay close and neutralise the reaction as soon as all the colour is removed.

There, the perfect solution for all those nasty bits of purple aluminium found on so many retro bikes :twisted:
 
Just don't leave a really nice set of cranks in solution for too long...........threads, what threads.............ask me how I know :oops: :oops: :oops: :oops:
 
So far I've used 1kg of Caustic Soda to pour about four pints of the CS/water mix. If I'd been able to plug it properly and leave it to soak in the tube it'd probably be done by now, but I'll have to do another session.


< Click for high res

In that last pic, you can see what the CS has done to the paint in a few places. However, you can avoid this - this happened when I tried the job a few months back. When I tried it then, I had the bike upside down and bagged-up the jutting part of the seat tube and seatpost together, which meant the top of the seat tube was soaked in CS. I left it to soak overnight and it's that that caused the paint issues. Annoyingly because the mix I used back then was so dilute it didn't actually remove much aluminium either! Fail.

Using the pouring-it-straight-down technique that you can see in my videos, the paint wasn't affected at all, even though I used a stronger solution and it splashed all over the place. I washed it off after about an hour so I guess the splashes didn't get a chance to get through the paint on the rest of the frame.

So if you're bothered about paint finish, don't leave anything with paint on it to soak in CS overnight!

I'll upload more pics when I've done another session, hopefully it'll be out soon...
 
Right, it's done! Yay! I've put some photos & a video below, but I learnt quite a few things, so here's my top tips:

- The paintwork's not going to be happy (particularly around seat tube), but you can mostly protect it with electrical tape. Gaffer would probably work too. CS doesn't melt the paint, but if it gets under it it does seem to 'enhance' scratches & chips
- You can probably do the whole job with 1kg of CS; I got through 2kg in the end, but I wasted loads with it too dilute and pouring it through a non-sealed frame
- Mix it way more concentrated than it says; you know it's the right strength when the plastic bottle you've got it in starts to shrink away from it's wrapper from the heat!
- Mix and pour it in batches of about 250-300ml at a time; I was doing it pint by pint but it gets weaker after about 5 minutes so it's a bit of a waste to mix too much. If it drips through like it did with me, you can re-pour the stuff you collect, but it does get weaker
- If you can remove the BB and do it upside down, or seal the tube properly it'll be much more effective than the way I did it. Whilst pouring the final lot, the seattube did seal itself properly as it filled up with gunk, and the melting process got much quicker then. I initially tried to seal it by packing the seat tube with strips of rubber and it sort of worked ish
- Remove the whole of the visible part of the seatpost with a hacksaw before you start; there's no point melting stuff that's sticking out anyway. In my initial videos you can see I left loads sticking out - this was in the hope of wrenching it out, but was pointless; just cut the lot off
- When you're nearly through, the whole frame made a weird cracking sound. I now realise this was the seatpost melting through and releasing itself from the walls, but it sounded like the frame was doooooomed. When you hear that sound, you'll be able to lift the remains out - I carried on assuming it was still trapped until it basically floated out [see video!]

After about 300ml more CS from the last session, I was able to just tear the top pieces of alloy off and I mangled the alloy in the tube as much as possible to increase surface area:


Ten minutes later:


Five minutes after that:


Here's a video of me pulling the final sliver out:
http://www.youtube.com/watch?v=8lhMbiIu4EY

(Warning: contains victory swearing)

One happy, freshly-oiled frame:
 
samc":9eof4bxe said:
(Warning: contains victory swearing)

LOL!!! Great videos mate, really enjoyed that :). Such a good technique, but not, I would guess, for those that are a bit accident prone or not confident with this sort of stuff!
 
Well done :cool:
Great stuff caustic.I use it to clean ano parts before polishing them.I have a scratched ck top cap about to get the treatment :)

LBS wheelbuilder mechanic[a real one] has a small anodising set up in his garage,ive been picking his brain on it and hes researched his subject well and gets reasonable results[according to him]
I might be able to liberate it off him in exchange for some bits of paper.
Unfortunately not the common white bits of paper :(
 
:LOL: :LOL: :LOL: last vid was classic!
Gotta love that "whoo-hooo f@#k yea!" feeling, mission accomplished.
so carbon or titanium for the new post?? ;)
 
Back
Top