Hello to all
Over the years, I've come across three pairs of Mani 1 forks, none of which have worked and all have had completely dead internals. I've decided that the time has come to stop procrastinating and actually restore them back to working order. This has already proved to be more of a headache than I anticipated, but mainly in respect of sourcing some compatible elastomers. For the record - I know about the guys in the US that sell replacement elastomers for $55 - for me, this is too much for some slices of polyurethane rubber rod!
I actually sourced a digital copy of the Mani 1 owners manual and uploaded it on here some years ago now:
viewtopic.php?f=9&t=257529
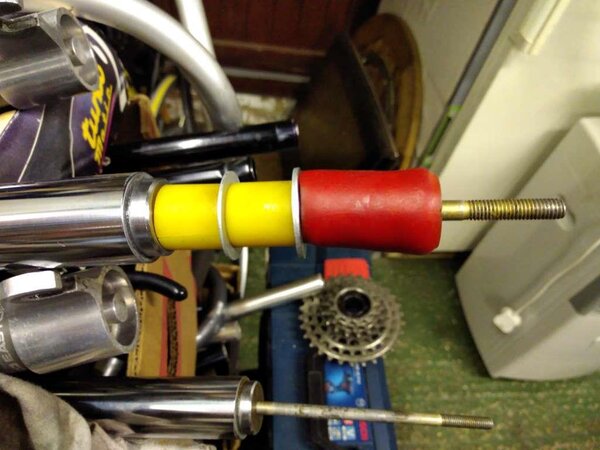
I've been pouring over it, to try and work out what I need to source so that I can put the thing back together in some semblance of working order, as when I disassembled the forks, they don't particularly match the assembly instructions that I uploaded. Below is a picture of the inner legs, with the remains of the elastomer stack on my workbench. You can see that there were two smaller yellow elastomers, and one bigger red elastomer. The yellow elastomers that I have are 17mm in length (17mm x 20mm). The red's are harder to measure as they are a little deformed. Whilst they actually measure 44mm - I'm assuming that they were a little longer than this originally, and were probably also the same OD originally (20mm) so that they've been a bit squashed which has made them a bit shorter and a bit wider than they should be? Does anyone know how long they should be?
For me, this raises some questions:
1 - Is this all correct? The yellow elastomers are clearly much softer than the red one. The red one has almost no give at all and is more like a plastic than an elastomer in terms of compression spring. Am I right in understanding, that this stack of 2x yellow and 1x red elastomers functions are all to give all of the fork compression, and then the rebound spring of the fork? ... or does the red elastomer do something else or is there, for another purpose?
2 - Given that the red elastomer is more like a plastic, is this because it's just really, really old and has hardened up over the years and simply doesn't behave as it would have done when it was new anymore? If not, and it should be extremely hard by comparison to the yellow elastomers - why is this?
3 - Assuming that these are correct and/or yes, I'm trying to source some 20mm polyurethane rubber rod; 20mm OD and with a 6mm ID bore. Does anyone know the rated hardnesses of what I need to source to replace the stack reasonably accurately? I've already visited a local plastics manufacturer, and whilst this probably isn't going to be a cost effective solution, he seemed to think that the yellows were around 40-50 (just by feel in his fingers), and that the red was around the 90 mark. Does this sound about right?
4 - What's the purpose of the rebound elastomer that sits inside the inner leg just underneath the long bolt, and does anyone know what hardness and what size this elastomer needs to be?
5 - Of most concern to me, is to understand why my stack doesn't really resemble the original Manitou instructions? In the Manitou schematic, it clearly shows just two washers, and two elastomers in the stack - one small and one large. I'd be enormously grateful if someone had a little more tech spec on this. I don't mind at all if what I put back into the fork is different, as long as it works as it should as a result.
5 - Once I've sourced the rod, or elastomers that I'm going to use, is it ok to simply use Pace RC7 grease to lubricate everything, and not fall into the trap of using the wrong (lithium) grease that degrades the elastomers into mush?
Once I've got this all sorted, I'm quite happy to share the rebuild pictures and details of where to obtain the replacement elastomers to actually make the refurb work.... without having to pay $70-80 to have them shipped from the US (with shipping).
Over the years, I've come across three pairs of Mani 1 forks, none of which have worked and all have had completely dead internals. I've decided that the time has come to stop procrastinating and actually restore them back to working order. This has already proved to be more of a headache than I anticipated, but mainly in respect of sourcing some compatible elastomers. For the record - I know about the guys in the US that sell replacement elastomers for $55 - for me, this is too much for some slices of polyurethane rubber rod!
I actually sourced a digital copy of the Mani 1 owners manual and uploaded it on here some years ago now:
viewtopic.php?f=9&t=257529
I've been pouring over it, to try and work out what I need to source so that I can put the thing back together in some semblance of working order, as when I disassembled the forks, they don't particularly match the assembly instructions that I uploaded. Below is a picture of the inner legs, with the remains of the elastomer stack on my workbench. You can see that there were two smaller yellow elastomers, and one bigger red elastomer. The yellow elastomers that I have are 17mm in length (17mm x 20mm). The red's are harder to measure as they are a little deformed. Whilst they actually measure 44mm - I'm assuming that they were a little longer than this originally, and were probably also the same OD originally (20mm) so that they've been a bit squashed which has made them a bit shorter and a bit wider than they should be? Does anyone know how long they should be?
For me, this raises some questions:
1 - Is this all correct? The yellow elastomers are clearly much softer than the red one. The red one has almost no give at all and is more like a plastic than an elastomer in terms of compression spring. Am I right in understanding, that this stack of 2x yellow and 1x red elastomers functions are all to give all of the fork compression, and then the rebound spring of the fork? ... or does the red elastomer do something else or is there, for another purpose?
2 - Given that the red elastomer is more like a plastic, is this because it's just really, really old and has hardened up over the years and simply doesn't behave as it would have done when it was new anymore? If not, and it should be extremely hard by comparison to the yellow elastomers - why is this?
3 - Assuming that these are correct and/or yes, I'm trying to source some 20mm polyurethane rubber rod; 20mm OD and with a 6mm ID bore. Does anyone know the rated hardnesses of what I need to source to replace the stack reasonably accurately? I've already visited a local plastics manufacturer, and whilst this probably isn't going to be a cost effective solution, he seemed to think that the yellows were around 40-50 (just by feel in his fingers), and that the red was around the 90 mark. Does this sound about right?
4 - What's the purpose of the rebound elastomer that sits inside the inner leg just underneath the long bolt, and does anyone know what hardness and what size this elastomer needs to be?
5 - Of most concern to me, is to understand why my stack doesn't really resemble the original Manitou instructions? In the Manitou schematic, it clearly shows just two washers, and two elastomers in the stack - one small and one large. I'd be enormously grateful if someone had a little more tech spec on this. I don't mind at all if what I put back into the fork is different, as long as it works as it should as a result.
5 - Once I've sourced the rod, or elastomers that I'm going to use, is it ok to simply use Pace RC7 grease to lubricate everything, and not fall into the trap of using the wrong (lithium) grease that degrades the elastomers into mush?
Once I've got this all sorted, I'm quite happy to share the rebuild pictures and details of where to obtain the replacement elastomers to actually make the refurb work.... without having to pay $70-80 to have them shipped from the US (with shipping).