So I picked up this well worn 'Hopper late August from cocodemer:


As the man said in the for sale post:
This was my brothers first proper MTB, and he rode it all over, it has even been to the summit of Ben Nevis! when he bought a smaller hardrock, all the parts were swapped over, so the bike is hung with a full Suntour XCE groupset, from a 1990 or so Hardrock Comp. The bike isnt in great nick, having been my dads work bike for a bit, and I ended up using it for a while after my Kona was nicked ( Sad ) but its a well worthy project if anyone is looking for a bigger framed footnote of MTB hsitory.
So the original plan was to simply touch up the paint, replace what was worn and get those wheels turning again. So I spent a few weeks touching up the paint with a wee pot of modelling enamel that was a pretty close match. At the end of the day, I wasn't happy with the results, so I decided a full strip, repaint and new decals was in order. I'd never done any kind of rattlecan spraying, so I reckoned this was a pretty good learning opportunity.
I began with tracing and photographing/scanning the existing decals. A bit of work in paint.net and then inkscape to produce some vector graphics, and then I handed over what I'd done to gil_m to work his magic and get them printed.
Meanwhile, one rainy Saturday and half a tin of nitromors later, I had a completely stripped frame and forks. Some plastic decorating sheets later, and my man cave was ready for some spraying and/or a bit of the old serial murderering!

So I started with 4 coats of acid etch-primer, with a rub down of 1500 grit between coats. Then another 4 coats of the colour, again with 1500 grit between coats. Finally, 3 coats of clearcoat, with a final rubdown of 1500 grit before the final coat. It's a messy business, even with all the polythene, and I'm glad I invested in a decent facemask and filters.
Anyway, I'm at the point now where I have a half finished bike.

Unfortunately, I definitely got some of the decal sizing wrong, the 'Rockhopper' on the downtube is not long/wide enough, and the one on the seat tube is too big too (doesn't help that I put it on a bit squint too).
Anyway, still pretty happy with the results. The paintwork looks not bad (from several feet away") ), although I could have done a better job prepping the frame, and the clearcoating could have been better too.
), although I could have done a better job prepping the frame, and the clearcoating could have been better too.
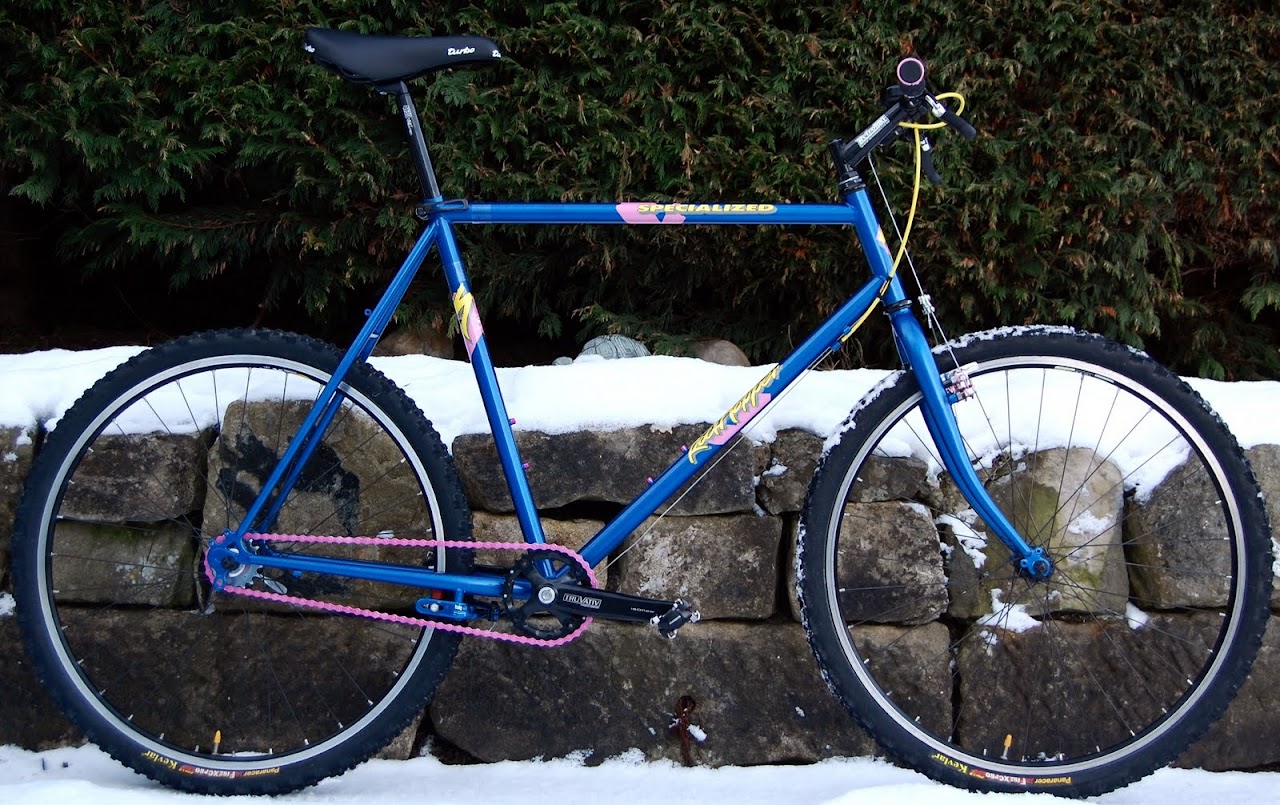
I'm going to single speed it, and would ultimately like to get a nice set of black cranks on there. Should have it up and running for the end of the month post-Christmas Macretro ride.
2009-01 Update
Ready for the MacRetro Dunkeld meet.
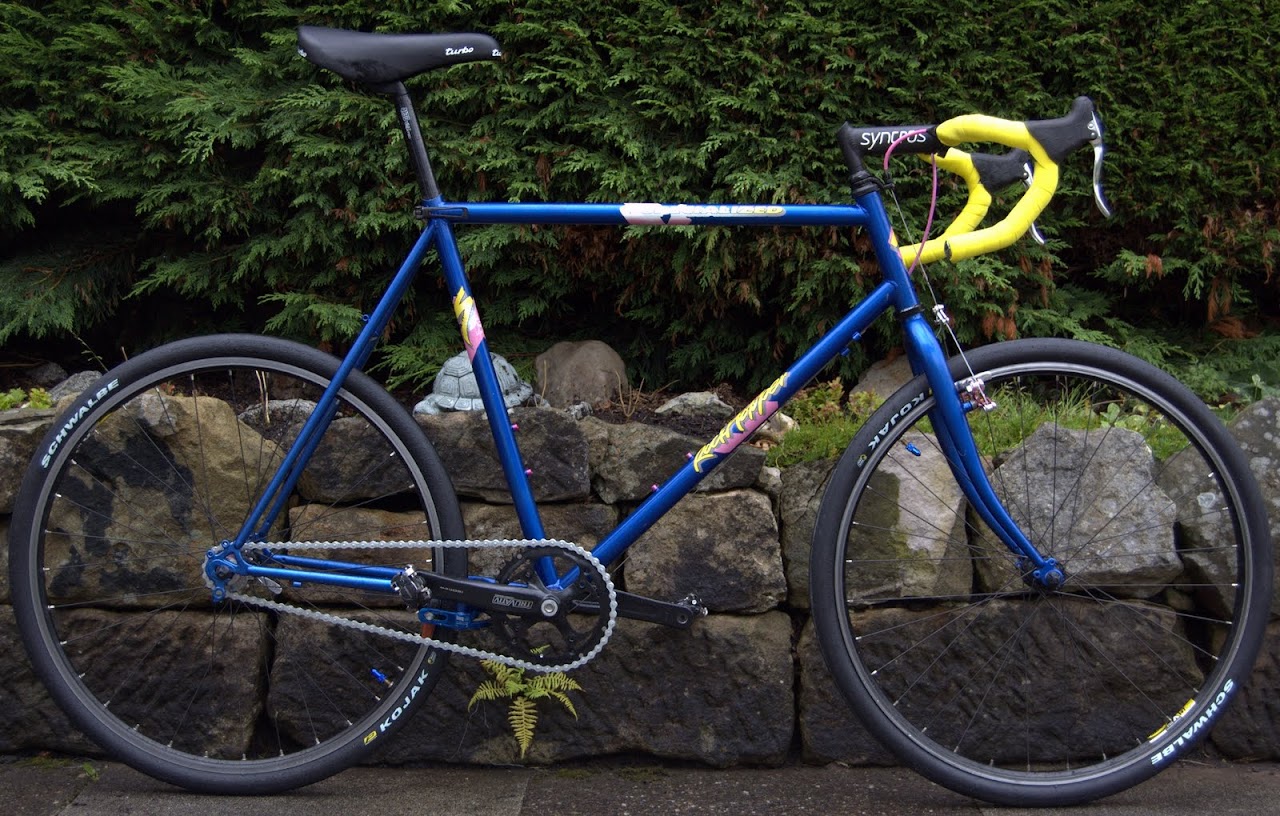
2009-08 Update
Change of tack - Now with drops and slicks. Urbane assault kerbhopper...
As the man said in the for sale post:
This was my brothers first proper MTB, and he rode it all over, it has even been to the summit of Ben Nevis! when he bought a smaller hardrock, all the parts were swapped over, so the bike is hung with a full Suntour XCE groupset, from a 1990 or so Hardrock Comp. The bike isnt in great nick, having been my dads work bike for a bit, and I ended up using it for a while after my Kona was nicked ( Sad ) but its a well worthy project if anyone is looking for a bigger framed footnote of MTB hsitory.
So the original plan was to simply touch up the paint, replace what was worn and get those wheels turning again. So I spent a few weeks touching up the paint with a wee pot of modelling enamel that was a pretty close match. At the end of the day, I wasn't happy with the results, so I decided a full strip, repaint and new decals was in order. I'd never done any kind of rattlecan spraying, so I reckoned this was a pretty good learning opportunity.
I began with tracing and photographing/scanning the existing decals. A bit of work in paint.net and then inkscape to produce some vector graphics, and then I handed over what I'd done to gil_m to work his magic and get them printed.
Meanwhile, one rainy Saturday and half a tin of nitromors later, I had a completely stripped frame and forks. Some plastic decorating sheets later, and my man cave was ready for some spraying and/or a bit of the old serial murderering!
So I started with 4 coats of acid etch-primer, with a rub down of 1500 grit between coats. Then another 4 coats of the colour, again with 1500 grit between coats. Finally, 3 coats of clearcoat, with a final rubdown of 1500 grit before the final coat. It's a messy business, even with all the polythene, and I'm glad I invested in a decent facemask and filters.
Anyway, I'm at the point now where I have a half finished bike.
Unfortunately, I definitely got some of the decal sizing wrong, the 'Rockhopper' on the downtube is not long/wide enough, and the one on the seat tube is too big too (doesn't help that I put it on a bit squint too).
Anyway, still pretty happy with the results. The paintwork looks not bad (from several feet away
), although I could have done a better job prepping the frame, and the clearcoating could have been better too.I'm going to single speed it, and would ultimately like to get a nice set of black cranks on there. Should have it up and running for the end of the month post-Christmas Macretro ride.
2009-01 Update
Ready for the MacRetro Dunkeld meet.
2009-08 Update
Change of tack - Now with drops and slicks. Urbane assault kerbhopper...