Firstly, apologies if this is common practice, and I am the last diddy on Earth to work this out! However...
Pukker headset presses can be found for less than £40 delivered online, but if (like me) you are too cheap even for that, maybe the below will be of interest. DIY headset press for the grand sum of about £5 (£13 if you use solid spacers instead of washer stacks - see below), and most importantly, which will press the cups into the headtube STRAIGHT, and thereby avoiding any risk of damaging your prized frame.
Ingredients
1. M10 threaded bar, cut to approx. 300mm in length x 1 - £2.50
2. M10 30mm solid spacer (preferred option) x 2 - £10
or if you cannot find any solid spacers...
2. M10 30mm penny washers x 20 (or to 60mm combined thickness) - £2.00
3. M10 50mm square heavy plate washers x 2 - £0.40
4. M10 nuts x 3 - £0.15
5. M10 Nyloc nut x 1 - £0.15
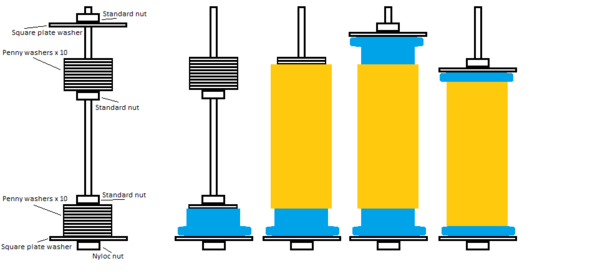
Ingredients should be arranged on to the bar as follows (from bottom to top):
- Nyloc nut;
- Square plate washer;
- 30mm spacer / stack of penny washers to 30mm combined thickness;
- standard nut;
- [space - distance determined by length of headtube];
- standard nut;
- 30mm spacer / stack of penny washers to 30mm combined thickness;
- square plate washer (added to the bar just prior to installing the headset);
- standard nut (added to the bar just prior to installing the headset).
'Pinch' the lower spacer/stack of washers between the standard nut and nyloc nut, by tightening both simultaneously with a couple of spanners.
Method (also illustrated via world-class CAD drawing below)
1. Arrange the bar as above.
2. Sit the lower headset cup over the lower spacer/washer stack (in this case, a lovely blue headset), and on to the plate washer. This should be a snug fit.
3. Offer the bar with lower cup up to the headtube (in this case, a mango headtube...very similar to one of the bikes in my sig...") ). Adjust the height of the middle standard nut so that around half of the second spacer/stack of washers protrudes from the top of the headtube. Takes a bit of trial and error.
). Adjust the height of the middle standard nut so that around half of the second spacer/stack of washers protrudes from the top of the headtube. Takes a bit of trial and error.
4. Slide the upper headset cup on to the bar, and on to the spacer/washers protruding from the top. Settling the upper and lower cups into the top and bottom (respectively) of the headtube while using the spacers, ensures that they are both aligned square with each other. Feed the top square washer on to the bar and hand tighten the last standard nut to hold the headset in place. DOUBLE CHECK THAT THE CUPS ARE INDEED SQUARE BEFORE TIGHTENING!
5. Start to tighten the top nut with a spanner/combination tool, checking that the cups are going in straight. Eventually, you will get a point where you cannot tighten any more but the cups will not yet be fully in. This is the top square plate tightening on to the upper spacer/washers, and being stopped from progressing by the nut holding the spacer/washers in place. Simply remove the top square plate washer, remove the spacer/stack of washers, replace the square plate washer and continue. The cups should be well enough in by this point that missing the upper spacer wont make any difference when tightening.
The above is tried and tested, and works absolutely fine. Although, for the sake of keeping myself in the clear, if you choose to use any of the above you do so at your own risk, and I accept no liability whatsoever for any damage caused to yourself or your headset or frame.
Pukker headset presses can be found for less than £40 delivered online, but if (like me) you are too cheap even for that, maybe the below will be of interest. DIY headset press for the grand sum of about £5 (£13 if you use solid spacers instead of washer stacks - see below), and most importantly, which will press the cups into the headtube STRAIGHT, and thereby avoiding any risk of damaging your prized frame.
Ingredients
1. M10 threaded bar, cut to approx. 300mm in length x 1 - £2.50
2. M10 30mm solid spacer (preferred option) x 2 - £10
or if you cannot find any solid spacers...
2. M10 30mm penny washers x 20 (or to 60mm combined thickness) - £2.00
3. M10 50mm square heavy plate washers x 2 - £0.40
4. M10 nuts x 3 - £0.15
5. M10 Nyloc nut x 1 - £0.15
Ingredients should be arranged on to the bar as follows (from bottom to top):
- Nyloc nut;
- Square plate washer;
- 30mm spacer / stack of penny washers to 30mm combined thickness;
- standard nut;
- [space - distance determined by length of headtube];
- standard nut;
- 30mm spacer / stack of penny washers to 30mm combined thickness;
- square plate washer (added to the bar just prior to installing the headset);
- standard nut (added to the bar just prior to installing the headset).
'Pinch' the lower spacer/stack of washers between the standard nut and nyloc nut, by tightening both simultaneously with a couple of spanners.
Method (also illustrated via world-class CAD drawing below)
1. Arrange the bar as above.
2. Sit the lower headset cup over the lower spacer/washer stack (in this case, a lovely blue headset), and on to the plate washer. This should be a snug fit.
3. Offer the bar with lower cup up to the headtube (in this case, a mango headtube...very similar to one of the bikes in my sig...
). Adjust the height of the middle standard nut so that around half of the second spacer/stack of washers protrudes from the top of the headtube. Takes a bit of trial and error.4. Slide the upper headset cup on to the bar, and on to the spacer/washers protruding from the top. Settling the upper and lower cups into the top and bottom (respectively) of the headtube while using the spacers, ensures that they are both aligned square with each other. Feed the top square washer on to the bar and hand tighten the last standard nut to hold the headset in place. DOUBLE CHECK THAT THE CUPS ARE INDEED SQUARE BEFORE TIGHTENING!
5. Start to tighten the top nut with a spanner/combination tool, checking that the cups are going in straight. Eventually, you will get a point where you cannot tighten any more but the cups will not yet be fully in. This is the top square plate tightening on to the upper spacer/washers, and being stopped from progressing by the nut holding the spacer/washers in place. Simply remove the top square plate washer, remove the spacer/stack of washers, replace the square plate washer and continue. The cups should be well enough in by this point that missing the upper spacer wont make any difference when tightening.
The above is tried and tested, and works absolutely fine. Although, for the sake of keeping myself in the clear, if you choose to use any of the above you do so at your own risk, and I accept no liability whatsoever for any damage caused to yourself or your headset or frame.