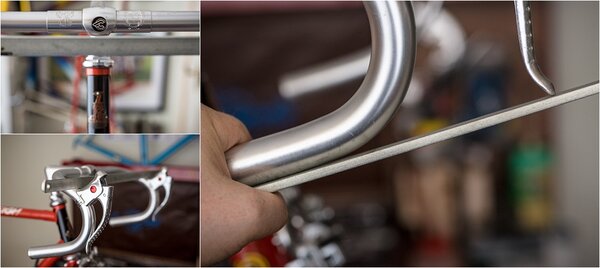
It was, indeed, for frame alignment, and that's probably why it immediately precedes the 'H' dropout alignment tools in the alphabet. The straightedge is the correct width so that, when held with edge flat on a 70mm Italian BB shell, it would just touch the inside of the rear dropout, when spaced for 120mm 5-speed. For wider spacings, you use a ruler along with it. When held against a British or French BB, there should be a mm of space at each dropout. This ensures that the rear triangle is aligned with the BB shell faces, the idea being that you would check that after tapping & facing the BB. You then use the H tools to get the dropouts parallel. The H tools also allow dropout spacing, as they should just touch or have a very slight space when using the proper spacers for the intended freewheel setup. However, they don't tell you if the dropouts are equidistant from the frame's central plane.
Most Campy toolkits I've seen are missing the G tool, as is my own. There was one in the first real bike shop I worked in, and it migrated to my workbench when the top mechanic left and I took on that mantle. It got more use aligning brake levers than rear triangles, because we didn't automatically disassemble bottom brackets on assembly, unless it was a high-end Raleigh, as their factory assemblers were not trustworthy. We did pull the arms on most cotterless cranks and check the fixed cup and adjustment, but using the G tool requires the cups to be removed.
I did a stint as an auto mechanic between bike gigs in the late 1970s and, while I had always treated the Campy straightedge with respect, that took a hit when I laid out a hefty pile of dough for a Snap-On straightedge to check the flatness of cylinder heads. With its precision ground edges and faces, it is the epitome of what a mechanic's straightedge should be. The G tool was just a piece of rolled steel with Campy's classic, matte silver plating. Of course, it's still cool and I still want one, if just to complete my toolkit. The Dura Ace rear alignment set is a much better designed tool. I don't see me paying 70 bucks for the Campy, so I suspect the length of silver-painted, 1 in. steel will be what I use until it's time for the final clearance sale.
One thing that surprised me about the G tool we had was that it didn't have anything stamped into it, as pretty much all the other Campy tools do. It looked generic, except for that finish. That's probably what kept it from disappearing, but it's also one of the reasons I never convinced myself to shell out the $30 in 1976 currency or whatever it was to buy my own.
")